I don’t know about you, but every time I think of trying to master the art of foundation, a little piece of my soul dies. It’s the one aspect of makeup that has literally taken me a lifetime to figure out. There’s such a fine line between not getting enough coverage and putting on so much that I end up looking like a mime. (Editors note: Maddie has this problem, Meg loves sheer foundation so much she wears it while home alone, truth. But now she’s excited to upgrade her one makeup obsession with skillz.)
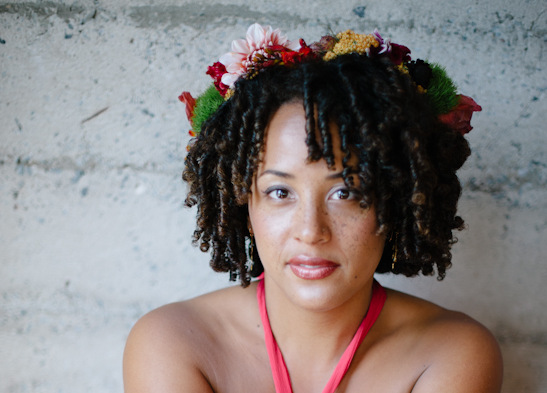
Which is why I wasn’t surprised when we polled the APW community asking what you hoped to get out of the P&G Beauty Tutorials, and one of the first things you asked for was how to do sheer foundation that lets the natural texture of your skin show through. And this look totally hits that nail on the head. Our lovely model, Chloe, has a gorgeous face full of freckles and we didn’t want to ruin it by covering up what makes her look like, well, herself. So Shana gave us all the tips and tricks for achieving wedding makeup that is both sheer and sultry. And now we’re passing them on to you: The Info—Stylist: Shana Astrachan of Fox & Doll Hair and Makeup/ Photography: Hart & Sol West / Venue: The Box SF / Flowers: Green Snapdragon Floral Design /Dress: Little Borrowed Dress / Jewelry: BrideBlu Vintage + Handmade Jewelry
For Face: The secret to sheer foundation (you know, the kind that lets your freckles stand proud) is first to choose a foundation that is already a bit more on the sheer side, and then to cut it with moisturizer. So we mixed equal parts CoverGirl NatureLuxe Silk Foundation and Olay Regenerist Wrinkle Revolution until we had a mixture that would offer a bit of coverage, but wouldn’t cover up Chloe’s naturally beautiful skin tone and freckles. Shana’s other secret, of course, is to then blend your foundation into your skin using the Beauty Blender we showed you last week (that’s that crazy thing that looks like a pink foam egg, and which you can totally pick up at a place like Target), which will ensure that the mixture gets blended into your skin evenly.
Another tip for keeping this look natural: you’ll notice that the steps above call for bronzer. Well, if we learned anything during our P&G Twitter chat a few weeks back, it’s that not all bronzers are created the same (and um, that you shouldn’t put bronzer all over your face, MEG). Shana specifically suggests using a matte bronzer to keep your skin’s natural texture and tone (for Chloe, we opted for CoverGirl’s Queen Collection Natural Hue Bronzer, which is specially formulated for darker skin tones), but if you do decide that you want to go with little more shimmer, just be sure to avoid anything with actual glitter in it (really, this goes for all makeup when you plan to be photographed, unless you’re headed to a rave in 1998). This is because anything with glitter is going to reflect light in a weird way and make you look unnatural in the shots.
For Eyes: In addition to foundation, dark eye makeup has been my nemesis ever since I got my first Wet ‘n Wild eyeliner in middle school. I love the way dramatic eye makeup looks when I put it on, but it always seems like 10 minutes later I end up with dark circles under my eyes. Shana says that one of the best ways to avoid dark eye circles is to apply mascara to your top lashes only (don’t bother with the bottom lashes). But if you’re really sold on wanting a little more definition on the bottom of your eyes, then you can take your eyeliner (the same pencil that you used to create the cat eye) and apply a little bit to a small flat eye brush. Then smudge that brush into your lower lashes to make them appear thicker.
Another tip: this look requires a fair amount of precision with your eye pencil. If you don’t always have a steady hand when applying a straight line (guilty as charged), just apply a small amount of your Olay Regenerist Wrinkle Revolution to the tip of a Q-Tip and keep it handy to clean up any errant lines or smudges that creep up during application. It acts as a magic eraser (seriously, just swipe it over the mistake and it literally disappears) and allows for you to fix small areas without undoing the rest of your look.
Lastly, if you’re worried that the cat eye look is going to be difficult, fret not. Just line your eye like you normally would (starting at the inner corner and working your way to the outer corner), but instead of following the line all the way to the corner of your eye, turn it up slightly just before you hit the outside corner. For extra drama, make your line a little thicker than you normally would and place it just above your lash line. And practice a little, it’s as easy as that. For this look we brought back our CoverGirl LiquilineBlast eyeliner (this time in Dark Brown), which is the awesome product we told you about a few weeks ago (it’s liquid liner, but it looks and feels like a pencil thus eliminating any chances for that moment when you accidentally get liquid eyeliner all in your eyeballs). The CoverGirl LiquilineBlast liner naturally wants to draw a thicker, more opaque line on your eyes, so most of the work is going to be done for you (not that I tried this at home the other night and discovered these things on my own or anything. That would be super lame).
And as always, if you have questions about how to modify this look, or which products would be best for your skin tone? Shana is usually standing by to answer them in the comments (because she’s awesome like that), but you can always direct your questions at @PGBeauty for their expert advice (or if you’re not on Twitter, post your questions on their Facebook page for more info).
Download a PDF of the shopping list for this look here.
**This post was sponsored by P&G Beauty. Thanks P&G for helping make the APW mission possible!**