Today is our last hair tutorial of the APW + P&G Beauty Tutorials (thanks again P&G!), so we figured we might as well go out with a bang. Today we’re doing finger waves. Because really, who hasn’t spent the last five years wondering how the heck you do finger waves? Or if you’re Meg, the last ten to fifteen years (seriously).
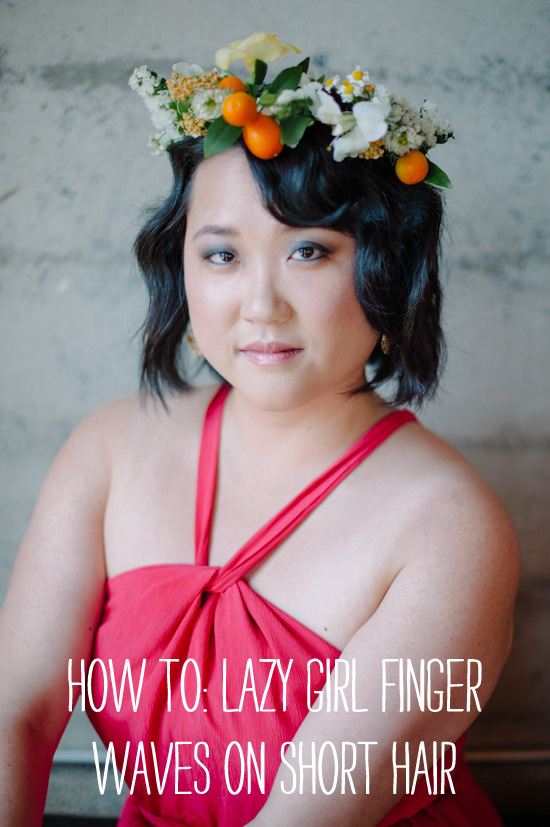
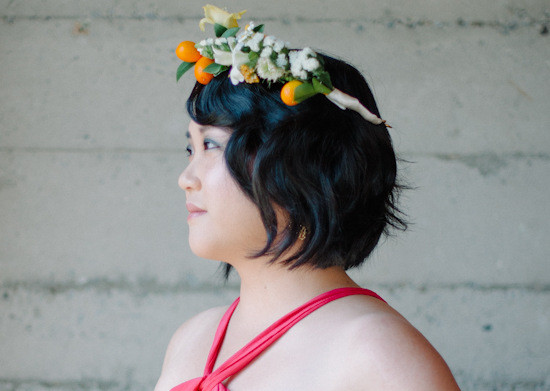
Plus, since so many of you asked for a short hair style for weddings, and since APW Associate Editor Maddie is a passionate advocate for short hair, we wanted to make sure we came up with something that was just as exciting and just as easy as the long-hair tutorials (because is it just me, or is the usual answer to short hair either to make the hairstyle so complicated that you need an MFA to execute it or to tell you to just blow dry it and wear it how you normally wear it? Where is the middle ground?) So this week we’re doing finger waves for girls with bobs. It’s two good things rolled into one wavy ball.
Now, before I let you in on the tips and tricks for perfecting this look, a small disclaimer: this is totally the cheater’s way to create finger waves. The legitimate and historically accurate method for creating finger waves involves (you guessed it) taking your finger and a comb and creating waves by combing the hair back and forth around your finger (if you’re interested in how that works, you can see a more detailed overview here). But since we’re all lazy all the time over at APW (cough), we thought we’d simplify that method into something a little easier to accomplish that doesn’t require as much time or technique.


The Info—Stylist: Nichole Kreps of Harper Paige Salon / Photography: Hart & Sol West, Michelle Govang / Venue: The Box SF /Flowers: Green Snapdragon Floral Design /Dress: Little Borrowed Dress / Jewelry: BrideBlu Vintage + Handmade Jewelry
Products: Part of what makes this look a quicker version of traditional finger waves is that you’re going to be using heat and product to set the waves, minimizing the amount of time that the look needs to “set.” Before drying your hair, Nichole suggests using a thickening spray at the roots (we used Pantene Root Lifter Spray Gel) and then working a mousse through the hair shafts (Nichole used Pantene’s Maximum Hold Mousse for fine hair) to give your hair extra volume and body (which will help when you’re creating the waves).
Once the hair is dry, Nichole recommends using a heat spray like Pantene Heat Protection & Shinespray on each section of hair before curling it (this will help set the curls and make your hair shiny). The reason this look calls for a little extra product is because you are relying on the product to make the look stay. Which means that the look will keep its shape even when you brush it out, rather than turning into a frizzy and unkempt mess.
Supplies: When it comes to picking up supplies for this look, don’t be alarmed by the funky-looking clips that Nichole used. You can get finger wave clips at most beauty supply stores (same with the double prong clips that she uses). The finger wave clips are the most important part of this tutorial. They allow the waves to maintain their shape while they set so that you get a nice pronounced wave instead of a looser wave.
Curling The Back: Curling the back of the hair for this tutorial might look complicated, but it’s not (promise). You’re going to use the same 3/4″ curling iron you used for the rest of this look, but instead of holding it horizontally, hold it like a candlestick and wrap the hair around the barrel of the curling iron. Starting at the bottom of your hair and working your way up, curl the hair in alternating directions which, when brushed, will mimic the soft “S” of the side finger waves.
Letting It Set: More than any other tutorial, it’s important to let this look set. Once you’ve created your finger waves and sprayed them with hairspray, hang around for a little while and let the wave set. When we did this tutorial we had Jess get her hair done first, then used the time it took to do her makeup to set the curl. This timeline worked perfectly for us. As always with these looks, practice, and then plan your wedding prep timeline appropriately (hot tip: this might not be the best look for early morning weddings… unless you want to get up before the sun).
Modifying For Longer Hair: Even though this look is designed for women with shoulder-length or shorter hair, you can modify it for slightly longer hair as well. The steps are exactly the same, except that when you get to the end of your finger waves (just above your ear), use sponge rollers to curl the rest of your hair.
Have questions about how to modify this hairstyle, or which products would be best for your hair? We’ll do our best to answer them in the comments, but you can always direct your questions at @PGBeauty for their expert advice (or if you’re not on Twitter, post your questions on their Facebook page for more info).
Download a PDF of the shopping list for this look here .
.
**This post was sponsored by P&G Beauty. Thanks P&G for helping make the APW mission possible!**