I used to be really terrible at makeup. I was the friend that other friends wouldn’t let touch an eyeshadow brush if their life depended on it. Then one day, I bought a basic makeup book that broke things down in idiot-proof language, and suddenly it all clicked. Now, I don’t suck at makeup. Hurrah! But hair? Hair is not my friend. In fact, a few weeks ago, when I was at a wedding in New York, I tipsily tried to give my good friend Monica a braided updo in the back of a cab. It… did not turn out well. (Shh, don’t tell Monica.) This was an important lesson in biting off more than you can chew.
The truth is, most of the DIY hairstyles I find on Pinterest are above my pay grade. So when APW’s stylist friend Rubi Jones released a hair book that was all about simplifying fancy hairstyles, I begged her for a copy and then read it cover to cover. (While most of the updos are sadly inapplicable to my pixie cut, the basic styling tips were a game-changer, and now my hair doesn’t get all frizzy when I blow-dry it in the morning.) Rubi packed The Art of Hair with a ton of modern updos (including her signature braided updos), but it’s really the basic tips—like what the heck each product does, and how to blow-dry your hair without looking like you stuck your finger in an electrical outlet—that make it a particularly good fit for hair novices. (The fancy hairstyles are a plus, but knowing how to blow out your bangs? That’s money.)
Of all the looks in Rubi’s book, this forties roll was easily one of our favorites, and she was nice enough to let us share it with you guys. Vintage hairstyles usually have two pitfalls: They can take a lot of time and effort, and sometimes look costumey. But this look does neither. It’s got a modern edge to it, and most importantly, it’s #lazygirl approved. Here’s what you’ll need:
- Straight hair, or hair that’s been straightened
- Styling cream
- Flat mixed-bristle brush
- Chopsticks
- Hairpins (small and large)
- Bobby pins
- Hairspray
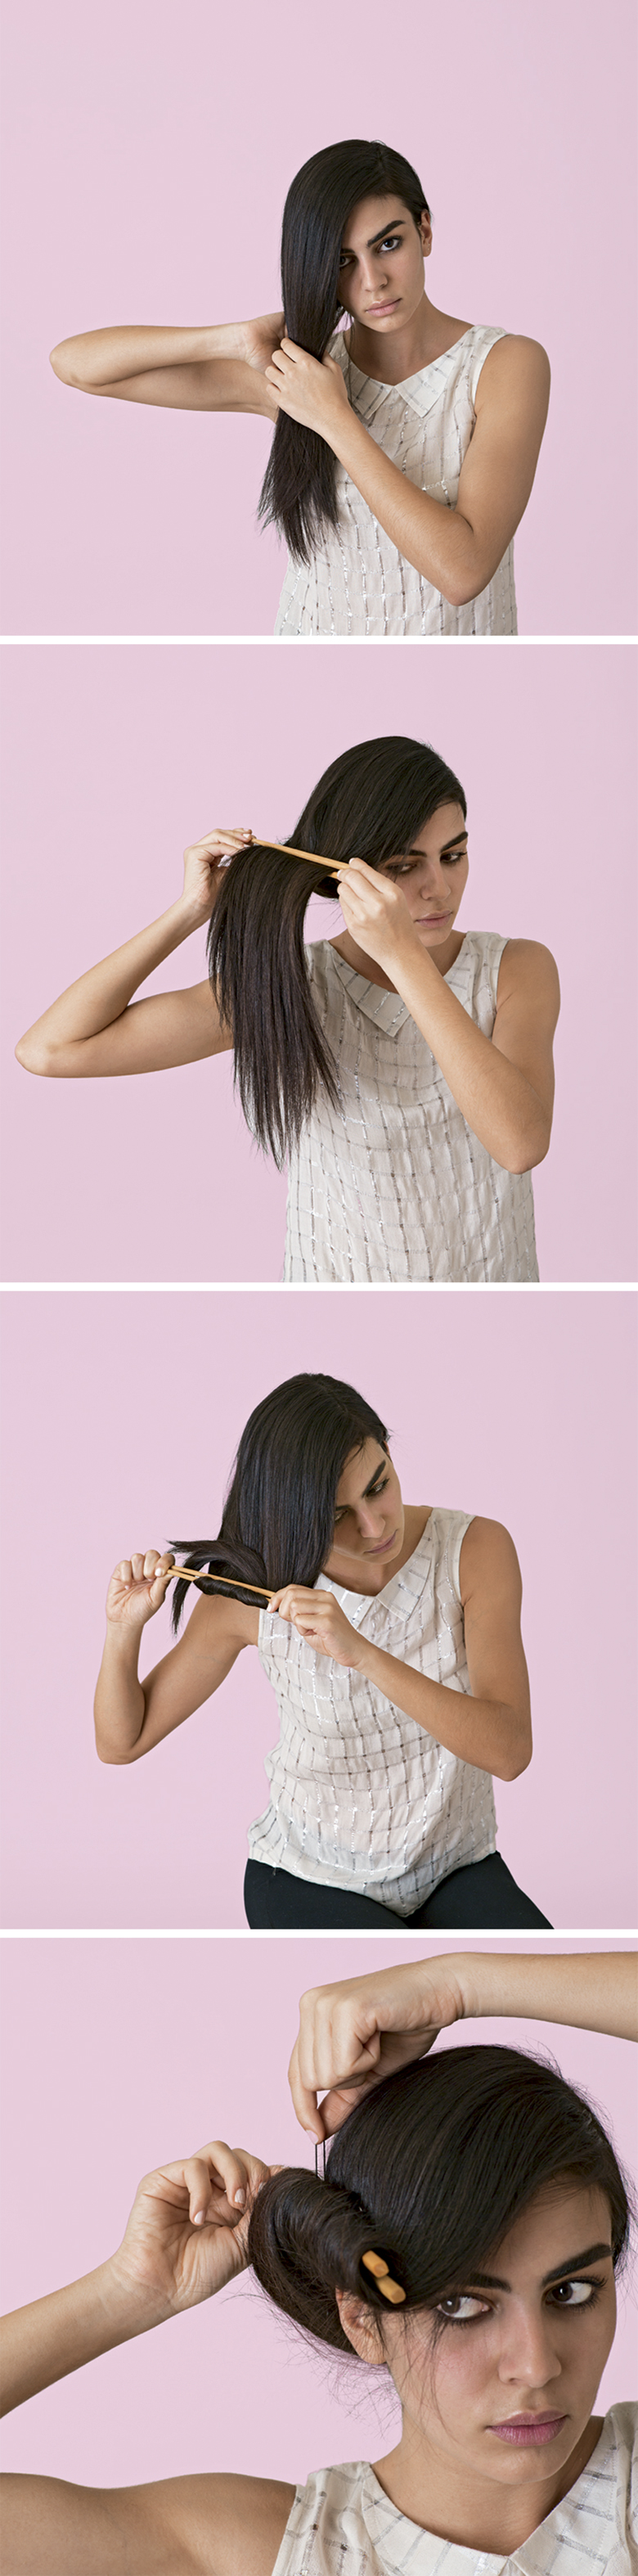
Forties-inspired Updo Steps:
1. Start with straightened hair. Apply styling cream to your hands, but don’t run through your hair yet. Instead, you’re going to transfer the product while you’re working on your style.
2. Part your hair to the side and then gather it all up low, like you’re going to make a low side-pony. Shape it so it covers one eye.
3. Next, take your chopsticks, and place one on either side of your hair, just underneath your ear, clamping your hair between them.
4. Bring the chopsticks about three-fourths of the way down your hair (this is important; don’t go all the way to the bottom). Then, keeping the chopsticks together, twist them up so your hair begins to form a roll. Continue until the roll extends tightly from one eye to the back of your head. The ends of your hair will have gotten tucked up into the roll as you go.
5. With chopsticks still in place, secure your forties roll with as many large hairpins as you need. Then pin or spray any flyaways.
6. Carefully remove your chopsticks and insert small hairpins and bobby pins across the twist, moving from back to front. Remove large pins. Tuck any additional flyaways and seal your hair in place with hairspray.
If you’re thinking of DIYing your hair (or if your wedding party wants to up their DIY hair game), Rubi’s book is available on Amazon for just $11. You can check it out right here.