
Here at the APW you often hear the phrase “one and done,” as in make one, make it awesome, make it count. This applies perfectly in the world of wedding decor. Because when you don’t have energy to spare, it’s the big stuff that sets the mood, looks great in photos, and generally gives you the most return on investment.
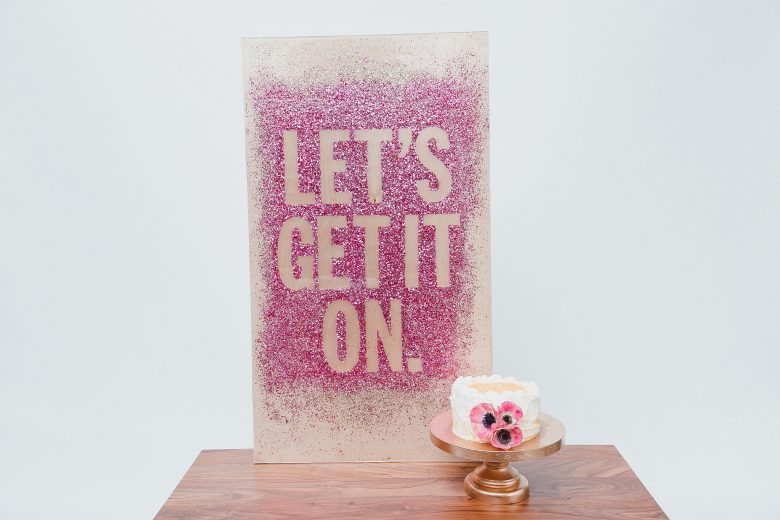
With that in mind, we came together with resident designer Tabitha of Winston & Main, to create a glittery high-impact sign that (bonus!) is sturdy enough to live on to decorate other spaces in the future (aka your home). Because if you’re going to spend time and money making wedding decor, why not make something you can hang in your home to remind you of how awesome that day was? The best part of this tutorial is that it utilizes resin, which means your glitter isn’t going anywhere. And it’ll last for pretty much forever. Here’s what you’ll need:
Glitter Sign Materials:
- 20 x 36 Birch Plywood from your local hardware store ($12-ish)
- 6” Vinyl Letters ($20, or $10 with coupon!)
- Mod Podge
- 4 Containers of Vintage Leaf Glitter ($50) OR $12 for chunky glitter at Michael’s or your local craft store.
- EnviroTex Lite High Gloss Finish Resin 32 ounce kit ($35, or $17 with coupon)
- 4 Plastic buckets
- Painter’s Tape or Patterning Tape
- Duct Tape
- Aluminum Foil
- Heavy Plastic Sheeting (polyethylene)
- Ruler
- Cardstock scraps
- Straw

Directions:
1. To start, use patterning tape or painter’s tape to tape off where you want your letters on the plywood.
2. Apply your letters, keeping the spacing between the letters uniform (ours are 1/2”) as well as keeping the space between words uniform (1”). This helps keep the words even!
3. Remove all the patterning tape or painter’s tape. Voila!
4. Mix glitter together in whatever proportion you like. We used two parts magenta, one part light pink, and a dash of gold. It works best to mix your glitter before you start applying it (instead of as you’re applying it).
5. Starting in the middle of your sign, slather on the Mod Podge and then cover in glitter, paying special attention to the edges around the letters and the space in between the letters.
6. Once you have completely coated the area in between and around the letters, continue applying coats of Mod Podge and glitter as you move toward the edges of the sign. If you want the same faded effect as our sign, use lighter coats of Mod Podge and glitter as you extend outward to the edges of your sign. You could also change the proportions of glitter here—using more light pink/gold for a more pronounced fading effect.
7. Let the sign dry overnight and then remove the vinyl letters. If you want to stop here, you can just spray your project with some clear acrylic and done.
8. To coat your project in resin (and make it last way longer), you’ll first want to place a piece of painter’s tape around each of the edges on the back side of your sign. This helps prevent leaks when you’re pouring the resin.
9. Next you’ll build a frame for the resin to sit in. Do this by securing tin foil onto duct tape and then pushing it firmly around the edges of your sign, leaving a foil lip. Make sure none of the sticky duct tape is sticking up above the edge where the resin might touch it, or it will stick to the resin.
10. Follow the manufacturer’s directions to mix the resin. For ours we measured exactly and then mixed for two minutes. Then we transferred it to another bucket and mixed for one minute. Finally, we poured it on to the sign.
11. Use a scrap of cardstock to spread the resin to all corners.
12. About fifteen minutes after you pour the resin, you’ll notice bubbles begin to appear. Pop these bubbles by gently blowing through a straw onto them.
13. Let your project cure for one to three days (depending on temperature) and then remove your frame and sand any accidents off the edges. Done!
Modifications:
- You can use a different color combo (blue, teal and silver look awesome) but bigger glitter definitely works better for this project. Smaller glitter ends up looking like you just painted it.
- You can change up the quote or size of the project, but shorter quotes are your best bet.
Tips + Tricks:
- You will need quite a bit of glitter for this project. We’ve been hoarding those Martha Stewart Vintage Leaf Glitter packs for a long time. If you follow our footsteps, you can purchase four packs from Amazon… (and you’ll have TONS of glitter in other colors leftover) but you can also just buy three different colors of chunky glitter from your local craft store!
- Make sure you cover your work area in plastic before you pour the resin, it’s super drippy and will stick to everything it comes in contact with. Also, wear gloves while working!
- We purchased both the resin and vinyl letters from Michael’s using 40% and 50% off coupons. They pretty much always give them out at the store, or you can look them up online before you shop. It makes a huge difference.

