The Site and our mobile application may contain links to affiliate websites, and we receive an affiliate commission for any purchases made by you on the affiliate website using such links. We are also a participant in the Amazon Services LLC Associates Program, an affiliate advertising program designed to provide a means for us to earn advertising fees by linking to Amazon.com and affiliated websites.
Up till about a week before my wedding I would have sworn up and down that I was going to wear a veil. I had so many reasons, including the Jewish idea that when you wear a veil, the spirits of all your decedents walk down the aisle with you. (Beautiful right?)
Also, I really like tulle. (I’m in the right business, no?)
But I didn’t wear a veil. And why not? Because every veil I put on made me feel like some kind of bride doll. I felt weirdly generic and nothing like myself. So at the last minute I whipped together a tulle hair-flower and wore that instead. It didn’t have the windswept glamour of a veil (seriously, those tulle in the wind photos). But it was quirky and delightful and a little weird, and DIY-ed by yours truly, and it did the trick.
But in the years since, I’ve been sad that I missed my opportunity for piles of tulle. And yet, every time I put on a veil—because I have a job where a decade later I still put on a lot of veils—that generic bridal doll feeling comes rushing back.
So when Rit Dye came to us and asked us if we’d like to work some colorful magic on veils, our whole team jumped at the chance. We’d been dying over the Rodarte Spring 2019 runway show since it happened, and kept wanting to create something that looked like these veils, without the Rodarte price tag. I mean:
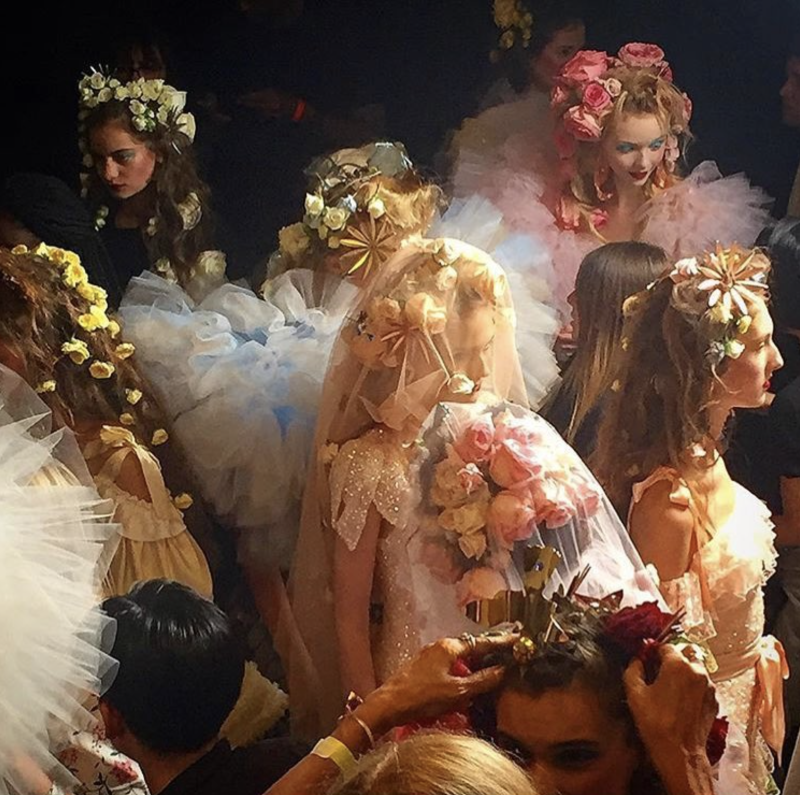
I think everyone on the APW team has at some point described this show as “basically the pinnacle of fashion, like ever.” So we wanted to see if we could do our own take on those headpieces, but without difficult-to-manage real flowers.
And these veils quickly became a passion project. Back when I was growing up, you could pick up powdered Rit Dye in a handful of colors, and that was what you got. I grew up making costumes and used those old-school Rit Dye colors so many times that they are now burned into my brain. BUT HOW TIMES HAVE CHANGED. Rit Dye now has a huge assortment of liquid all-purpose dyes in thirty-six different colors, plus a brand-new special formulation for synthetic fabrics, which means you can dye polyester, among other things. Not to mention, they have a color formulation section on their website with hundreds of different color recipes—the future is now, my friends. Which meant that what started out as a DIY project quickly became a bona fide science experiment learning pretty much everything there is to know about dyeing a wedding veil. Here’s what we learned:
How to Dye a Veil
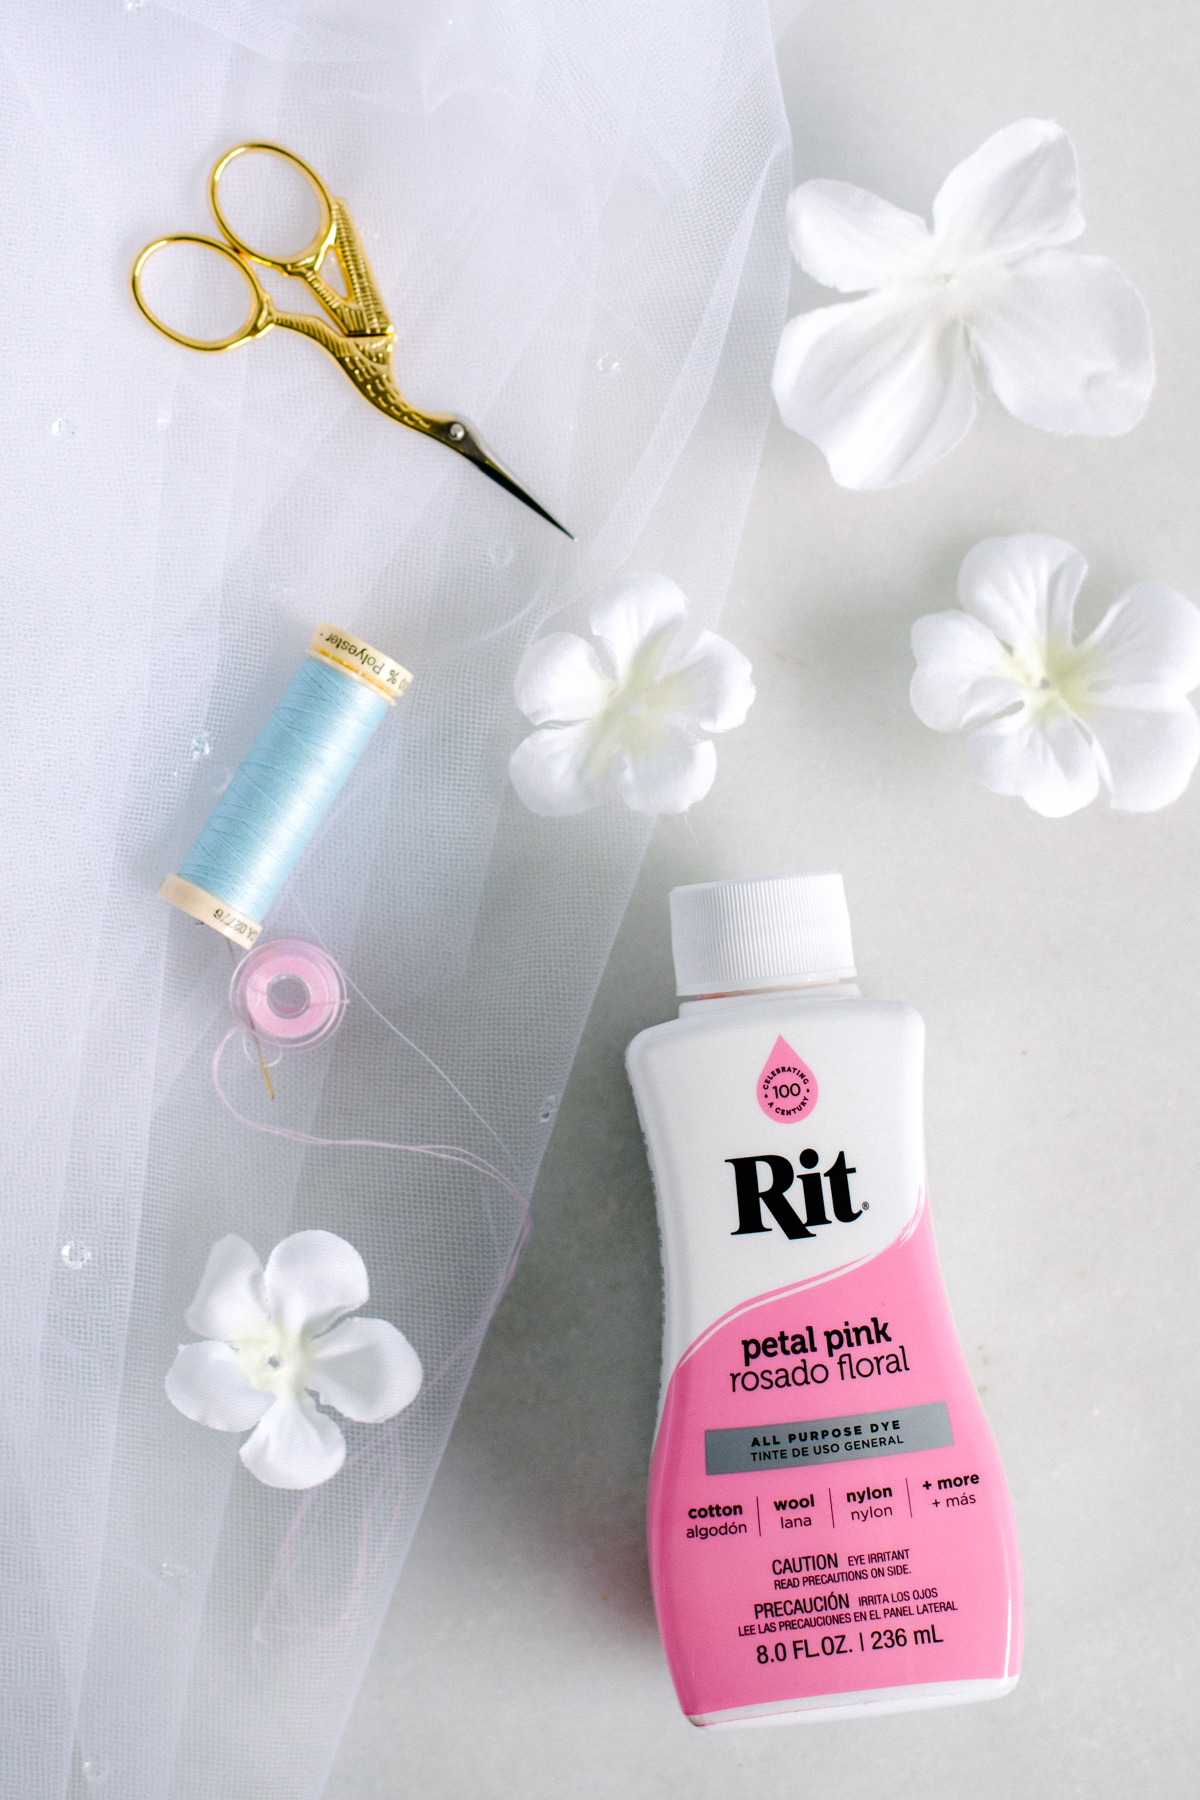
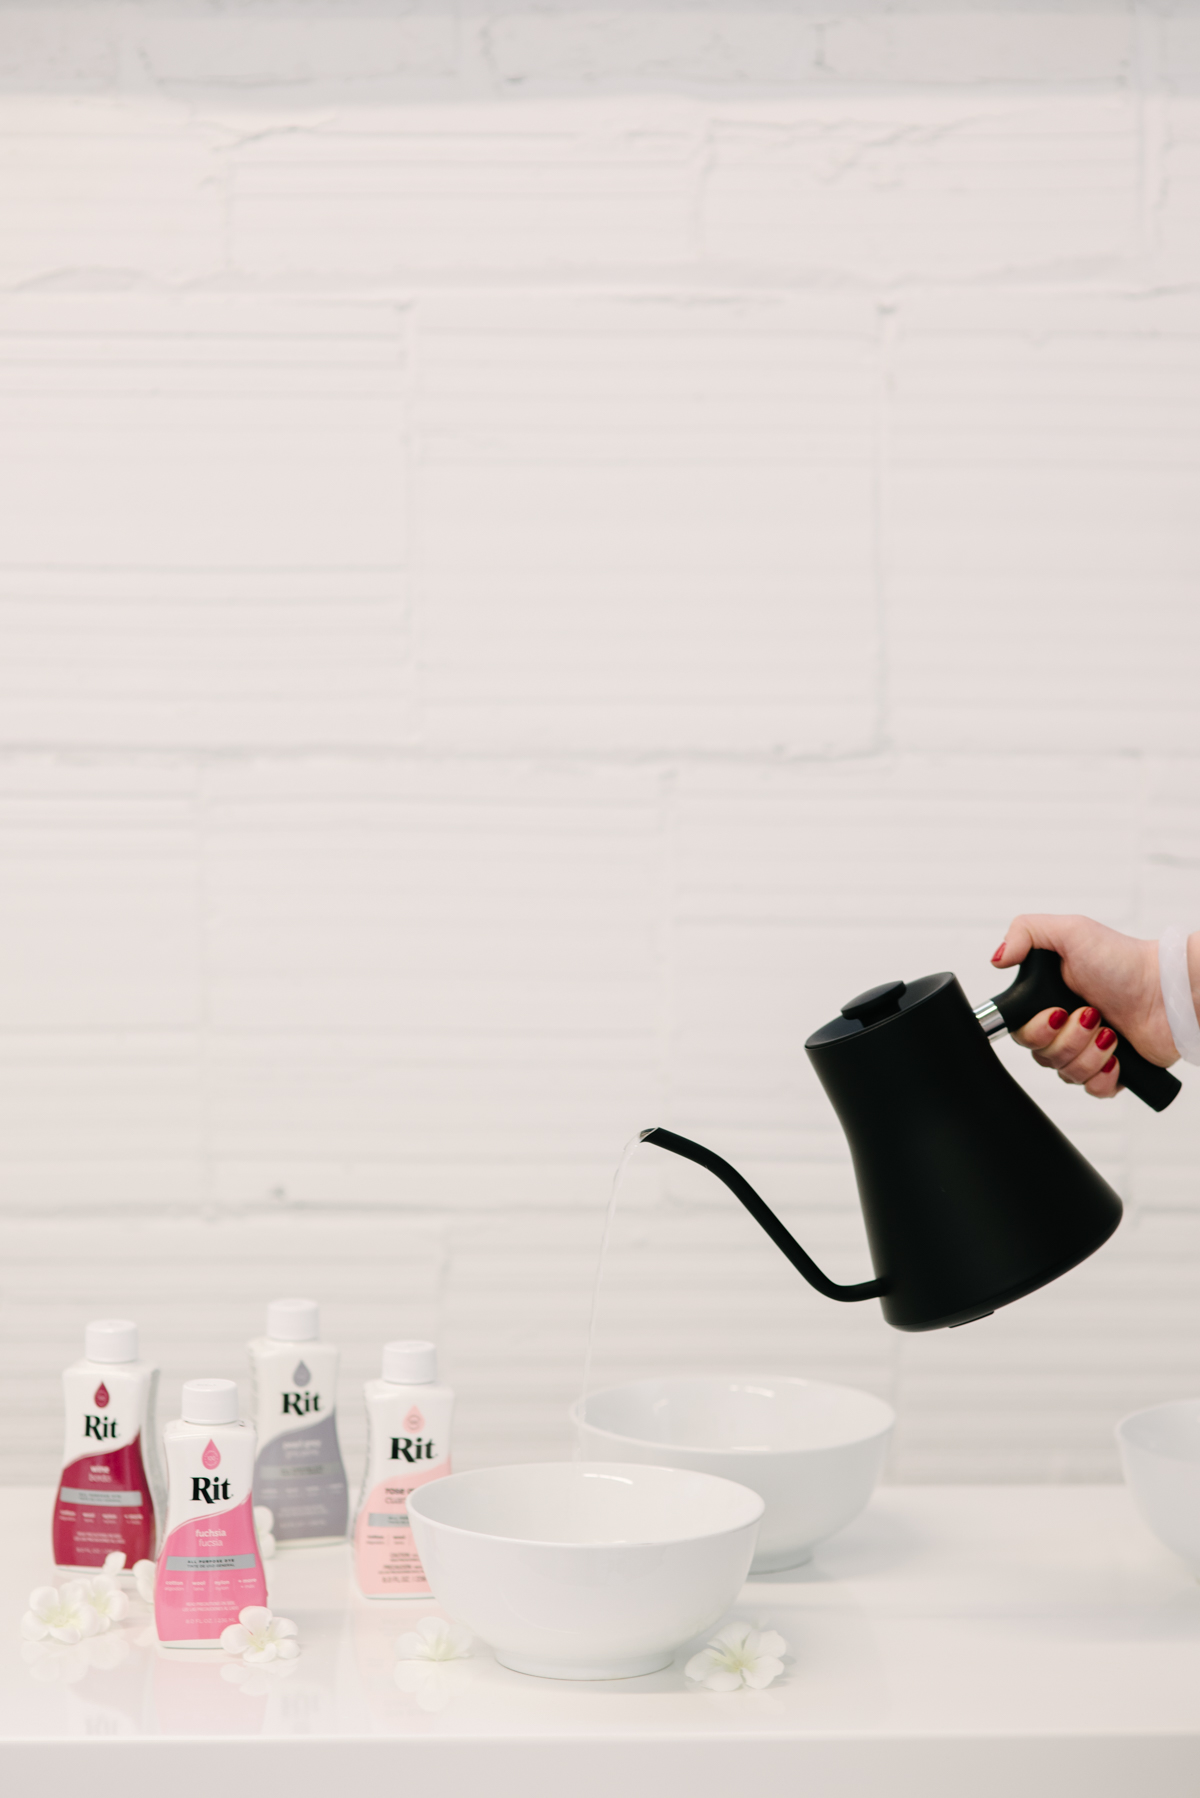
The basic steps for dyeing a wedding veil are actually really simple once you get down to it. So if you’re feeling intimidated, don’t. Rit Dye has a ton of information on their website that breaks the process down into a few steps. But first you’ll need materials:
- Wedding veil (or tulle and comb if you’re making your own)
- Silk flowers
- Plastic bucket (you can also do this in your kitchen sink or an old pot)
- Gloves
- Rit All-Purpose Dye (or DyeMore if you’re working with synthetic fabric)
- Stove or kettle for boiling water
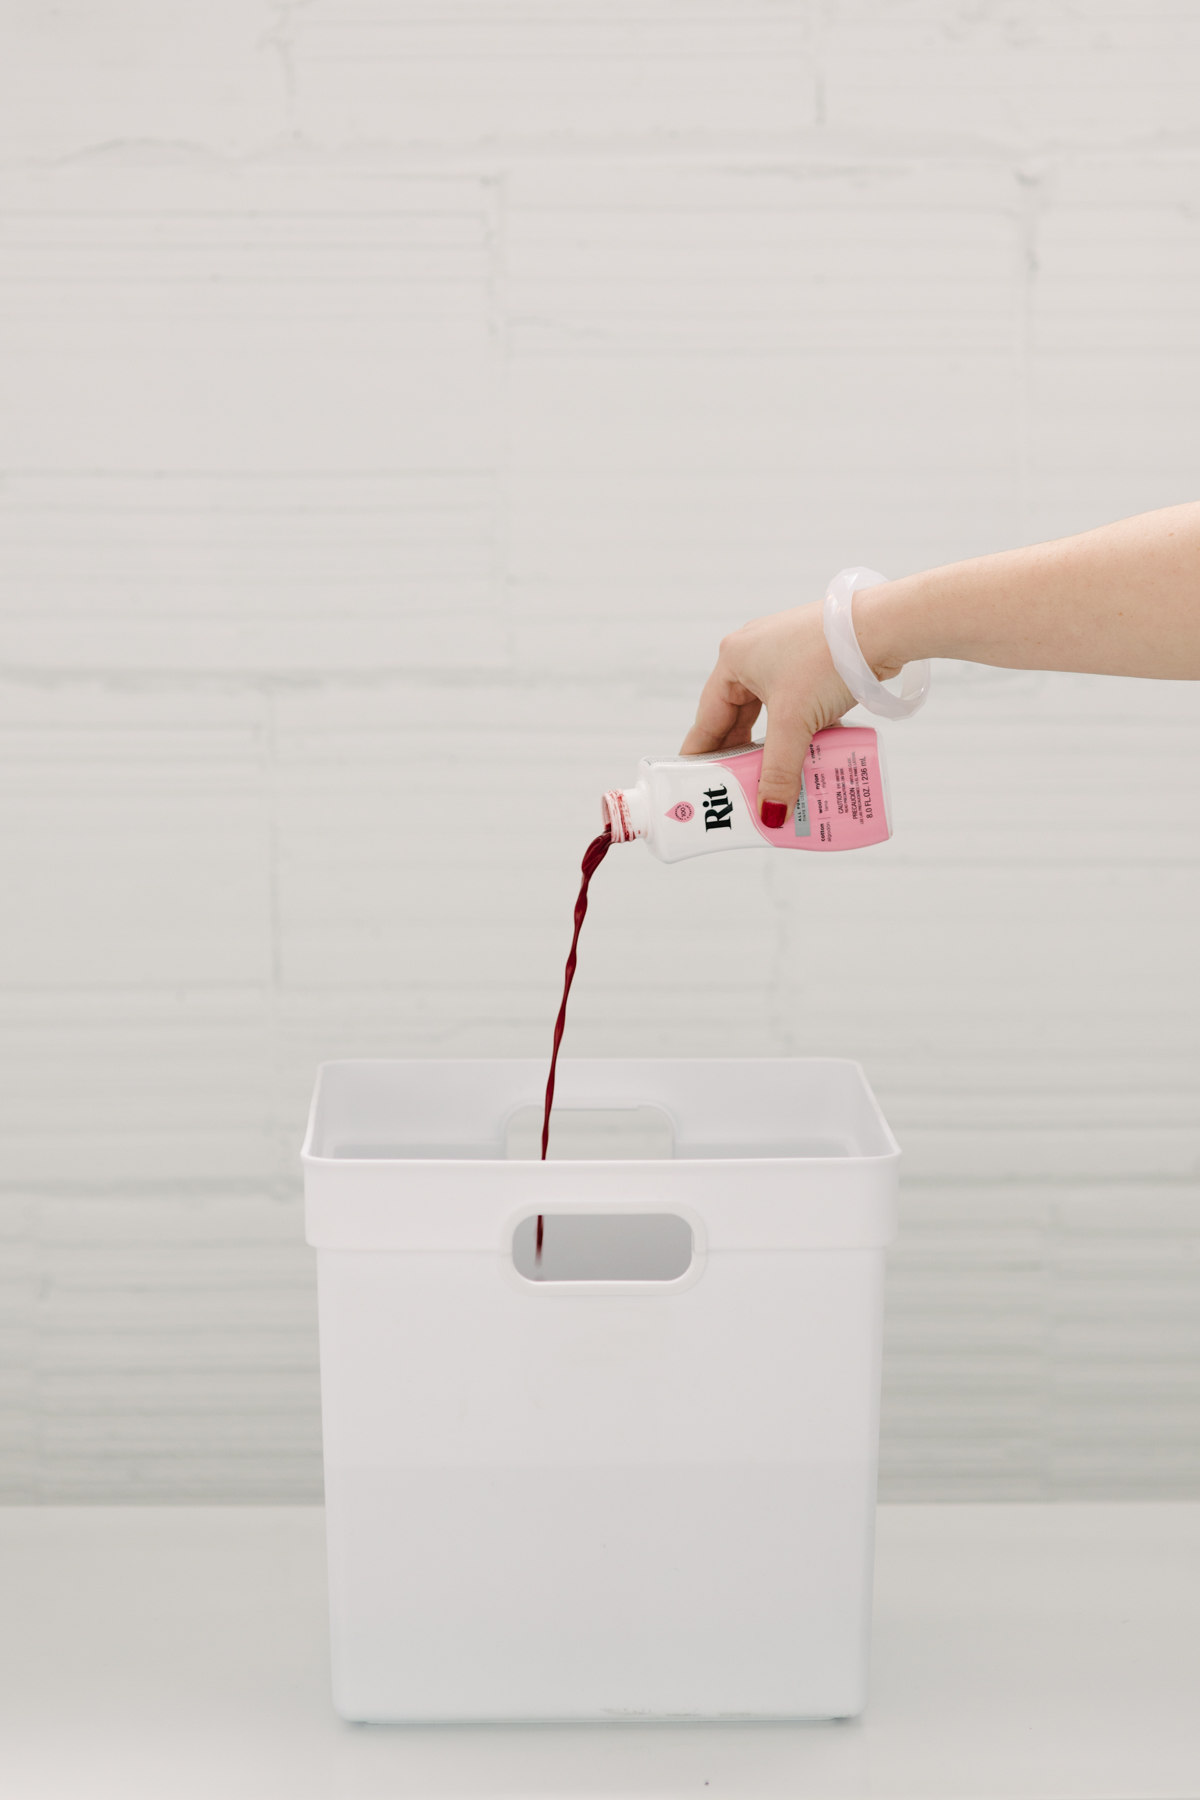
One: Read through this handy PDF first. As mentioned, Rit Dye has a huge recipe book with hundreds of color formulas on their website, and it’s basically idiot proof if you read through it before you start dyeing. It includes water temperature advice, conversion rates for smaller batches of dye, and lots of helpful tips. There’s also the How To Dye section of their website. We, obviously, skipped this part and then made a bunch of mistakes because of bad math. So do a read-through first and bookmark all the helpful sections.
Two: Once you’ve picked out a color, figure out what kind of fabric you’re working with, and how much of it you have. This will impact what kind of dye you’ll need and how much. Natural fibers work best with Rit All-Purpose Dye, while anything that’s more than 40 percent synthetic should use the Rit DyeMore formula. If you’re not sure, play it safe and go with DyeMore.
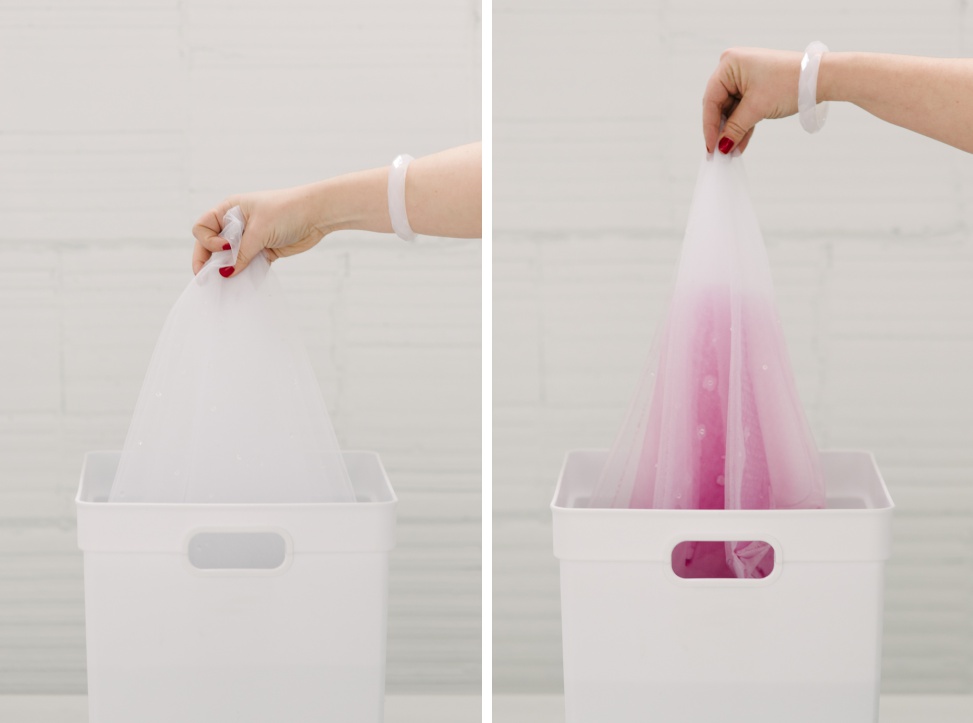
That said, if you want something pastel like what we did here, you can get away with using all-purpose dye on more synthetic tulle if you use boiling water and let the fabric sit for at least half an hour or more. Just remember that with wedding veils, most brands don’t indicate how much of the veil is synthetic, so you might be in for a little bit of trial and error. That said, if you want to be super precise and make sure you end up with the exact color you want, you can always snag a backup veil and cut it up for swatch testing (or you can make your own if you’re looking for the more budget-friendly alternative to that plan).
Three: Formulate and swatch test. Even though we didn’t make our own veils, we wanted to try out color formulations first just to see what kind of shade looked good in tulle, and what would work well with our faux flowers. And since we were using all-purpose dye on synthetic fabrics, we also wanted to make sure the dye would take. (Spoiler alert: It did, really beautifully.)
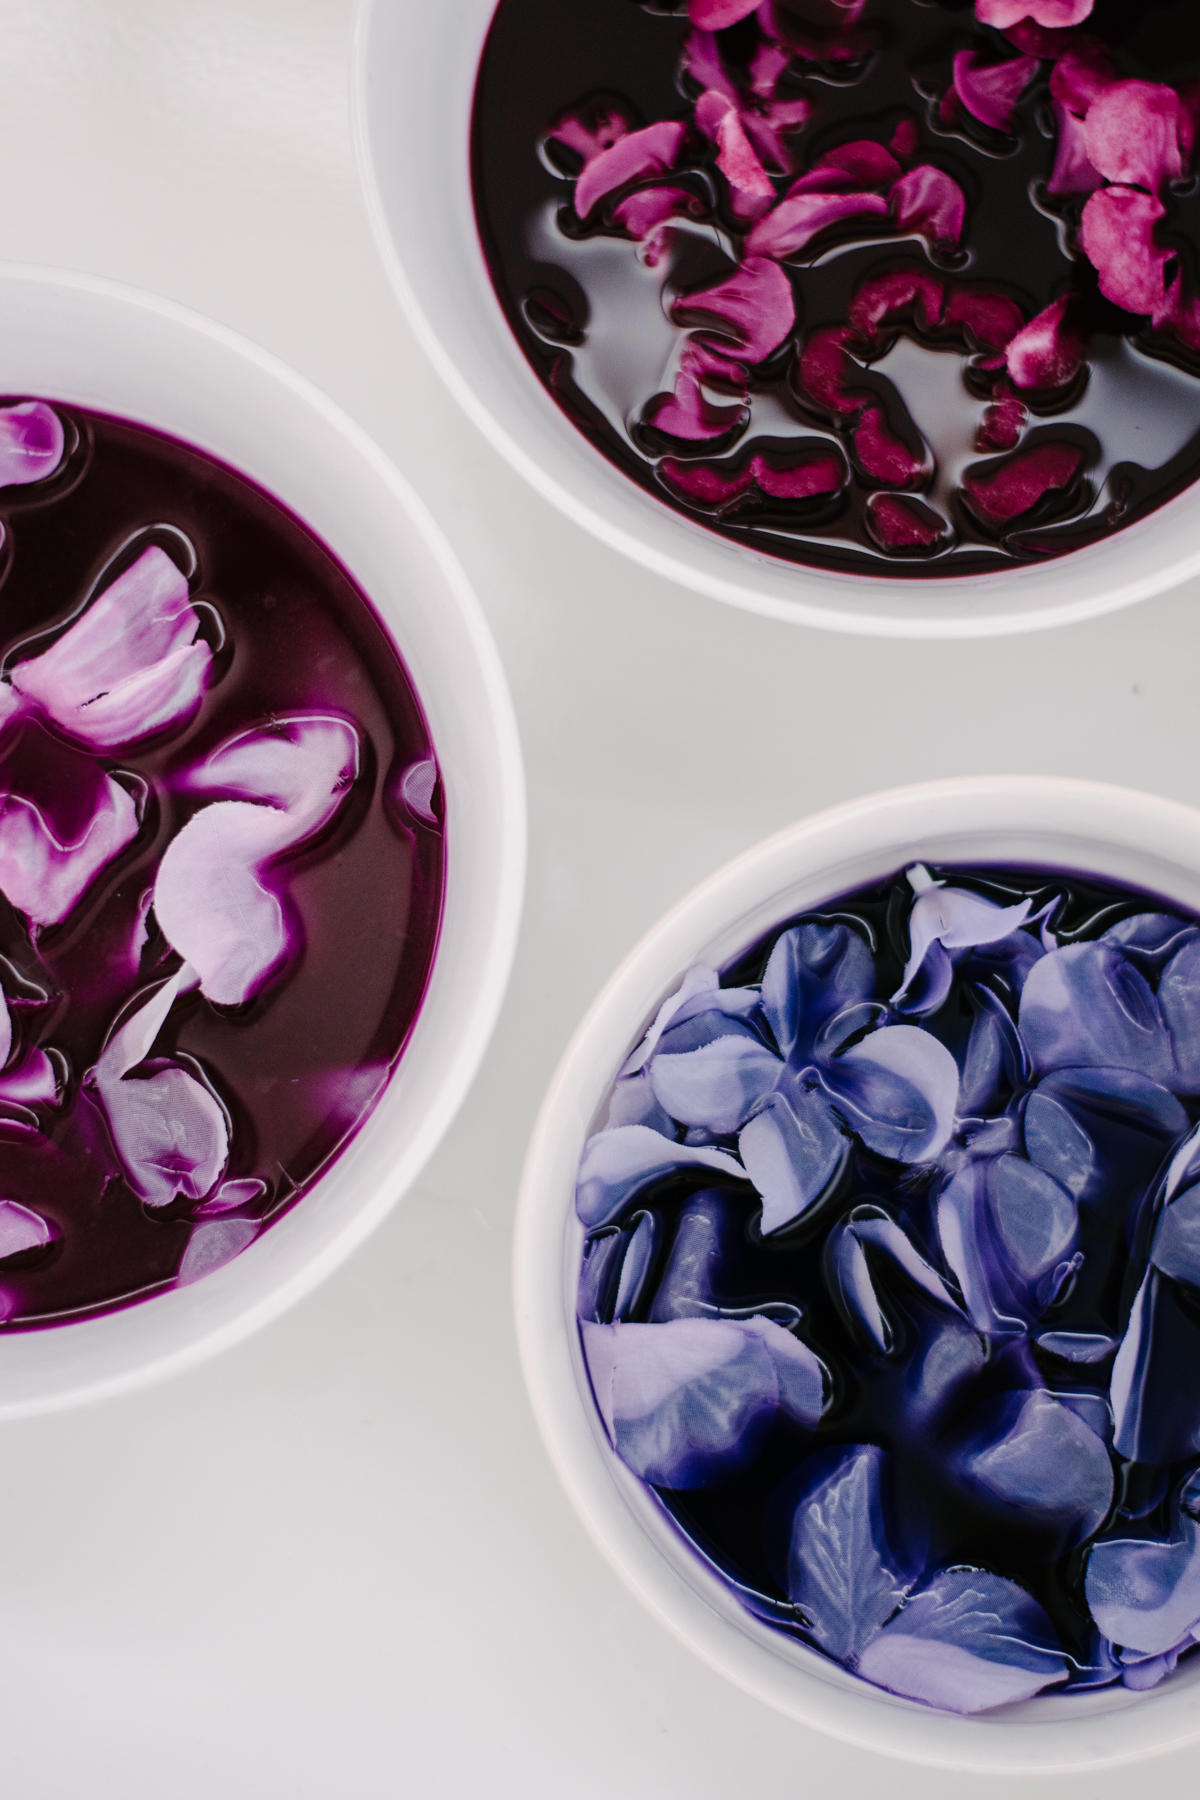
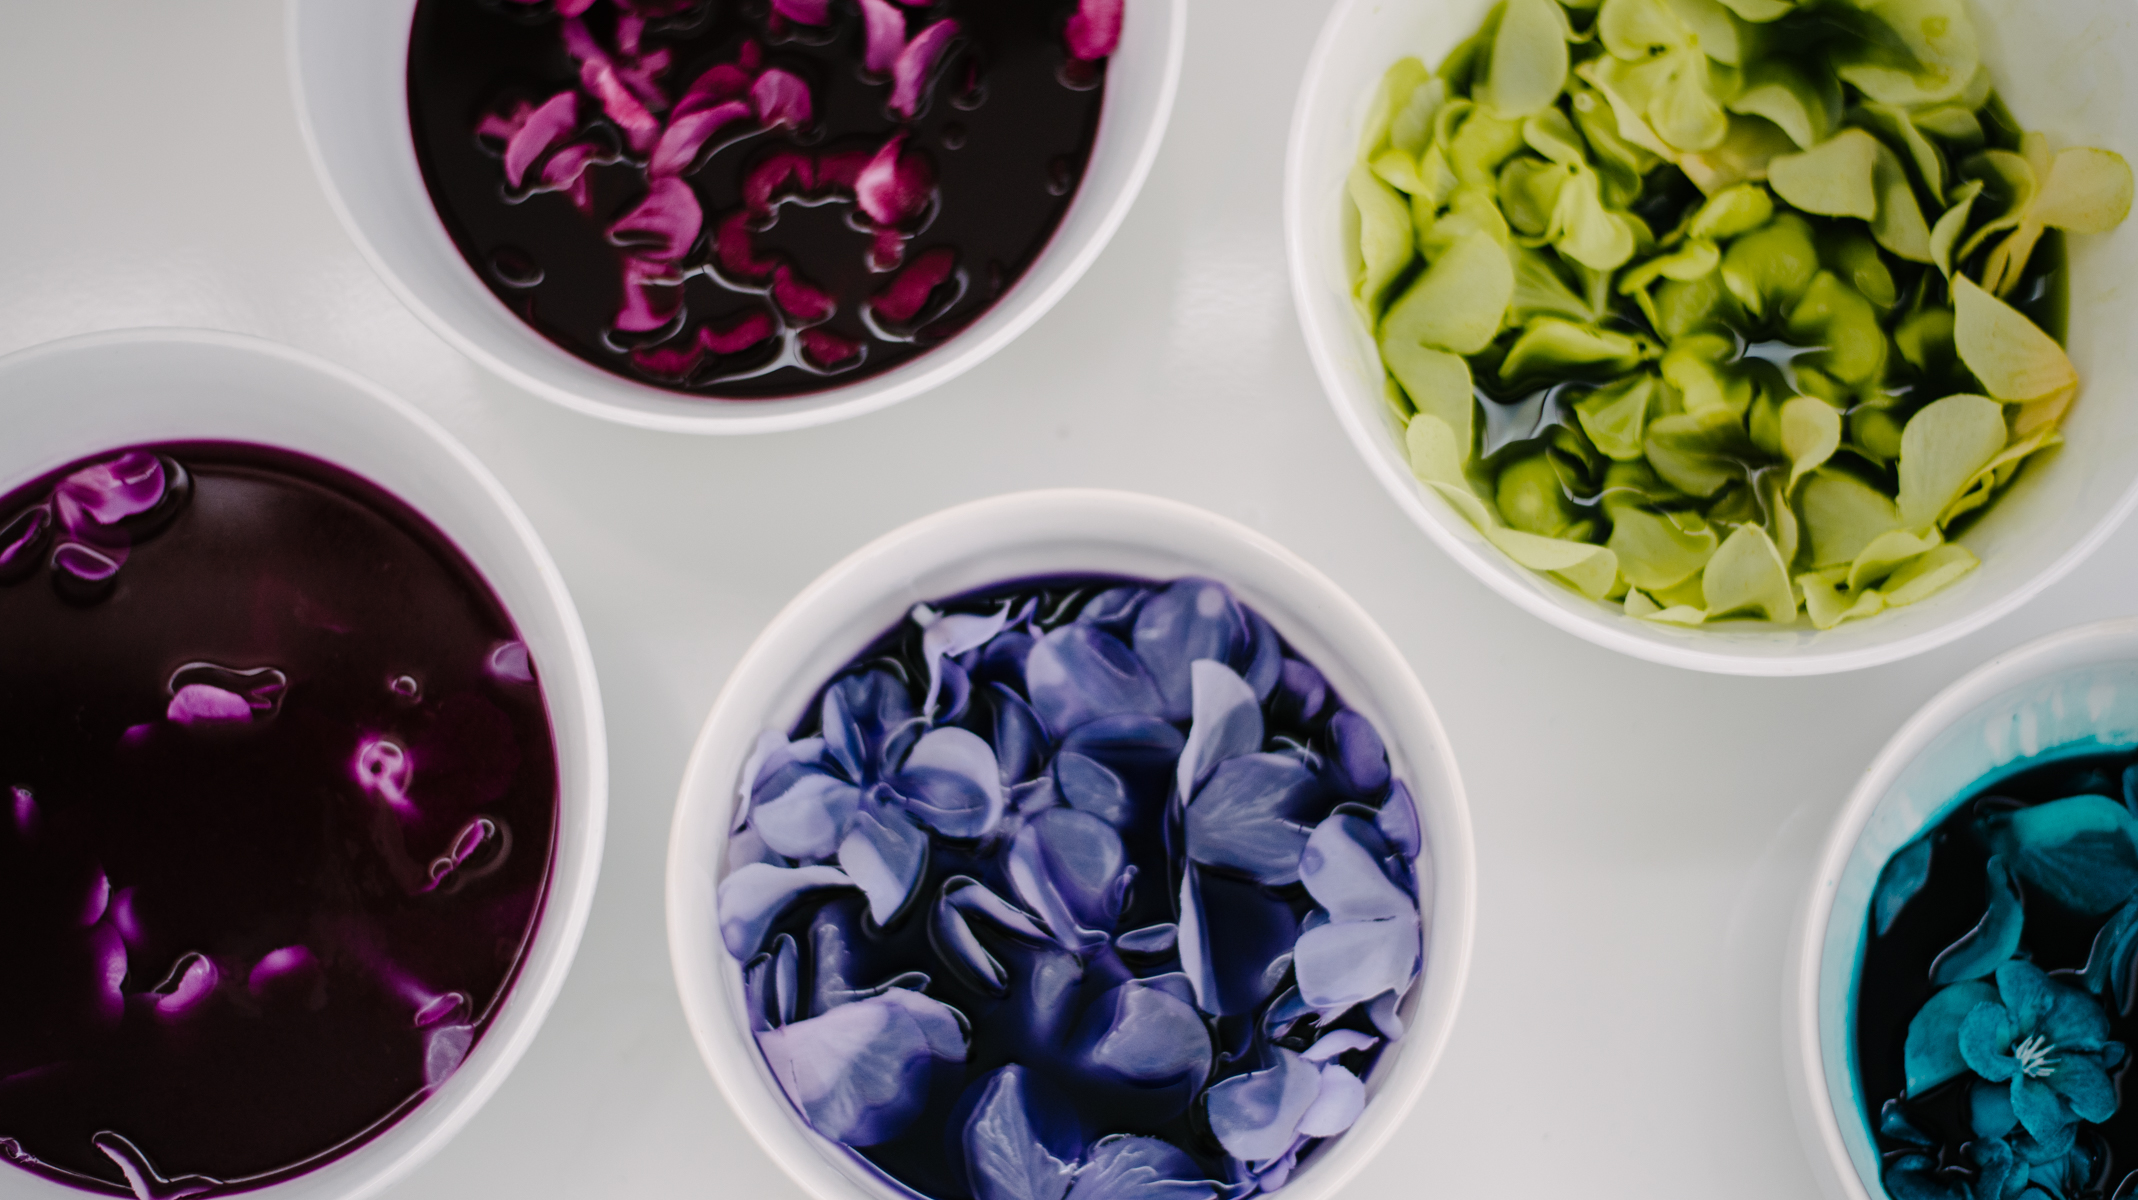
Because Rit Dye is smart, their color formula page has a built-in conversion chart, so we were able to create small test dye baths (think roughly the size of a soup bowl). We tested somewhere between sixteen and twenty different color formulations each in a few cups of water (including those few accidental test runs with the bad math) and learned the following:
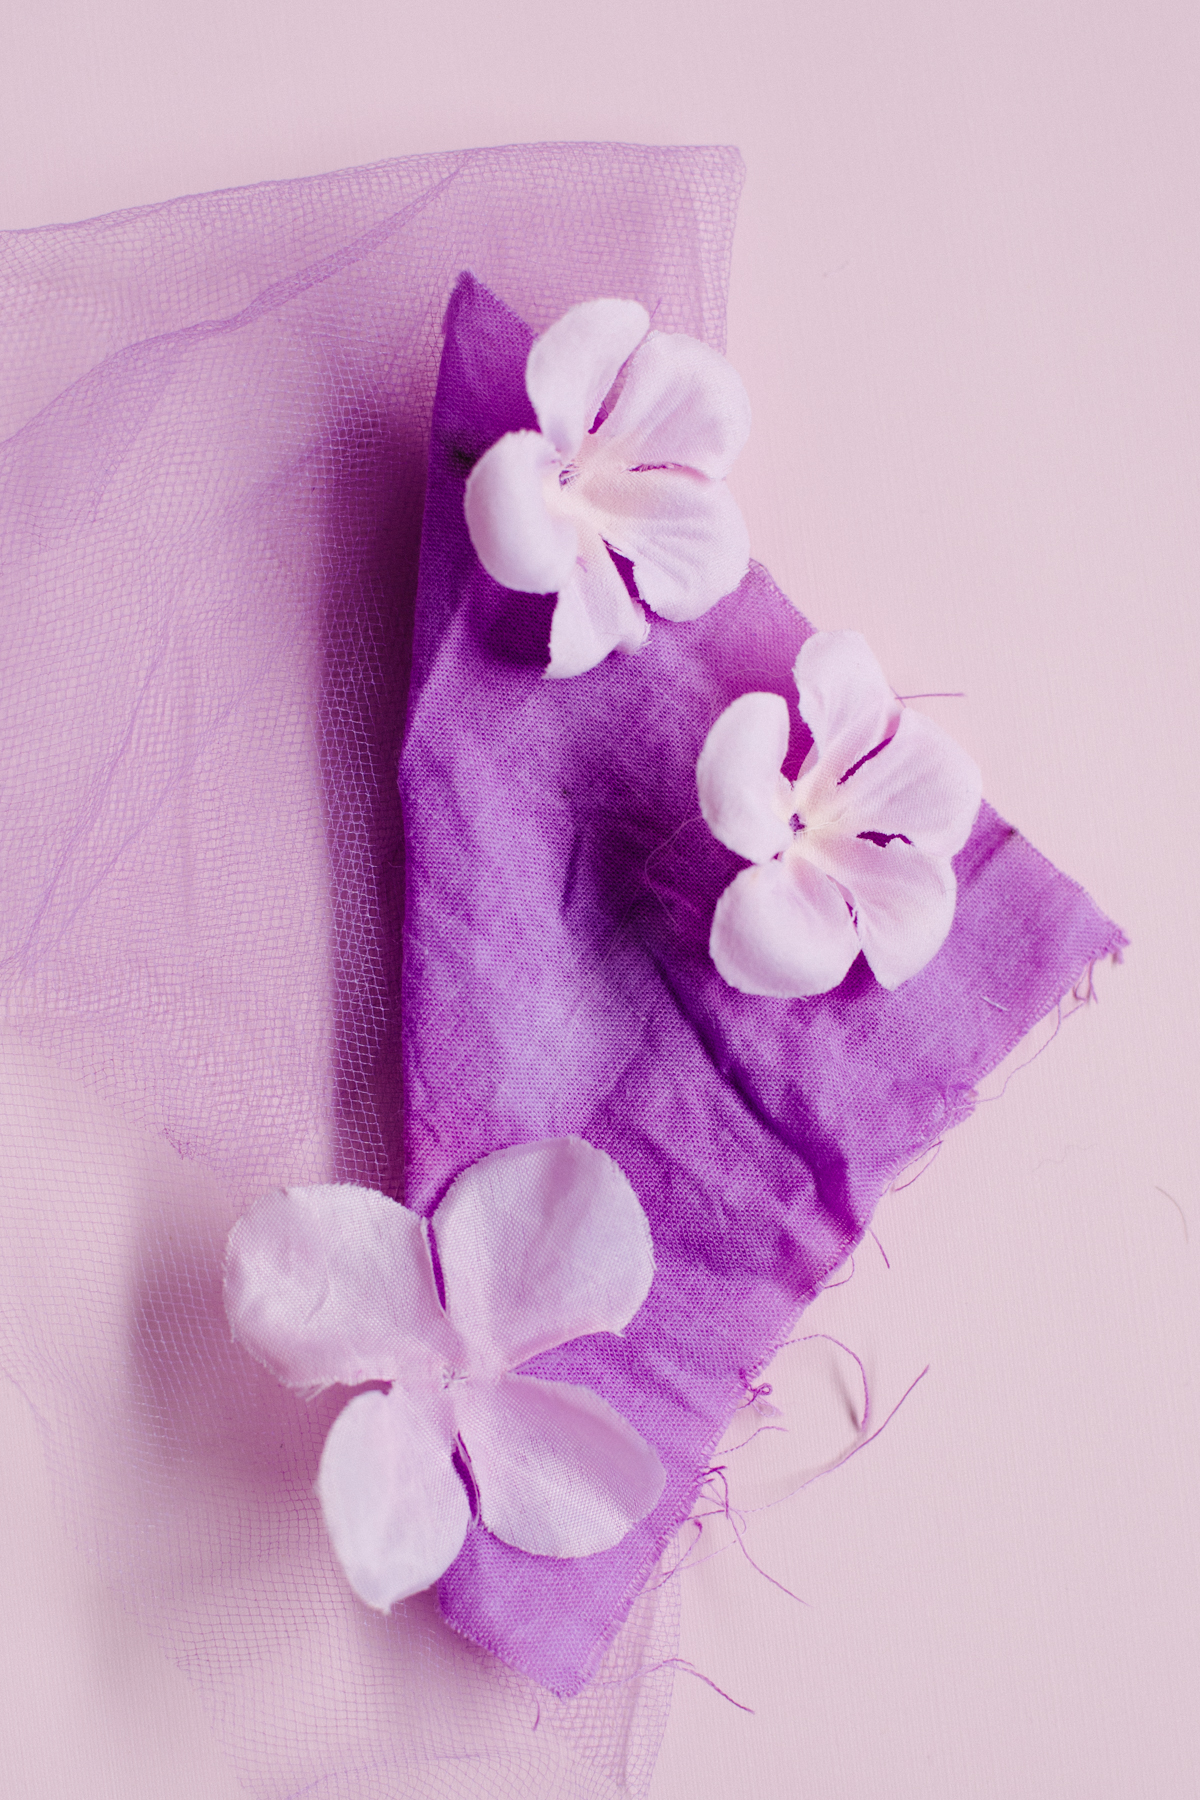
- Fabric really matters. In each dye bath, we tested a piece of muslin (aka cotton), a piece of tulle, and some fake flowers we bought at JoAnn’s and ripped off the stems. The muslin took the dye the strongest, the tulle second strongest, and the fake flowers came out very, very pale. (Which is what we were going for, so yay.) On the most synthetic fabric (aka our fake flowers), we also found that blue stuck better than most colors, and with yellow, the best we could get was a very pale buttercup.
- If you’re trying to increase your color saturation (say, if you’re using all-purpose dye on synthetic fabrics), you can increase the quantity of dye, the length of time the fabric is in the dye bath, or the temperature of your dye bath (or all three). For temperature, we alternated between 140 degrees—which is the minimum temperature Rit recommends and the hottest my house’s tap will get—and boiling water. And then we played around with leaving things in there for a just few minutes, all the way up to 45 minutes. Keep in mind, this was our hack for using all-purpose dye on synthetic fabrics, and our end goal was pastels. If you want more vibrant colors, your best bet is to simply use the DyeMore formula.
- Use gloves. Just in case you were planning on not using gloves. After a day of dyeing, Maddie looked like she was auditioning for the role of Violet Beauregard pre-juicing.
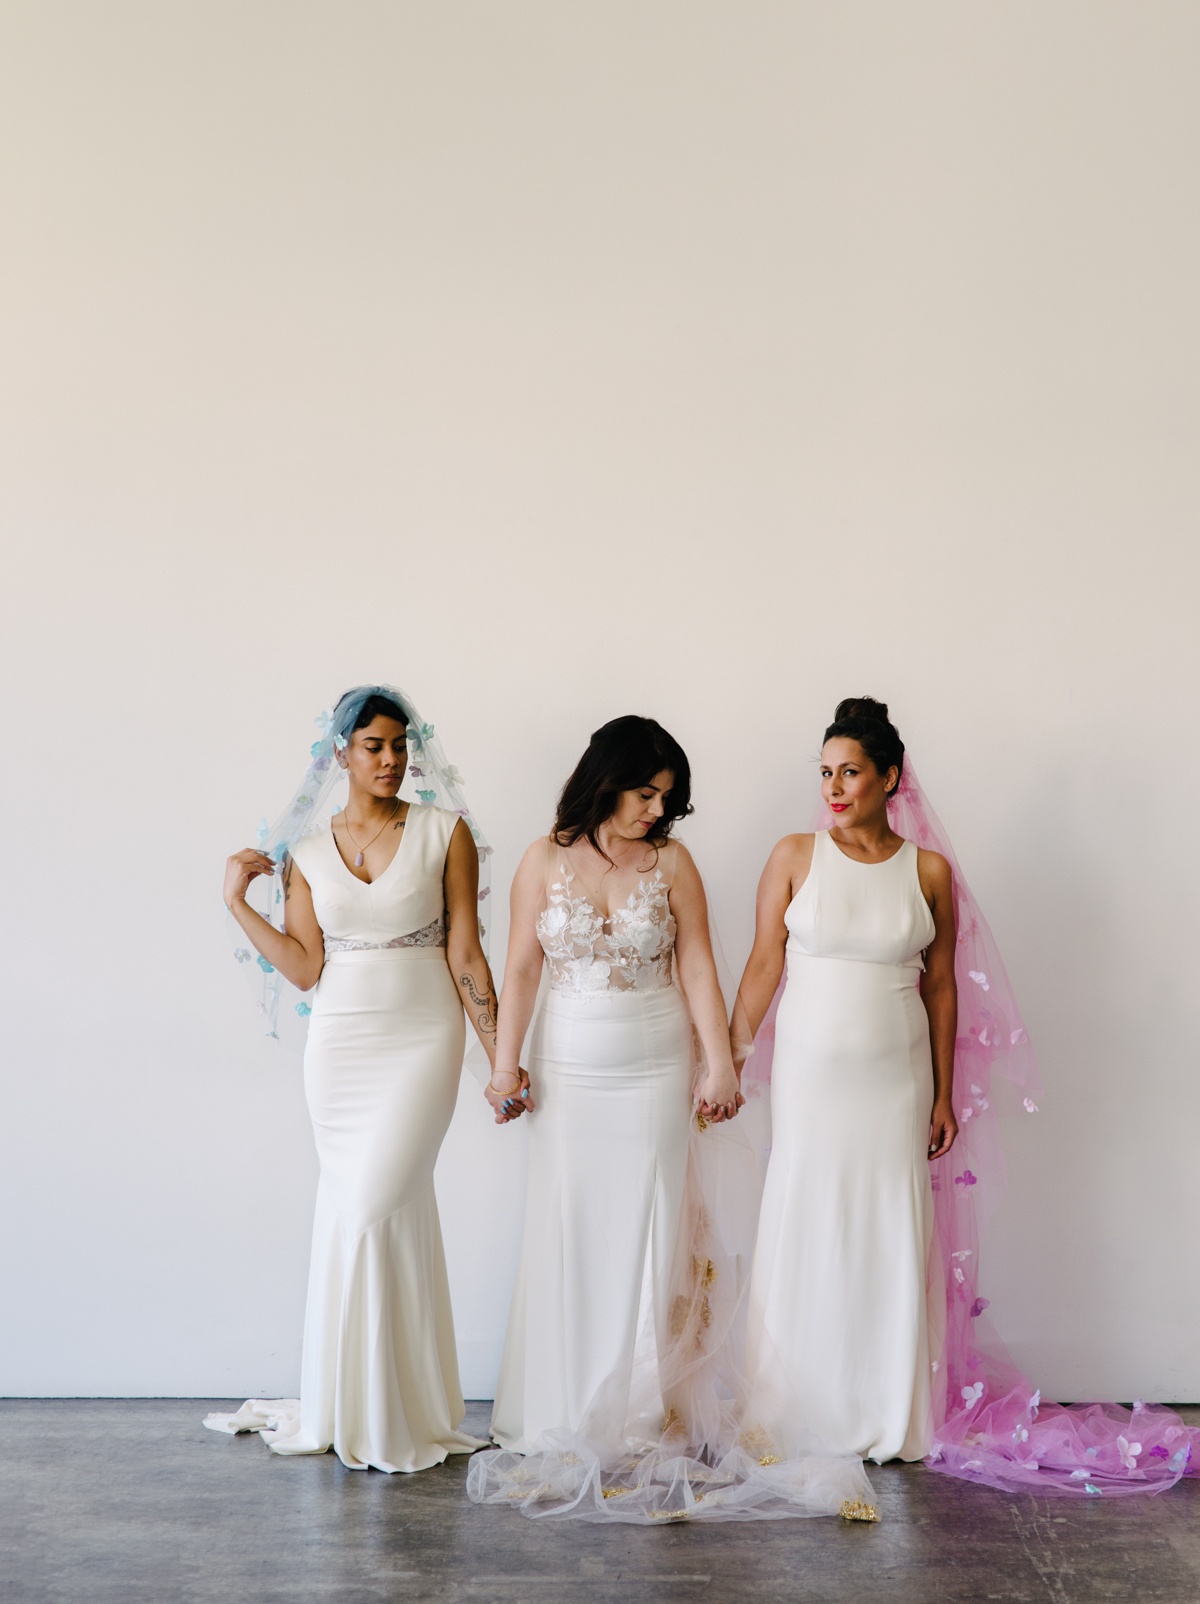
Four: Make your final dye bath. Since making veils from scratch felt like overachieving even for us on this project, David’s Bridal was generous enough to gift us a few of their Vera Wang veils to play around with. (This and this to be precise.) Now, if you’re making your own veil, the final dye bath should be as easy as up-scaling your calculations using the Rit color formula page (we used a gallon and a half of water in our final bath for each veil). However, what we quickly learned was that our David’s Bridal veils were made out of a much higher quality fabric than the tulle we’d been testing on. Which meant that our initial attempt at a pinky peach veil turned into something that looked more like Halloween Bride. So if you’re like us, and your experiments involve a bit of the unknown, here’s maybe the most important thing we learned in this whole process: If you’re trying to make something pastel, take it out of the bath way sooner than you think you need to (like, a check your color after a minute). You can always put it back in for longer, but you can’t turn pumpkin orange into pinky peach. Trust me, we tried. Our final colors were customizations of colors we’d found in the Rit Dye color formula chart:
Pink Lady
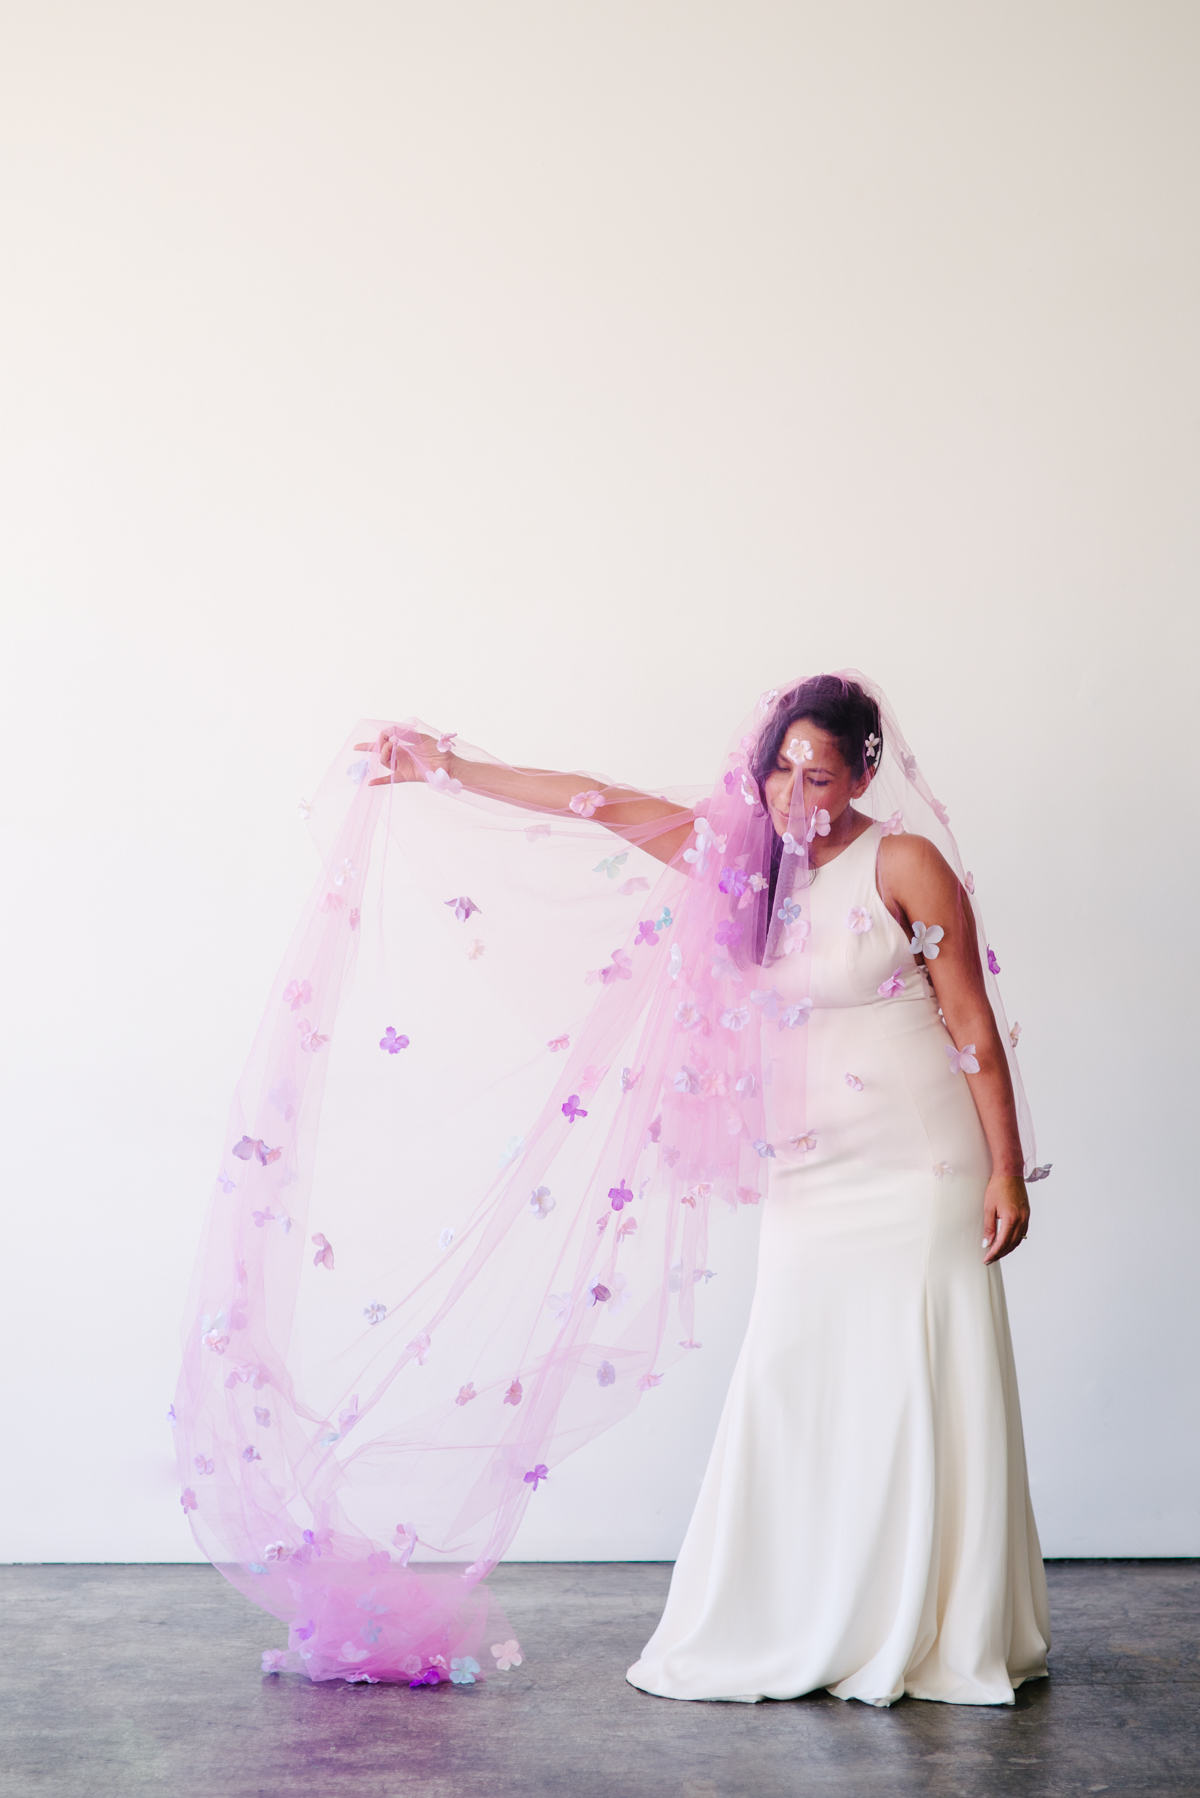
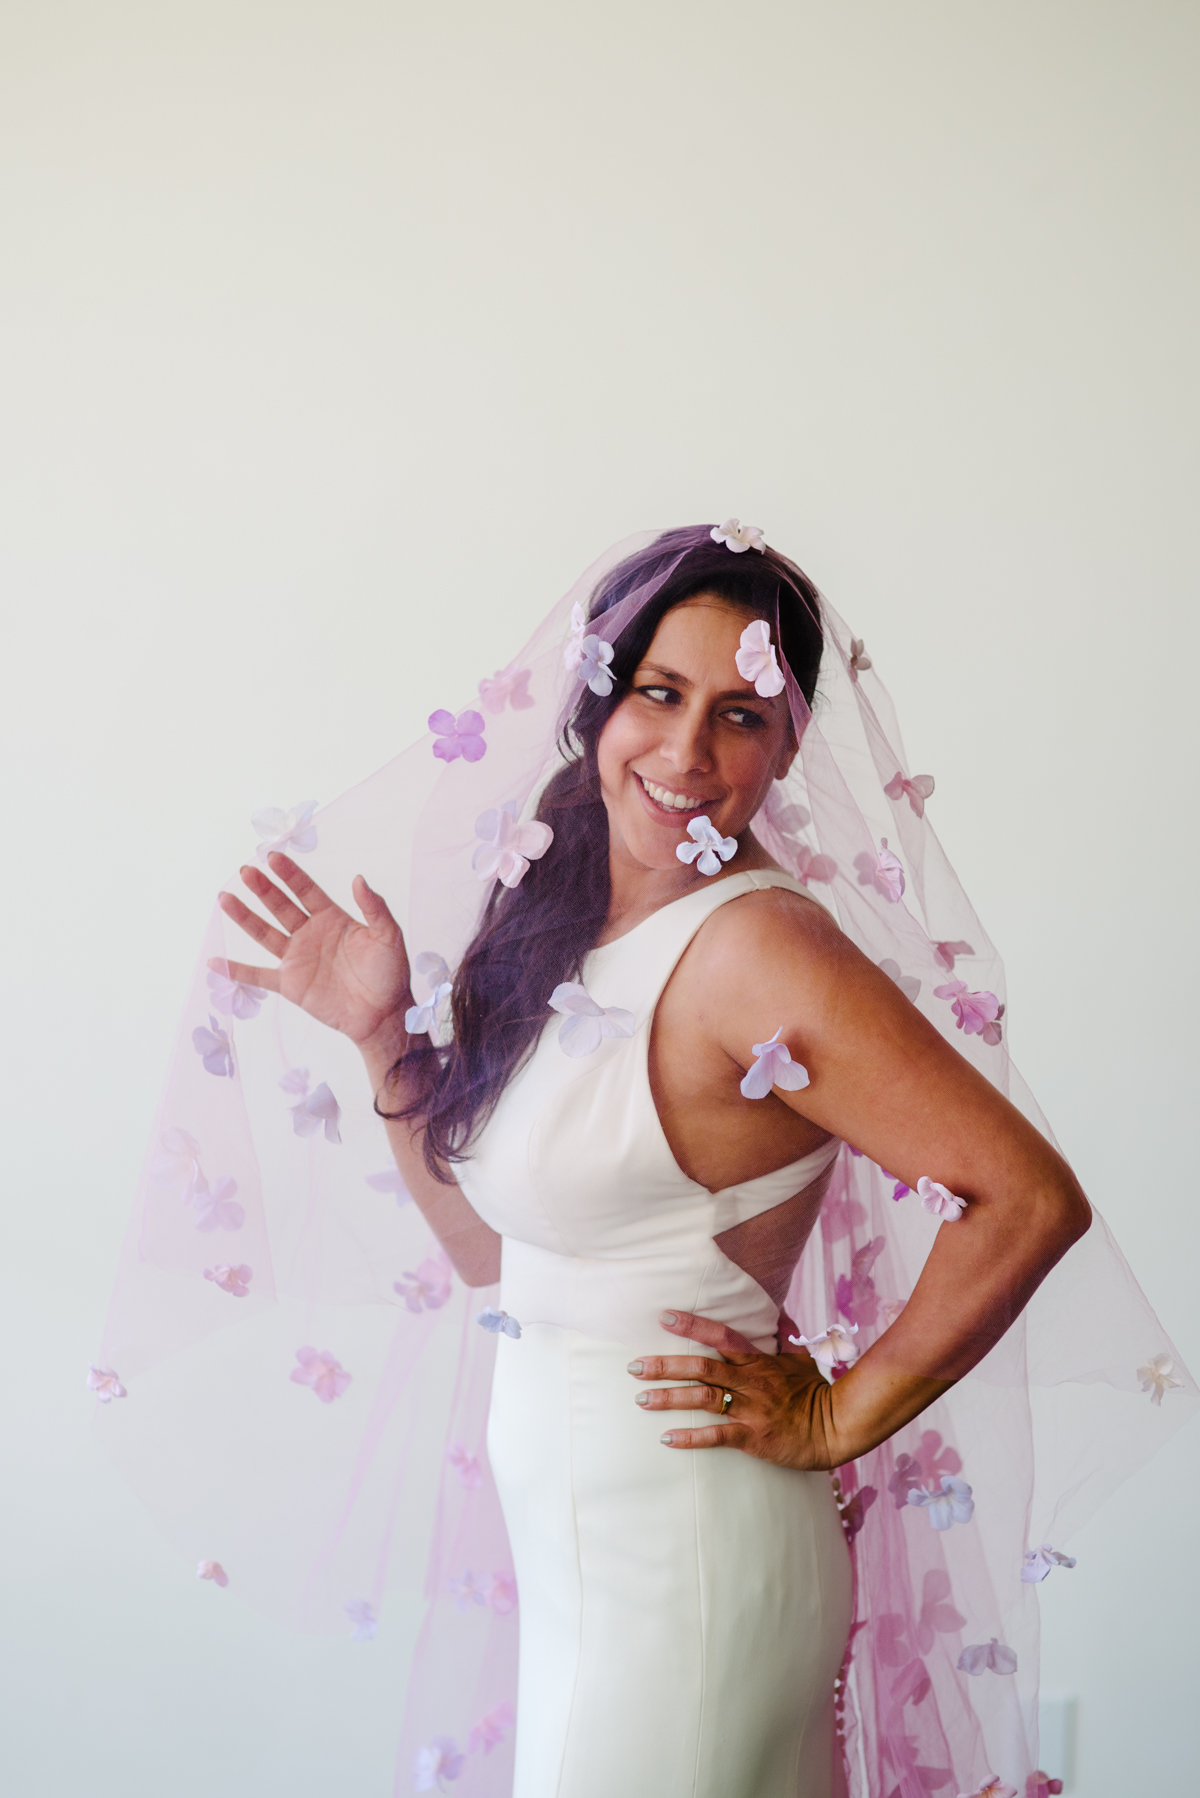

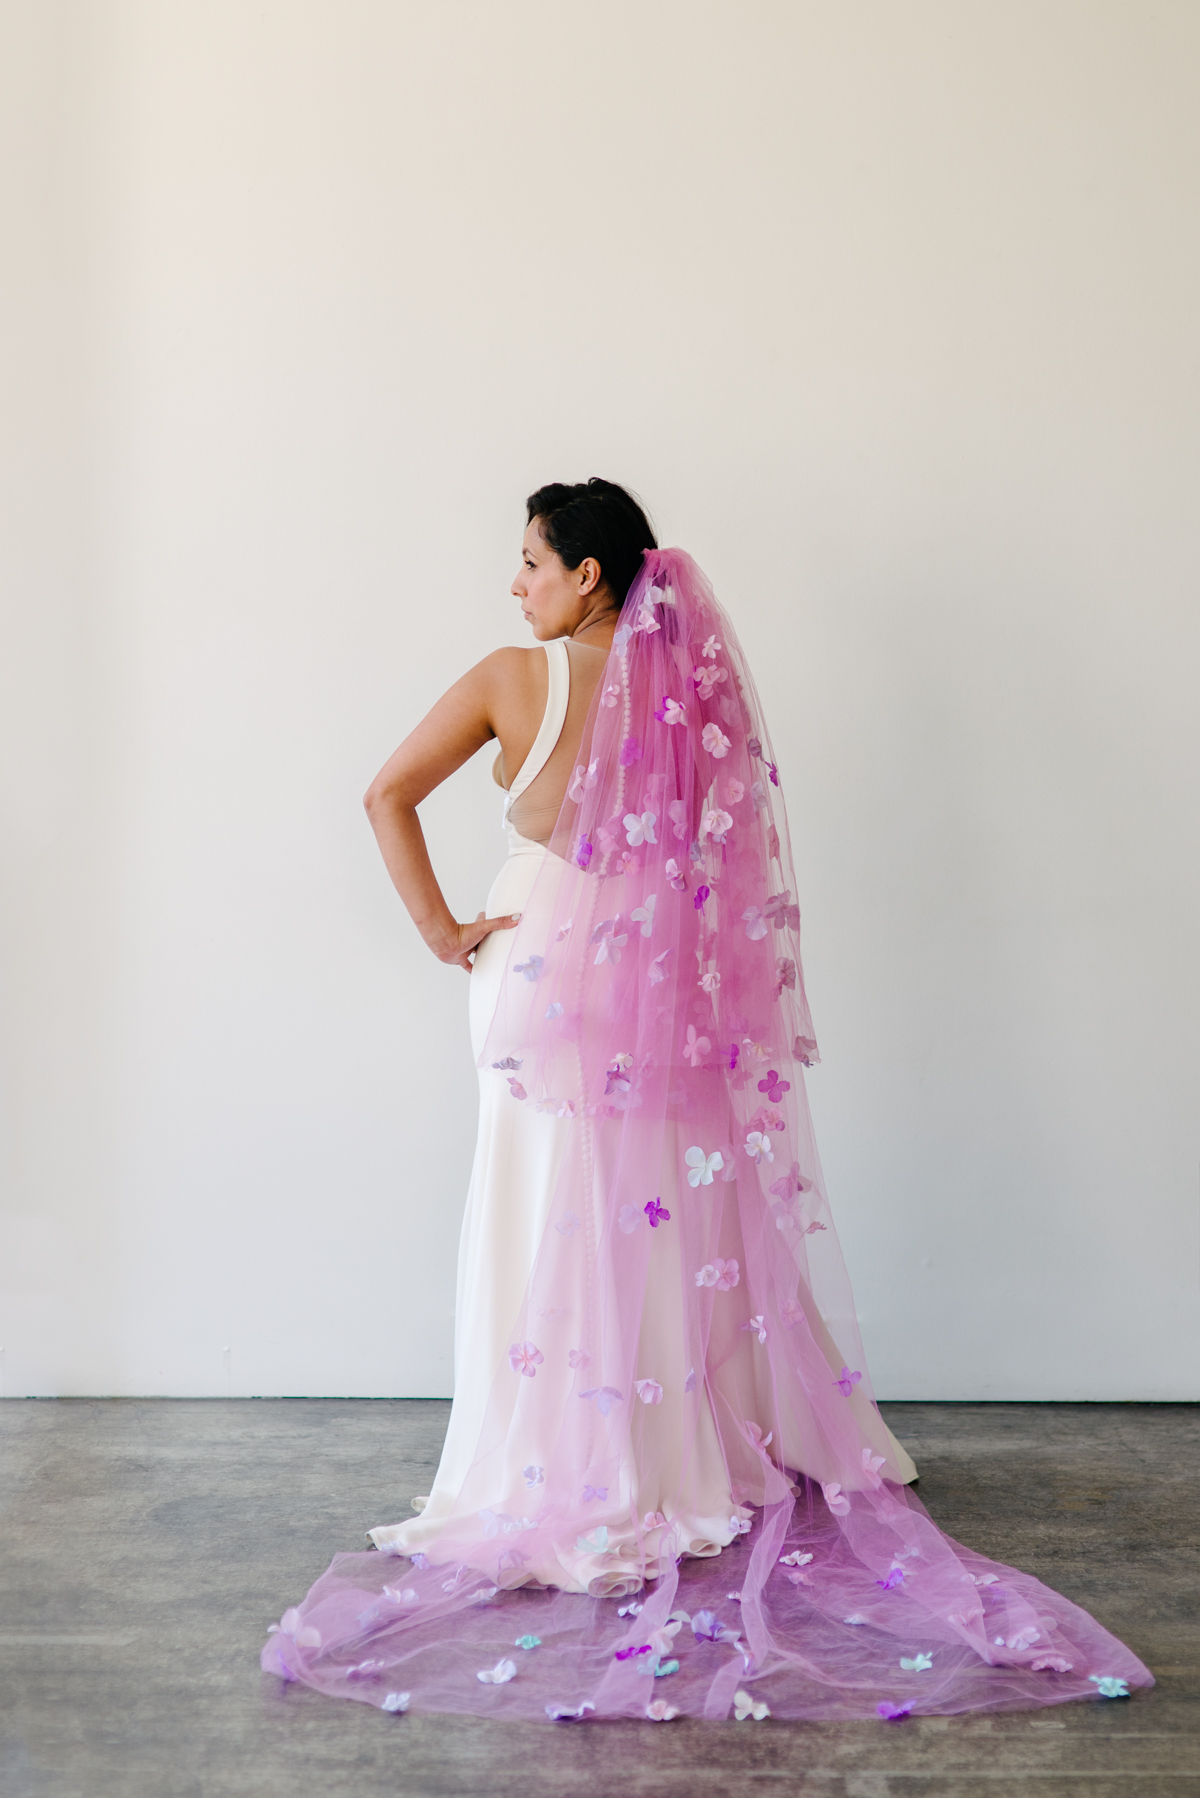
This pink was a straight copy of Rit Dye’s pink lavender formulation. We used one tablespoon of violet dye, and half a teaspoon of petal pink and dunked it in our dye bath for a little over a minute.
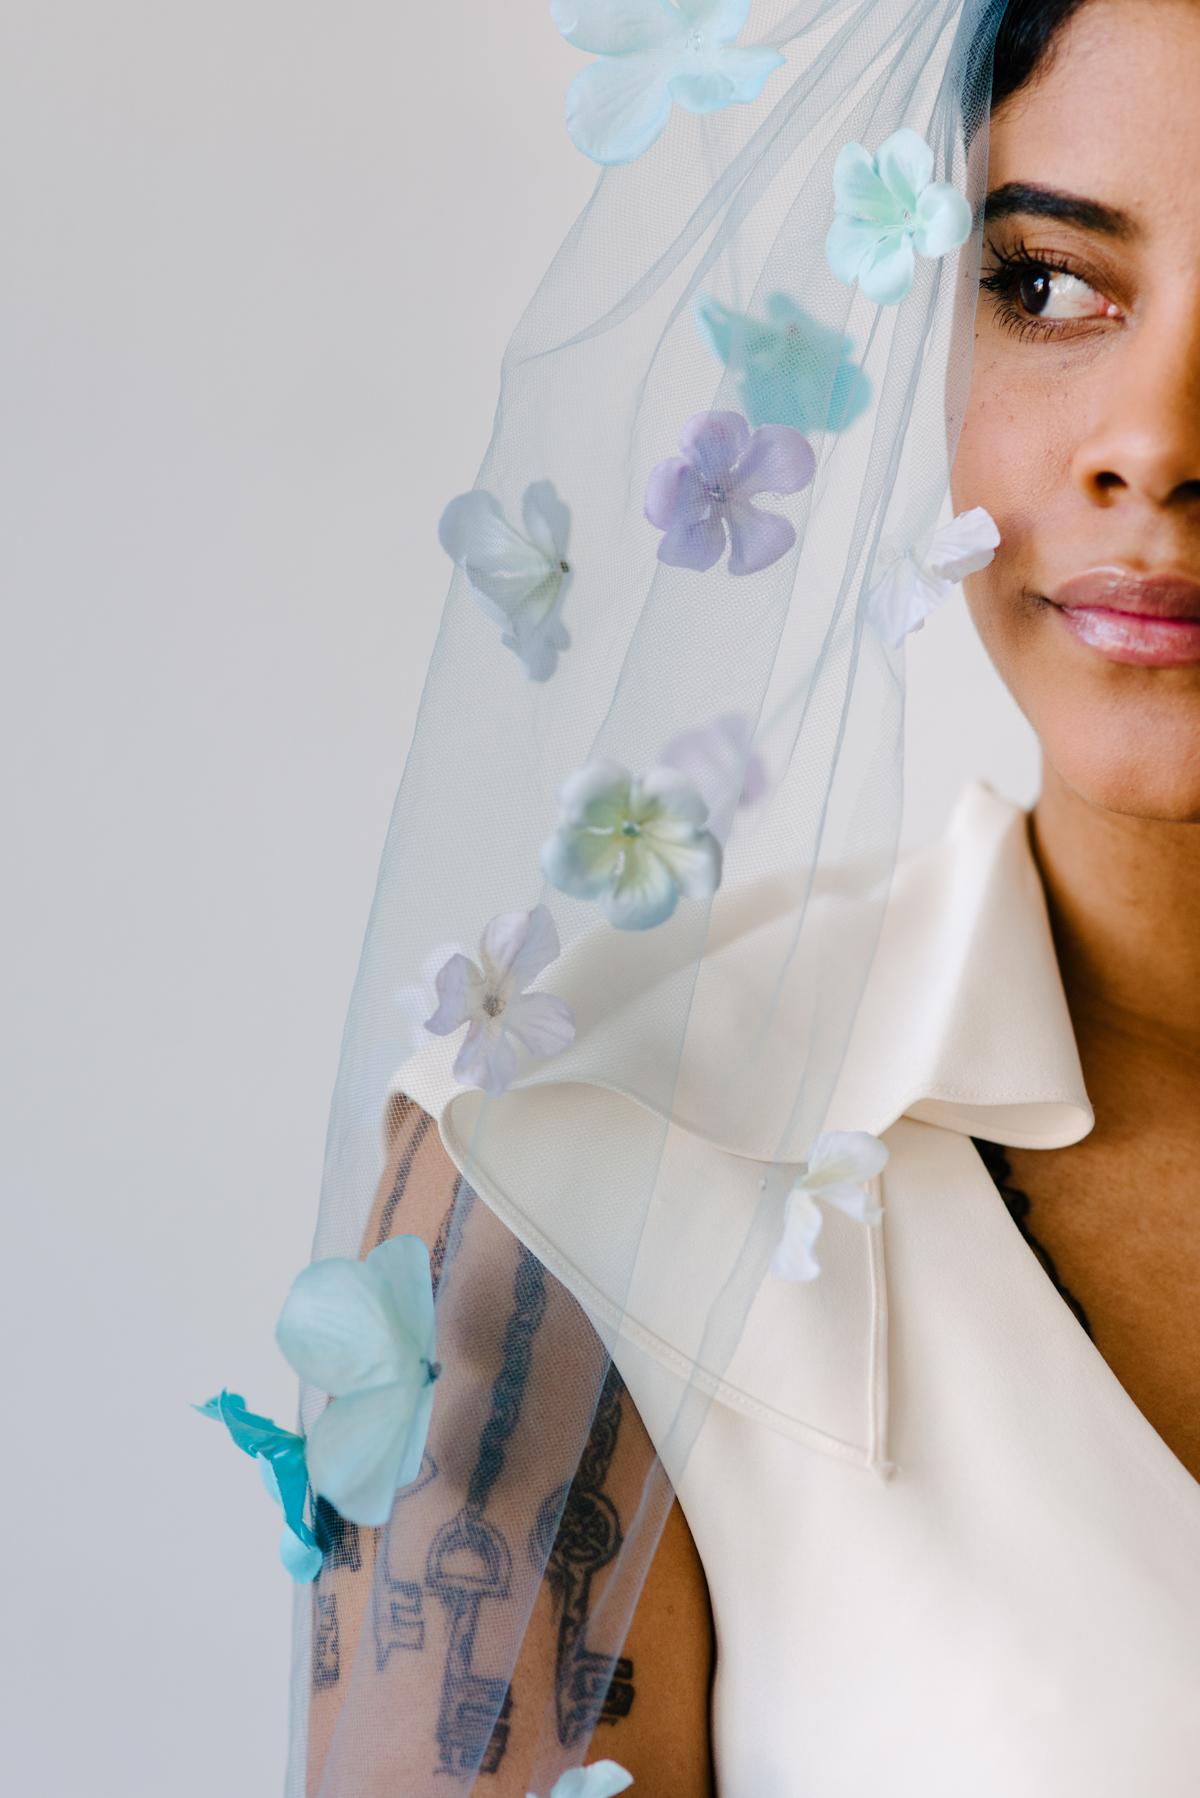
Blue Green Baby
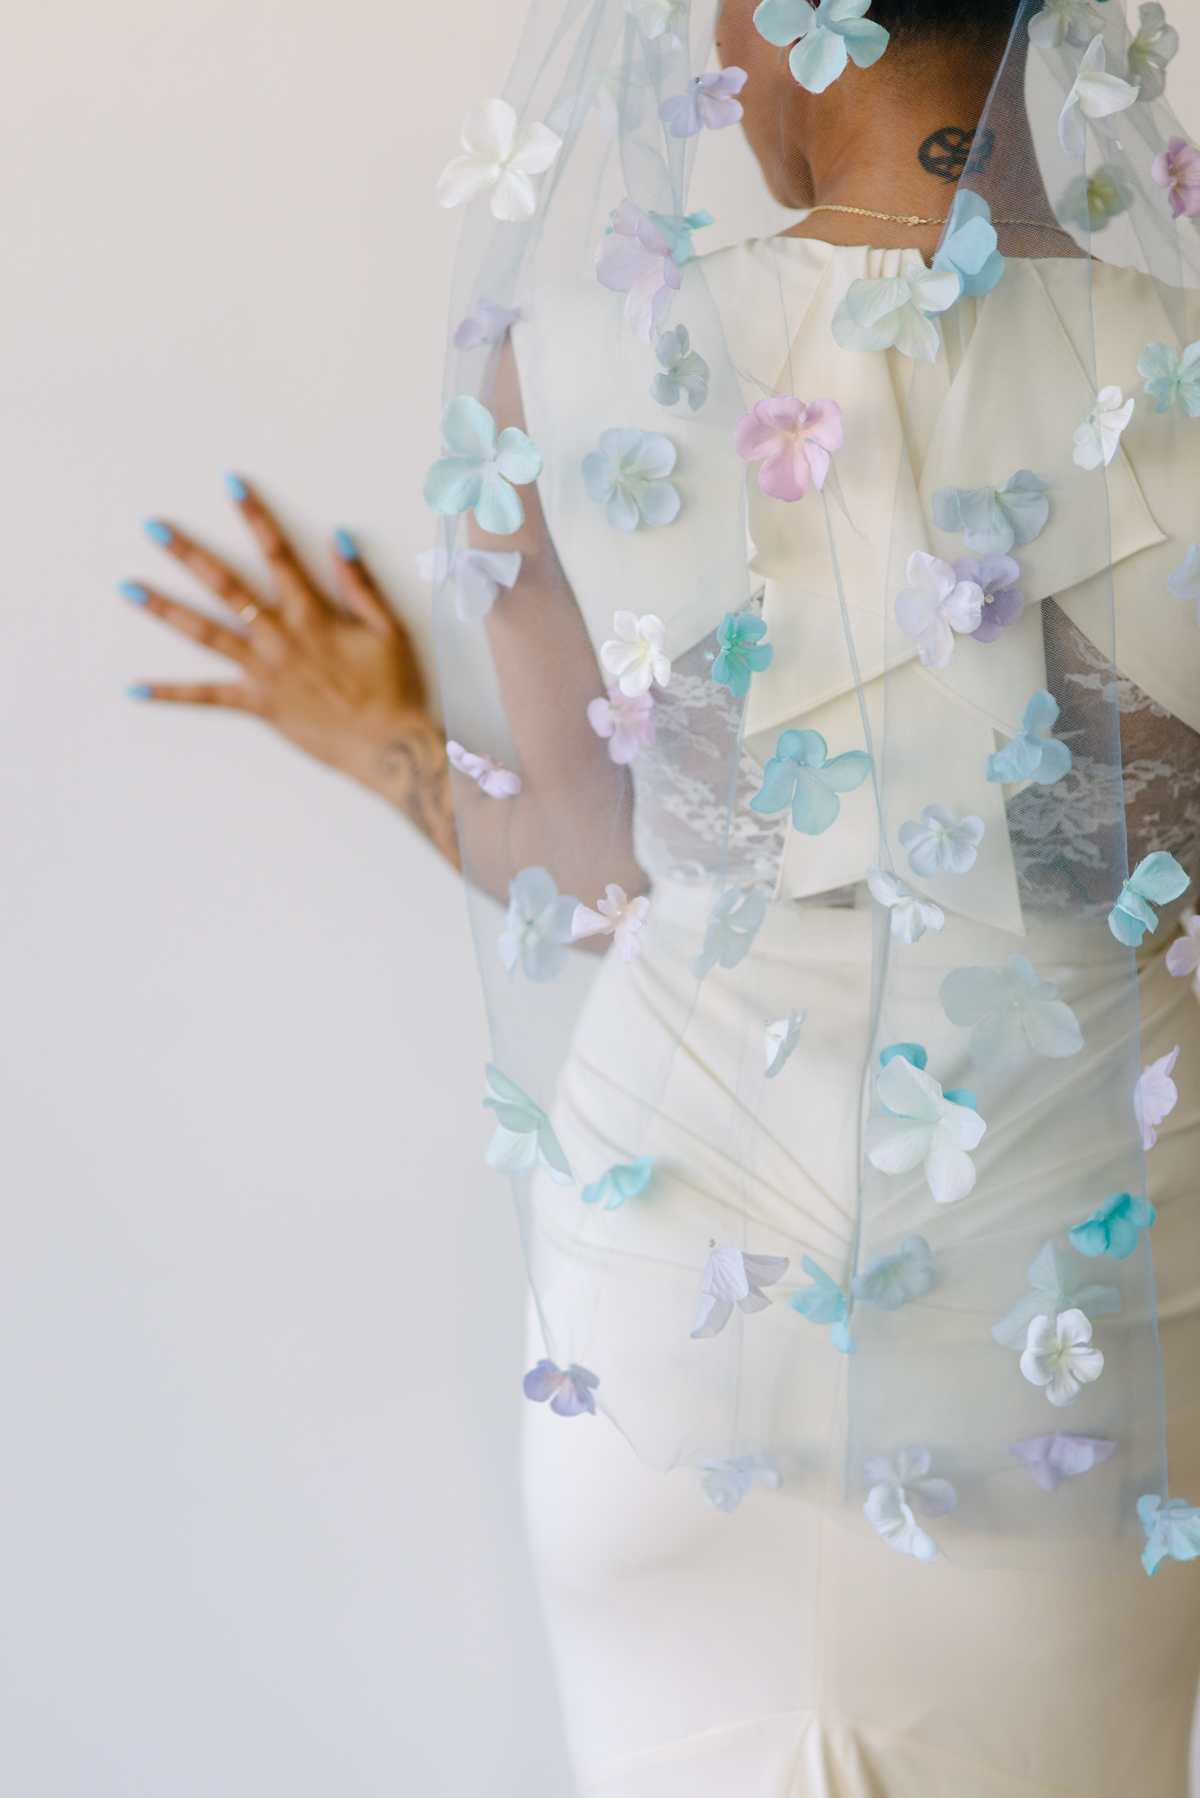
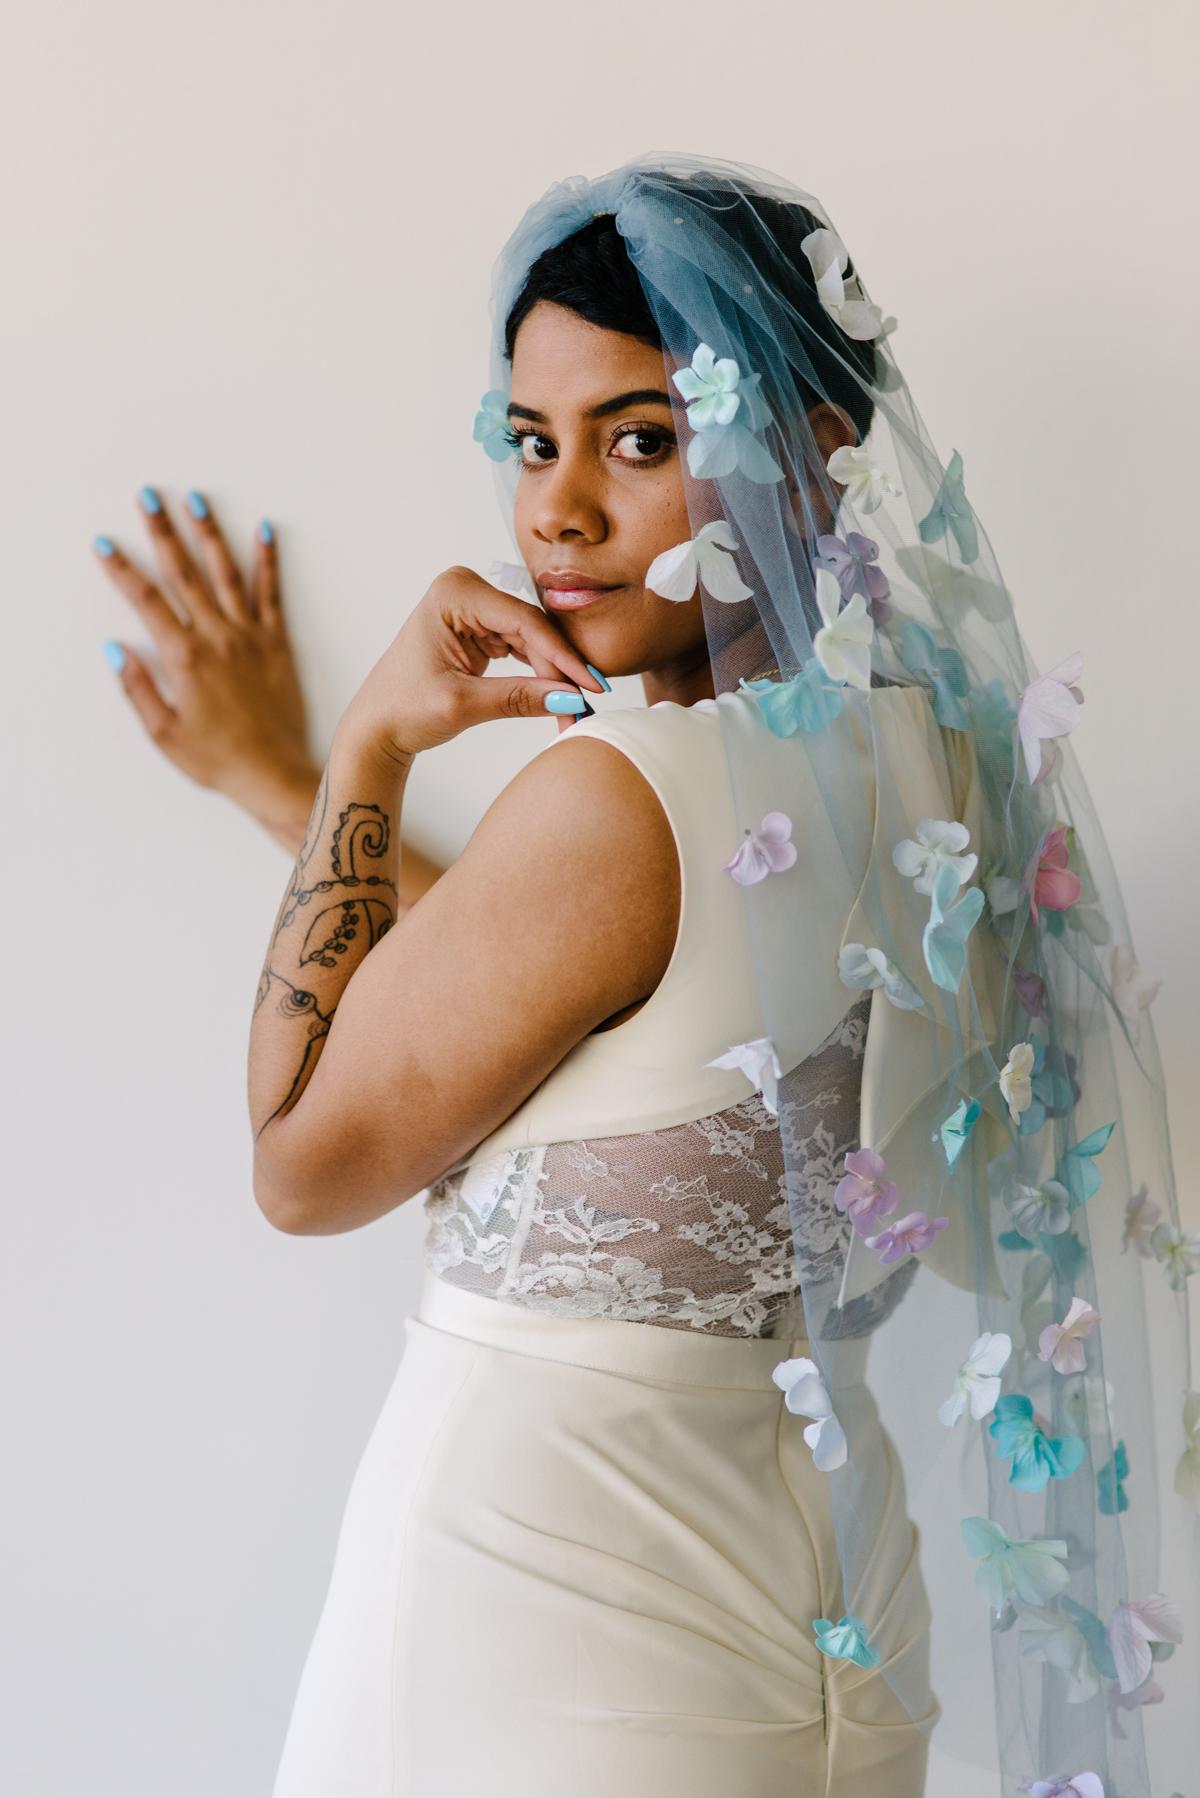
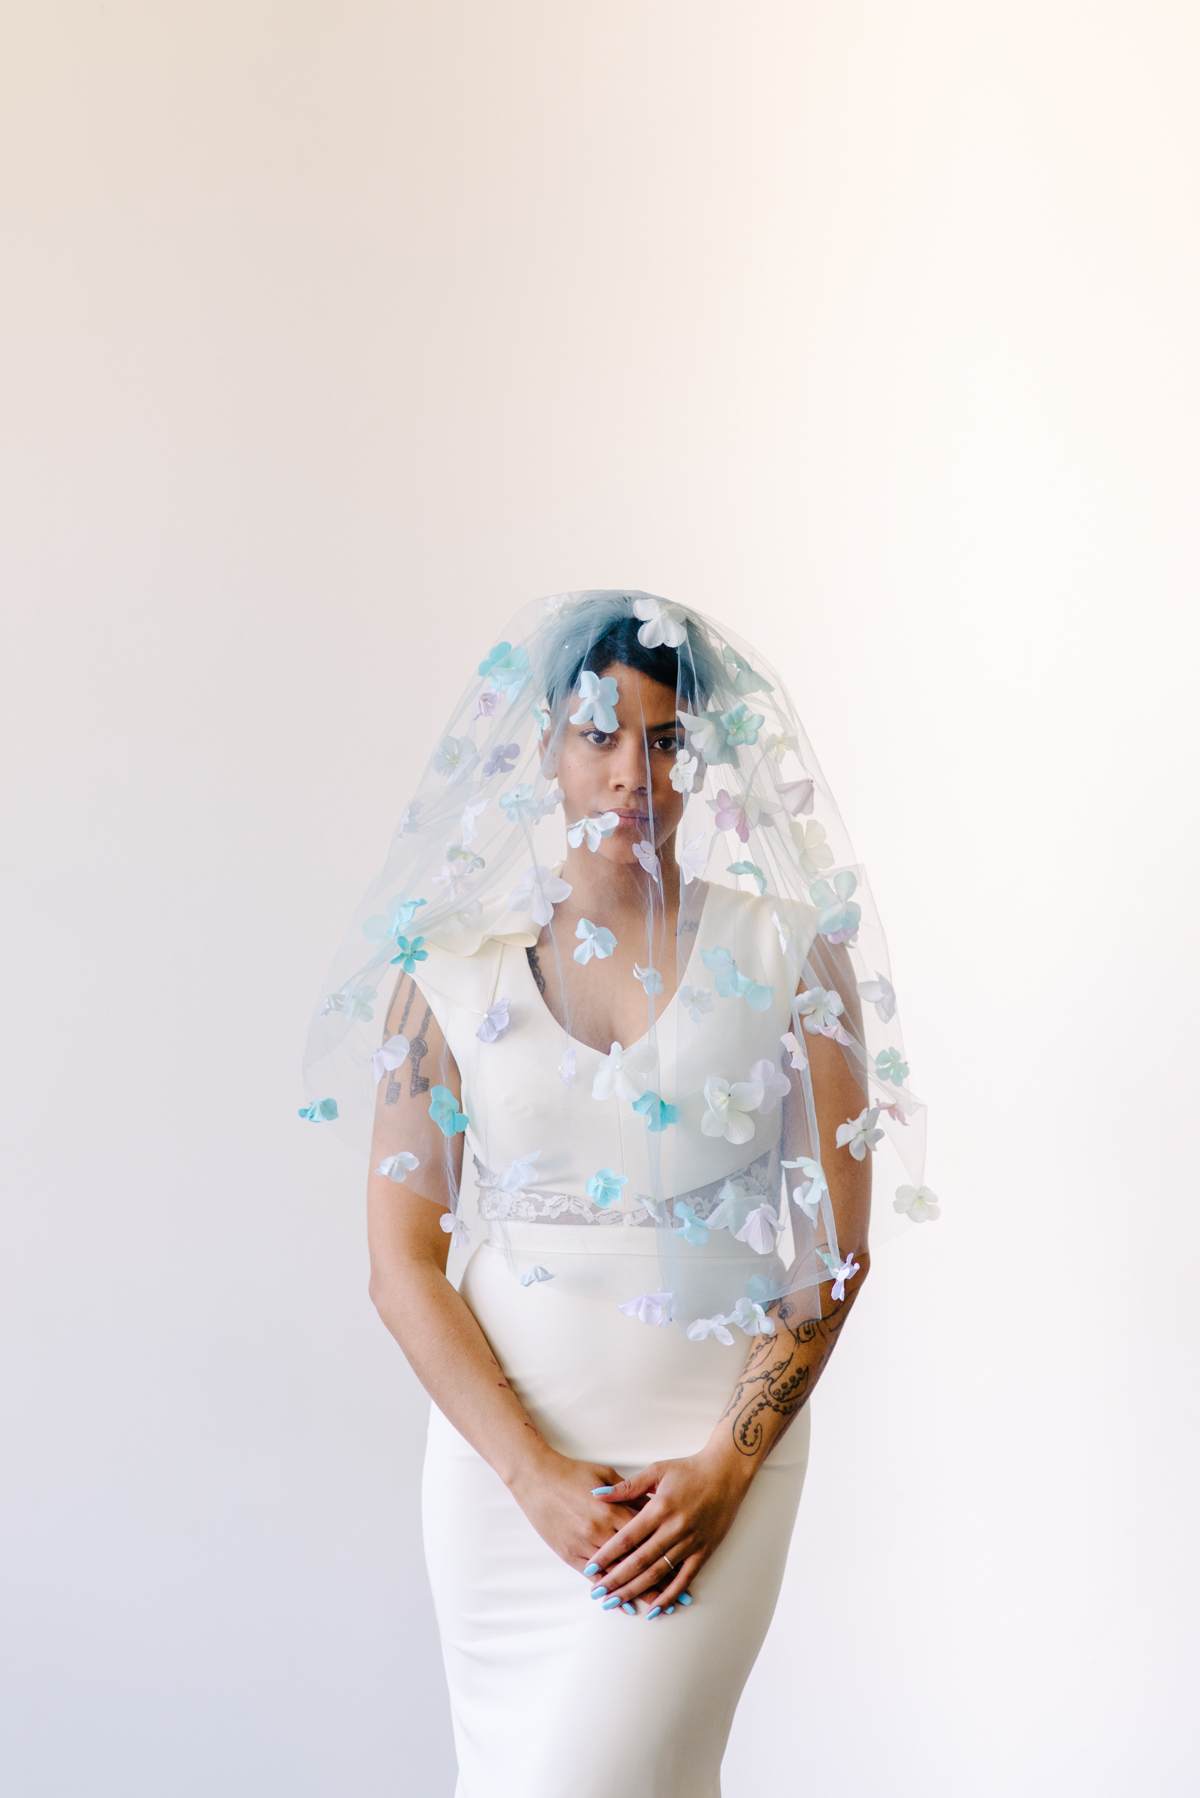
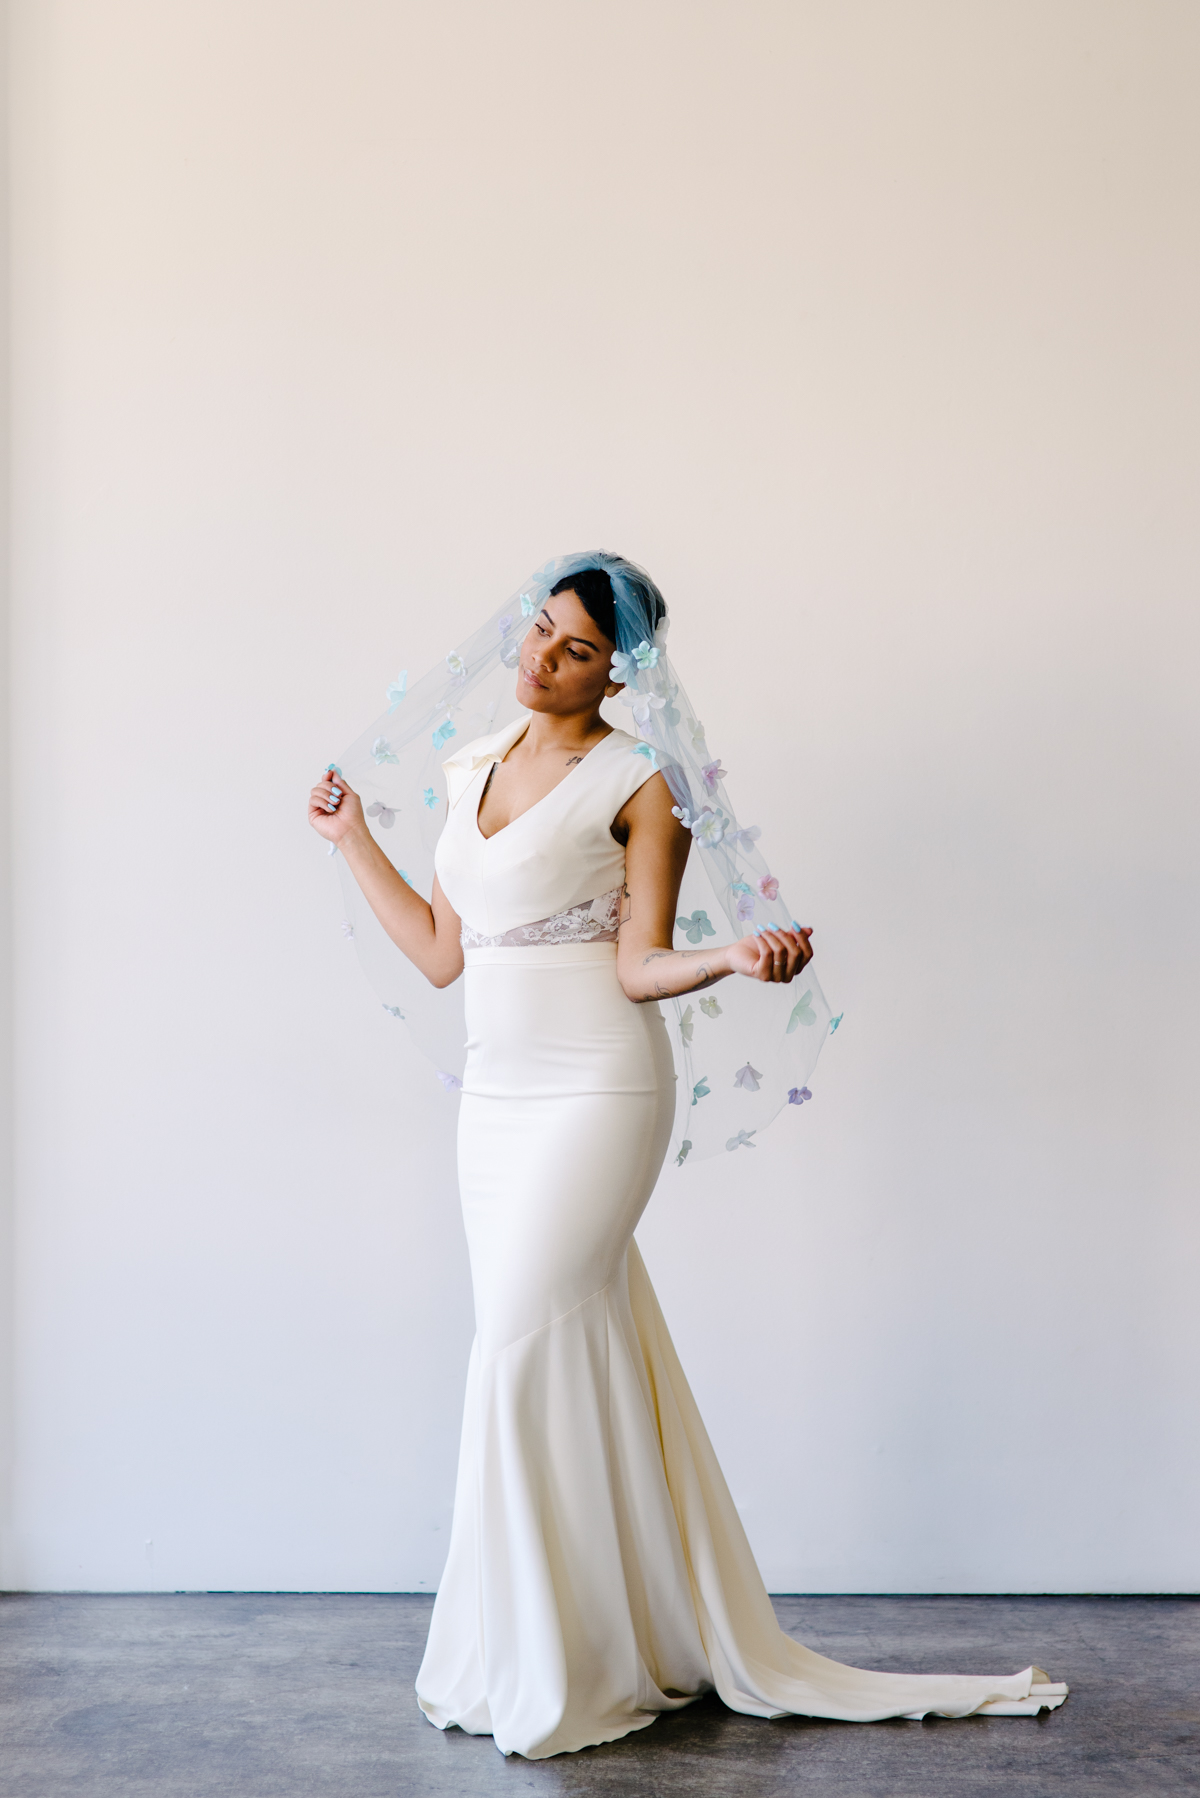
We really liked Rit’s Morning Mist color in their color formula chart, but didn’t have kelly green on hand, so we swapped it out for emerald and came out with a beautiful dusty blue color. Our recipe used half a tablespoon of pearl gray and one and a half teaspoons of emerald green. Pro-tip: This veil already had small rhinestone embellishments, so we used the spacing of those to mark where to sew on the flowers.
Golden Girl
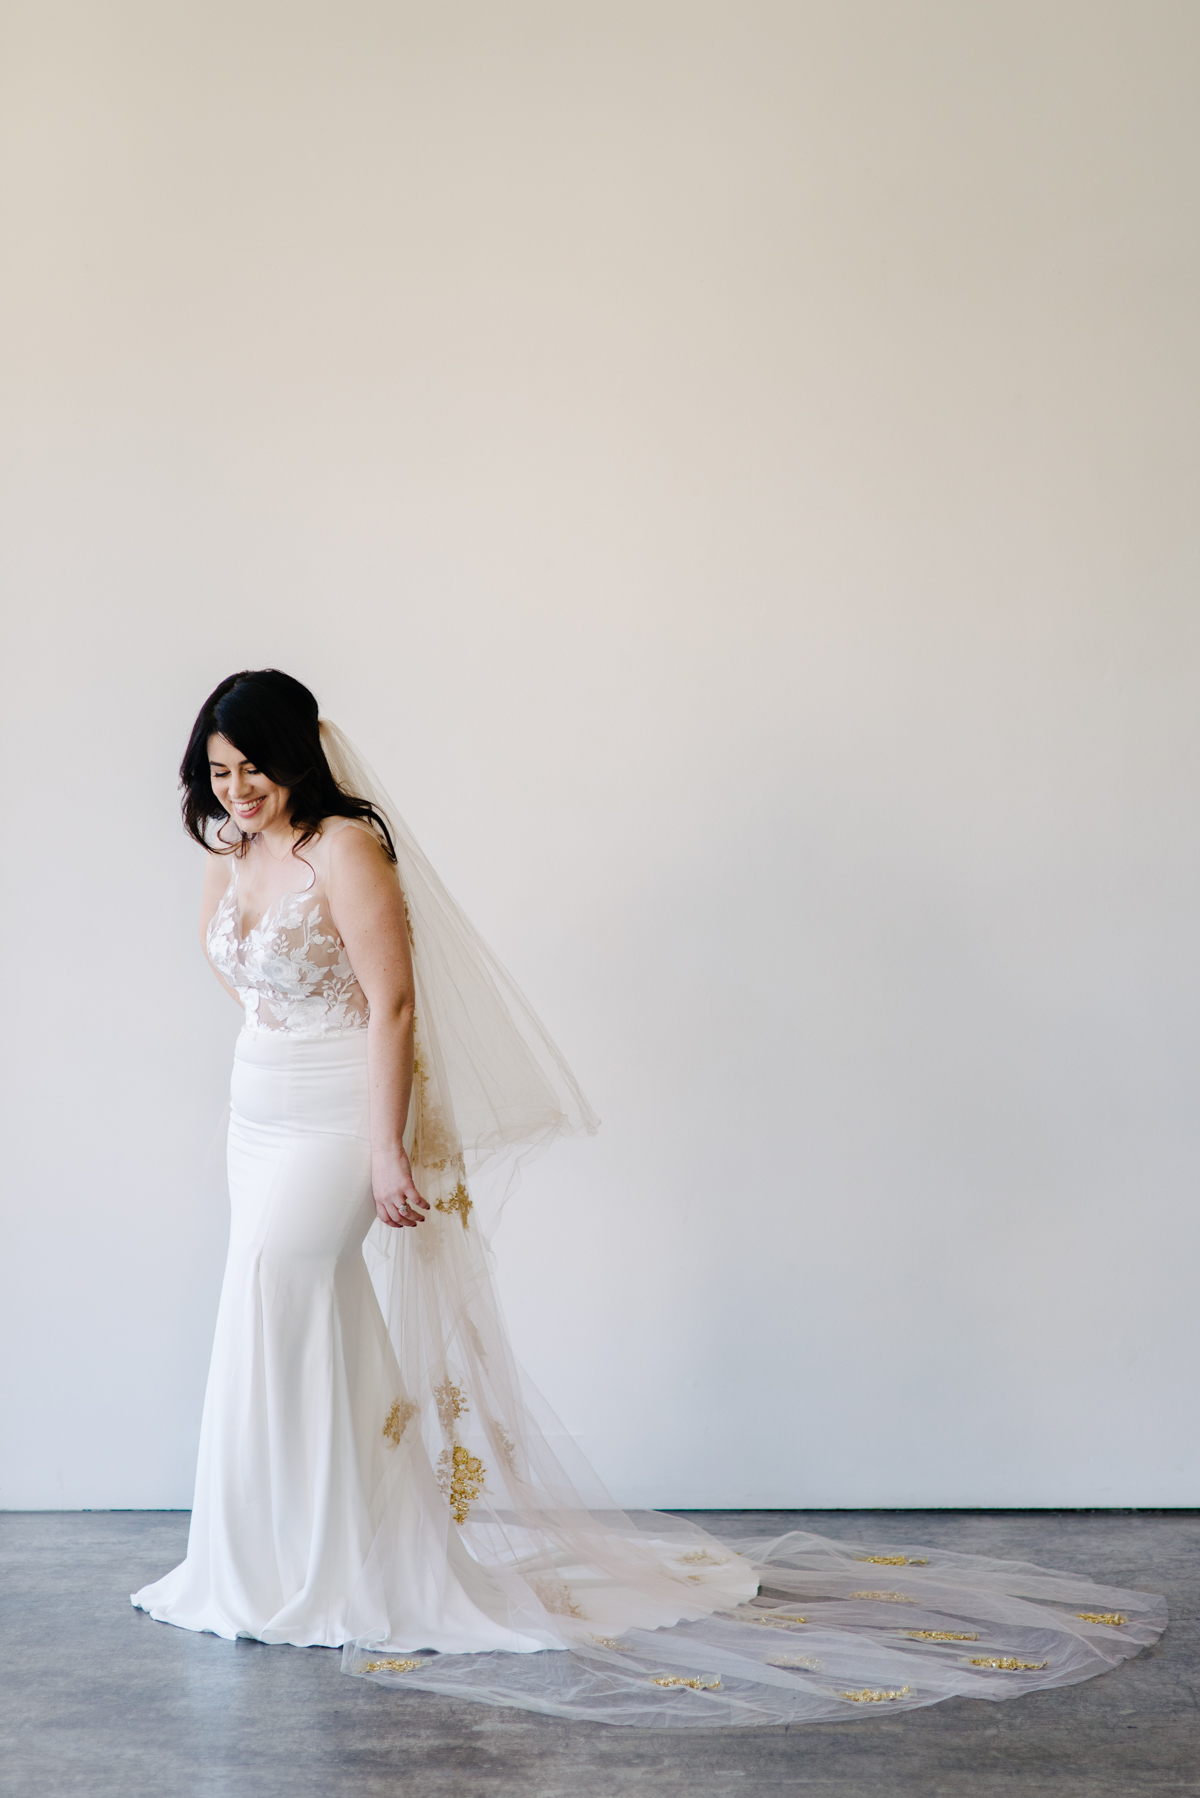
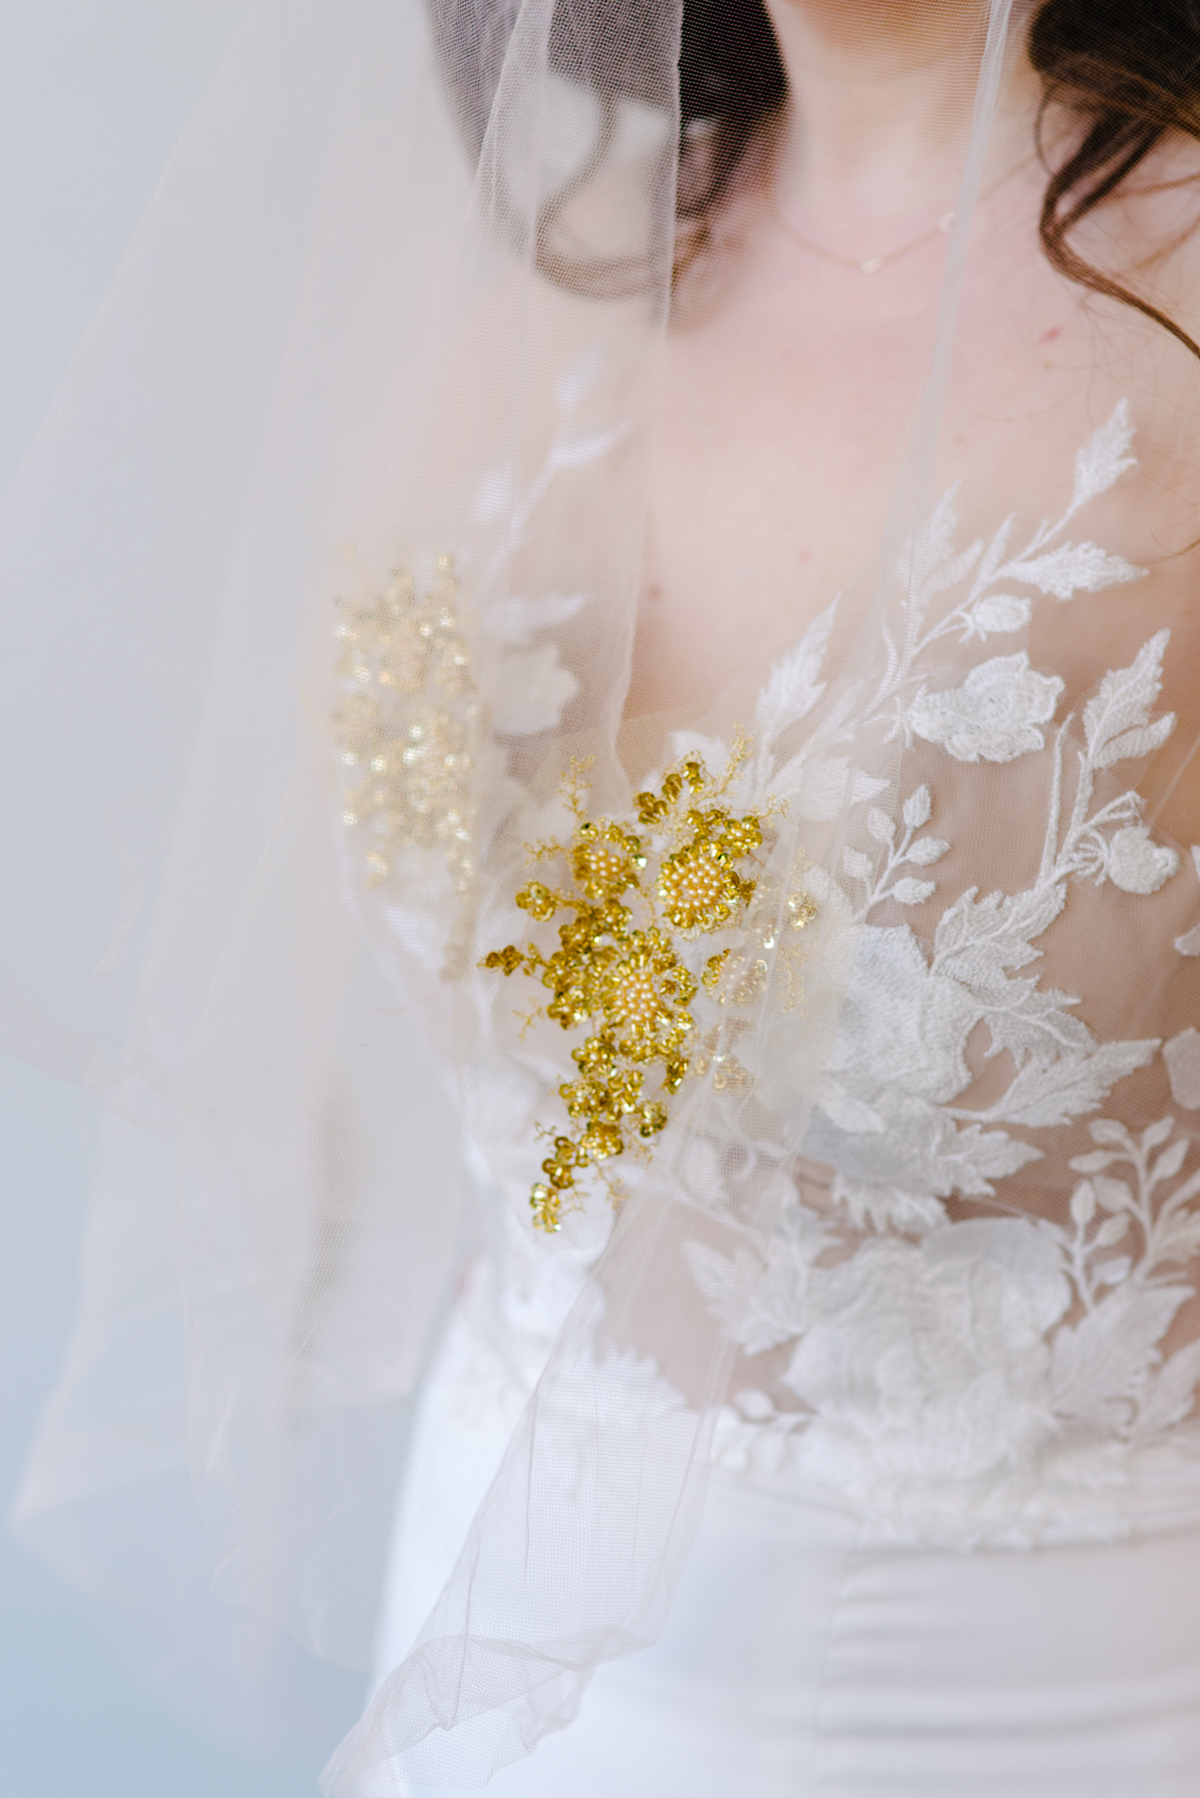
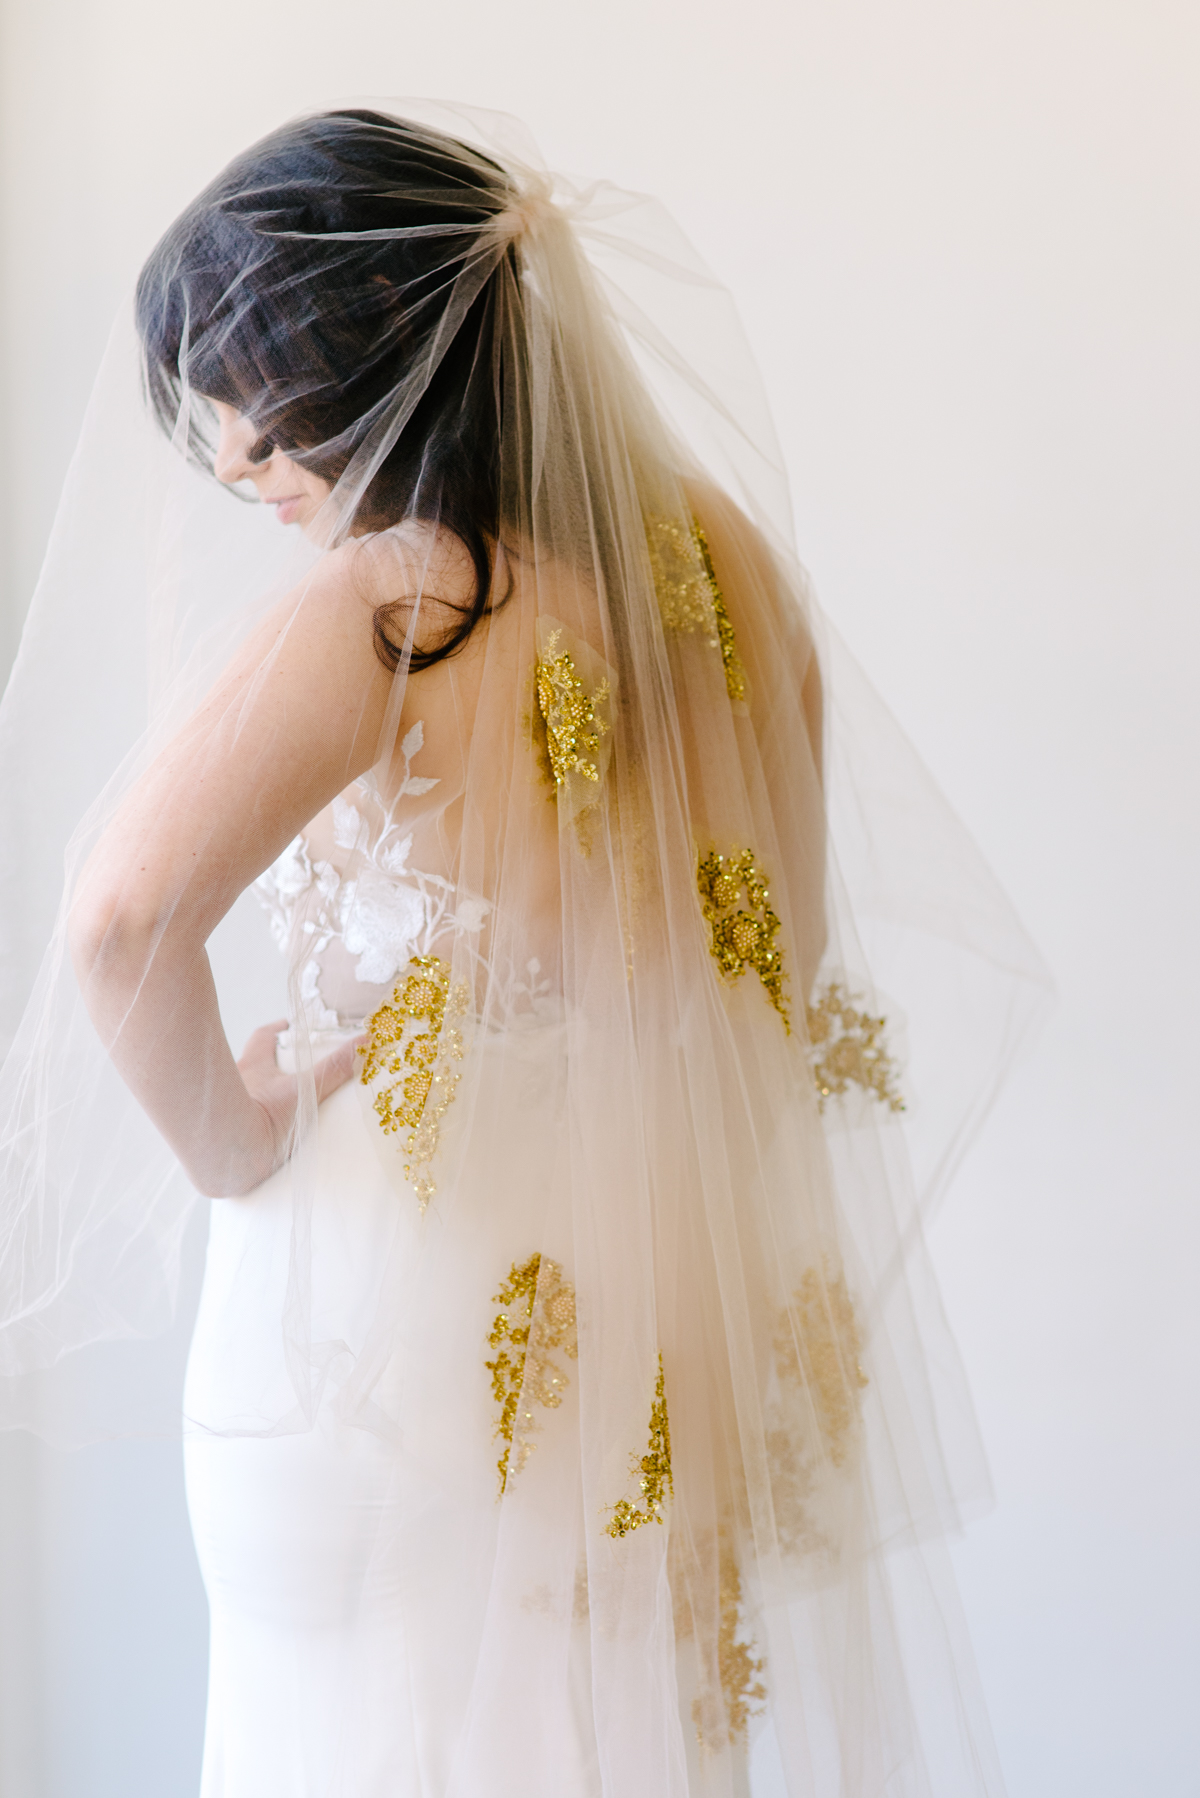

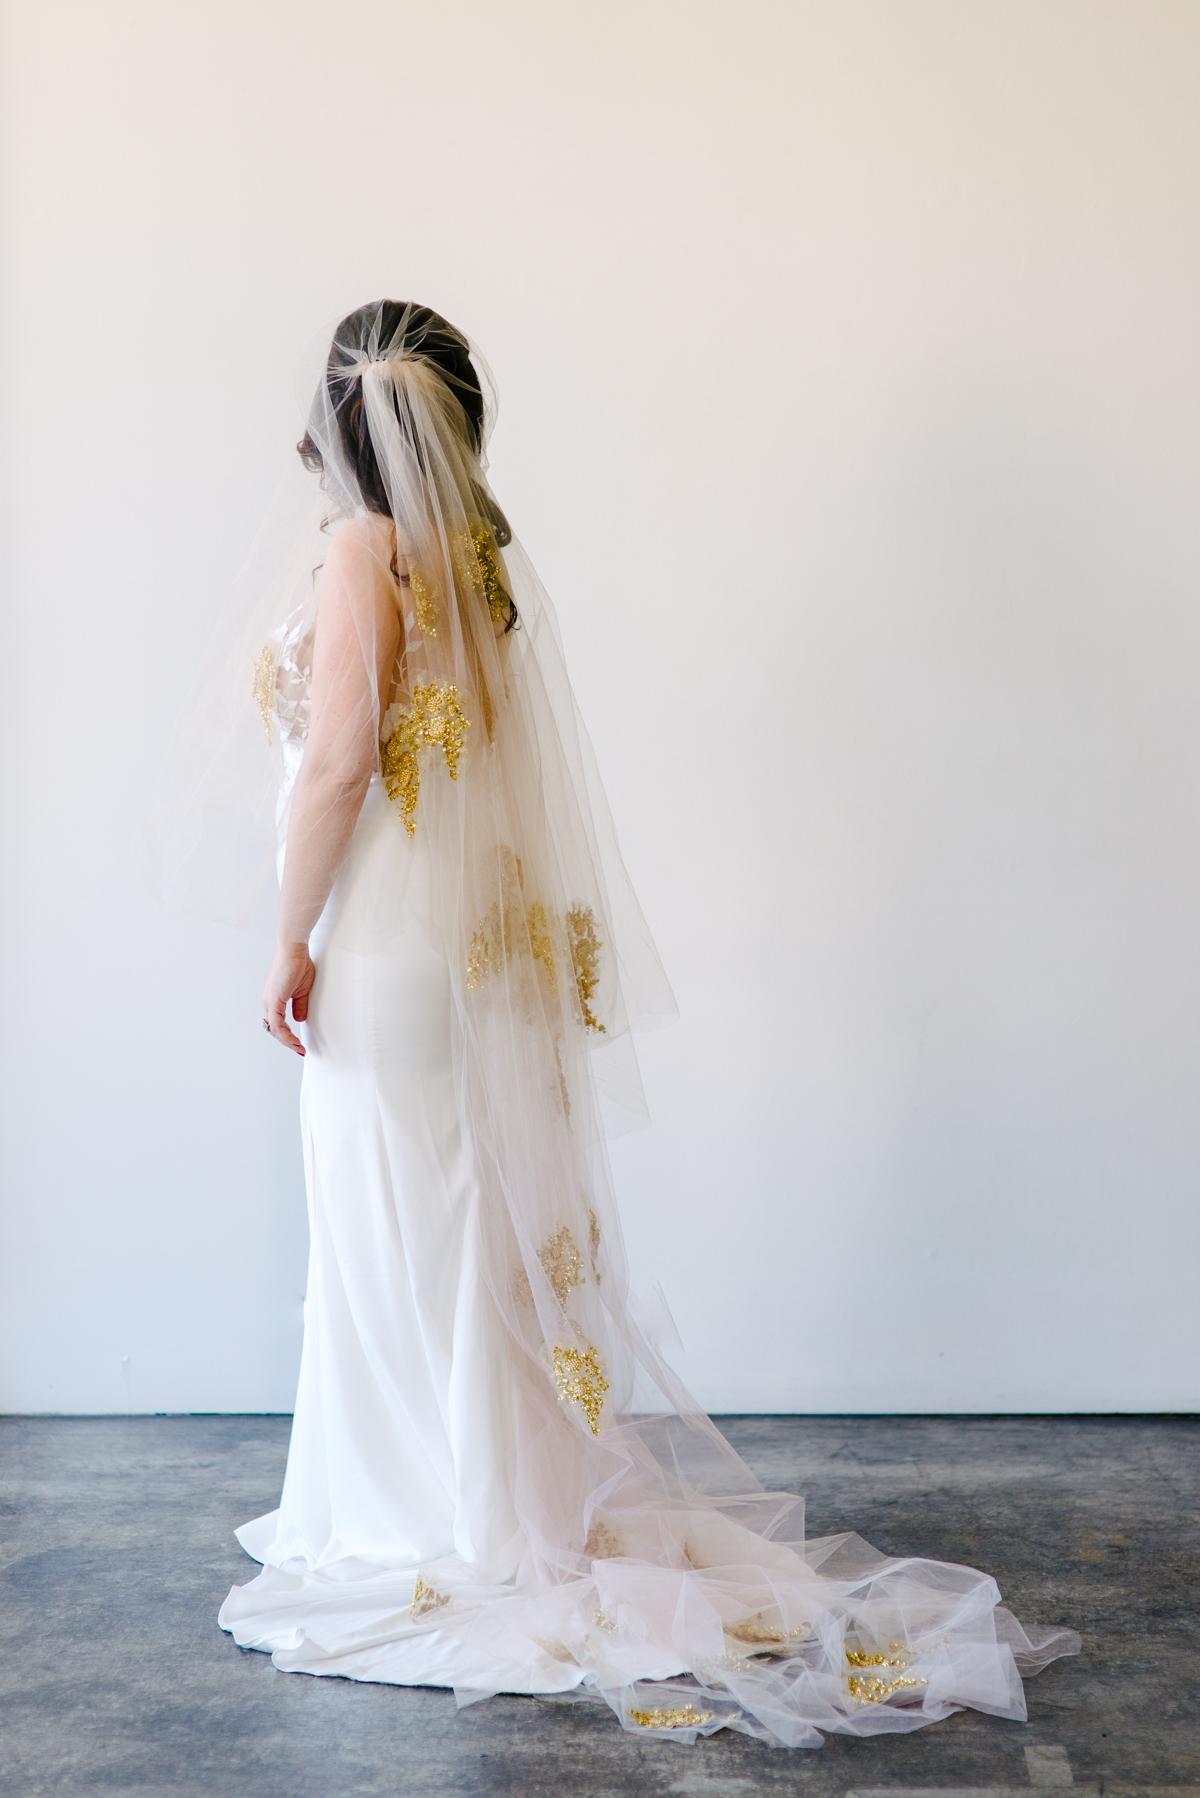
For our final veil, we made our own color formulation using equal parts neon yellow and golden yellow. But what was a lovely buttercup in our swatches ended up Easter egg yellow in large scale. So here’s a fun pro-tip: If you need to dull down a color, give it a very quick dip in its complementary color (that’s the one directly across from it on the color wheel). So for our gold veil, we dipped the Easter yellow in purple for one second (literally) and ended up with my favorite hue of the bunch.

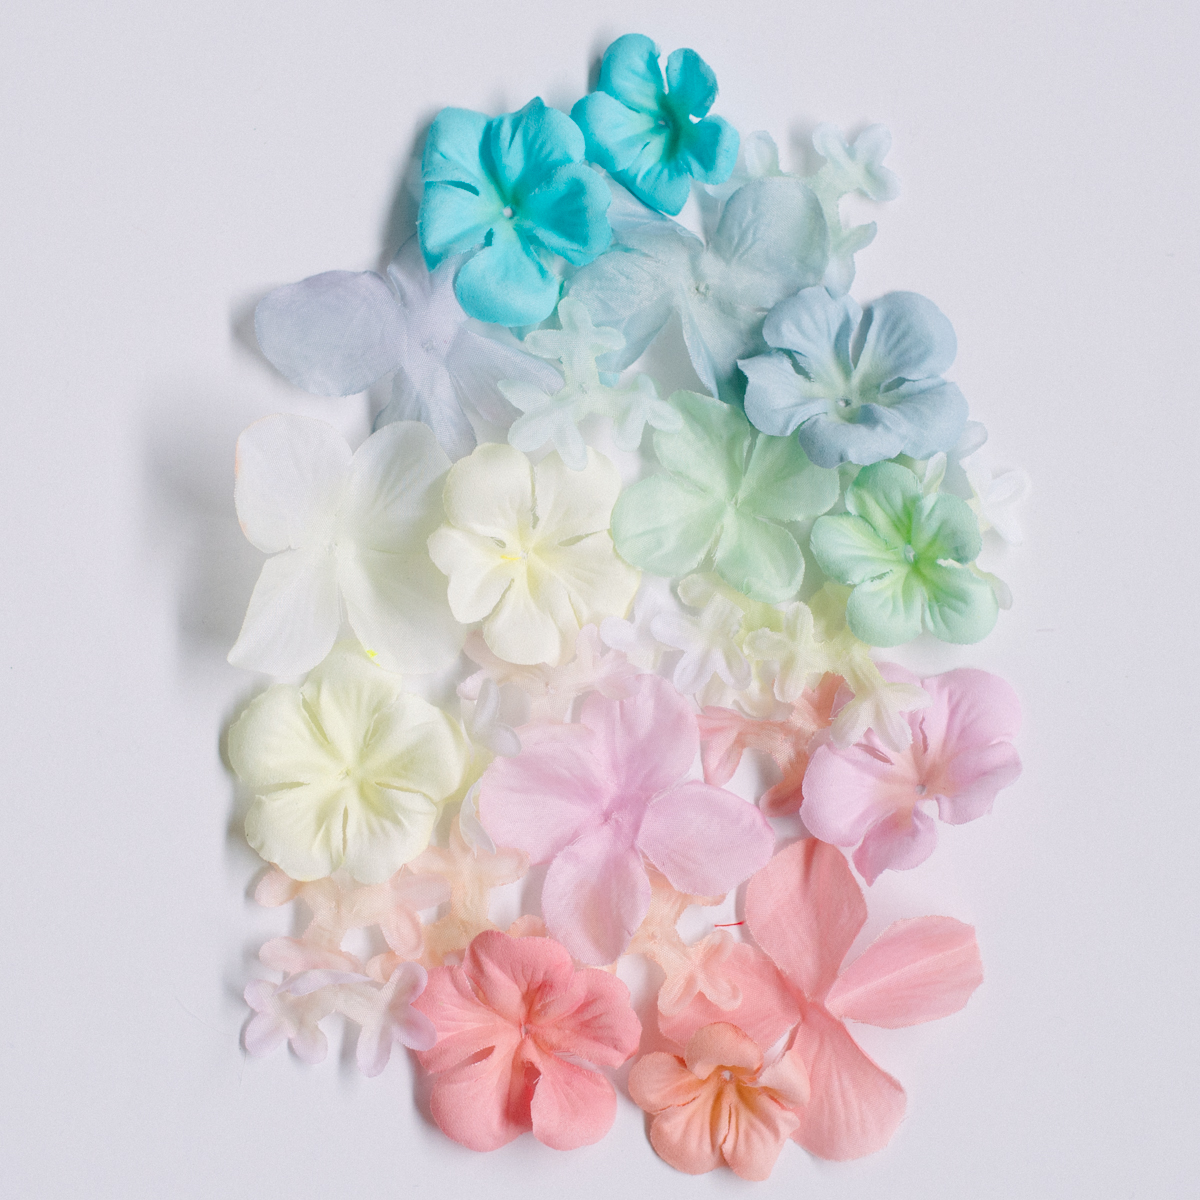
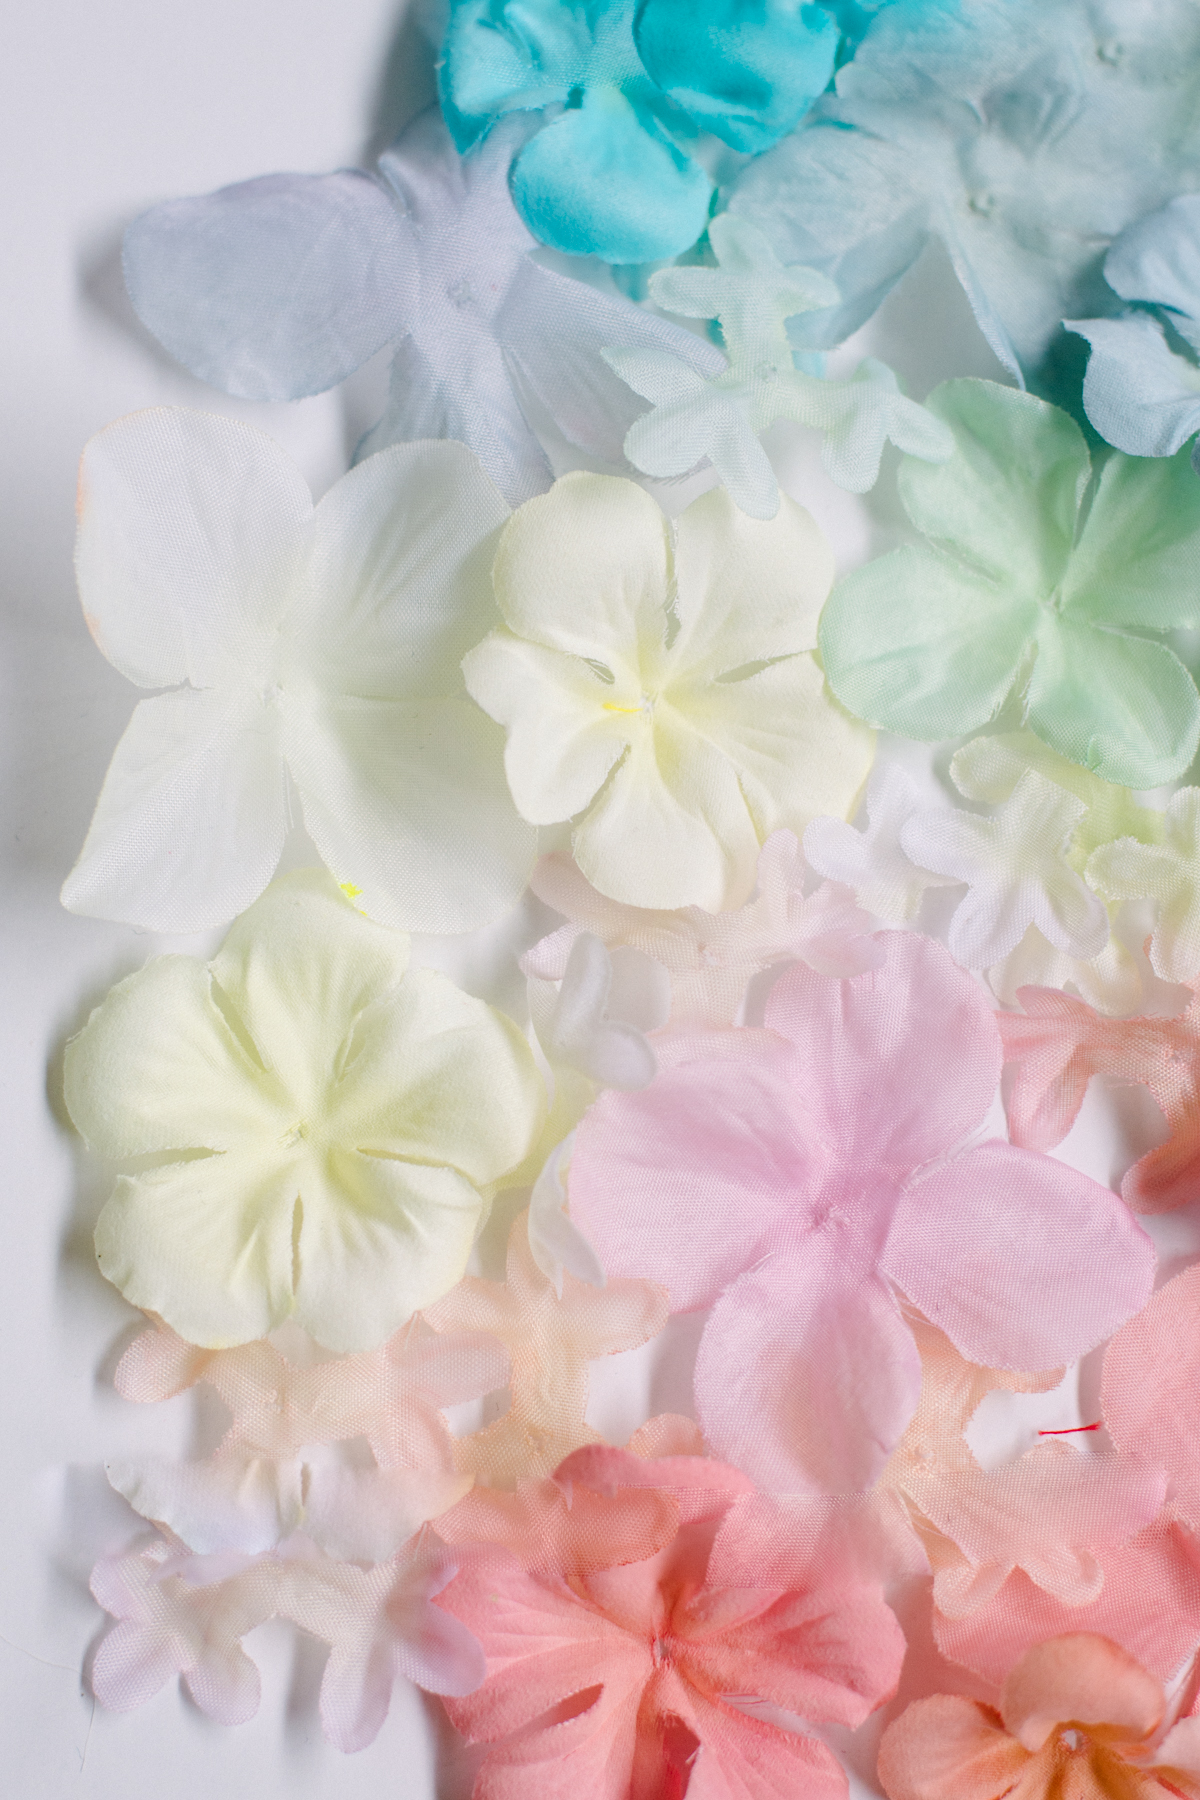
We wanted a variety of colors for our flowers, and didn’t want to spend hours calculating out exact measurements, so for these, we ended up taking what we’d learned in our swatch tests, and pouring out a variety of different pinks, blues, purples (and one or two yellow formulas) in five or six small bowls. You could obviously be more precise than we were, but we were quite happy with the end result.
Five: Rinse and dry. Once you pull the veil out of the dye bath, you’ll want to run it under the faucet for a thorough rinsing until the water runs clear. Then set it out to dry. If you really want to make your color last, though, you can use Rit’s ColorStay Dye Fixative before the rinsing step.
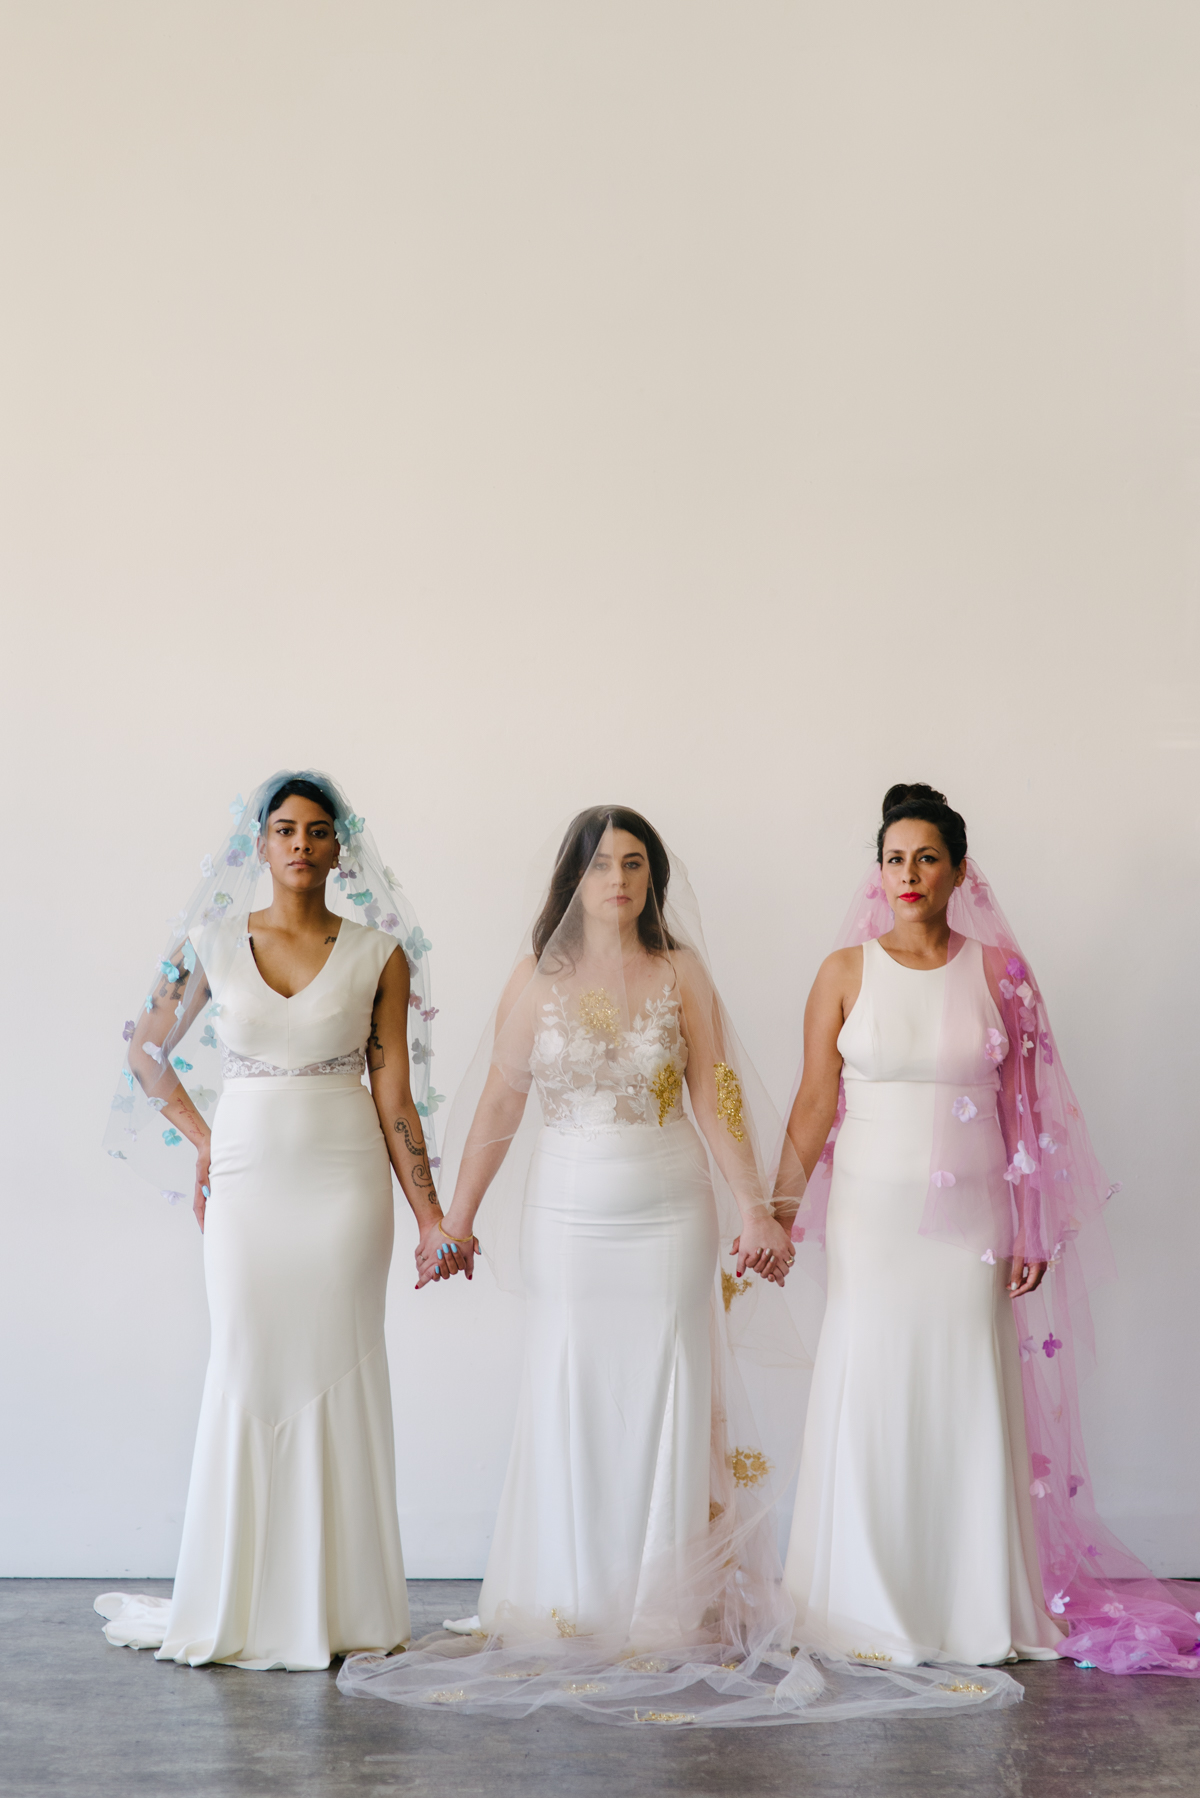
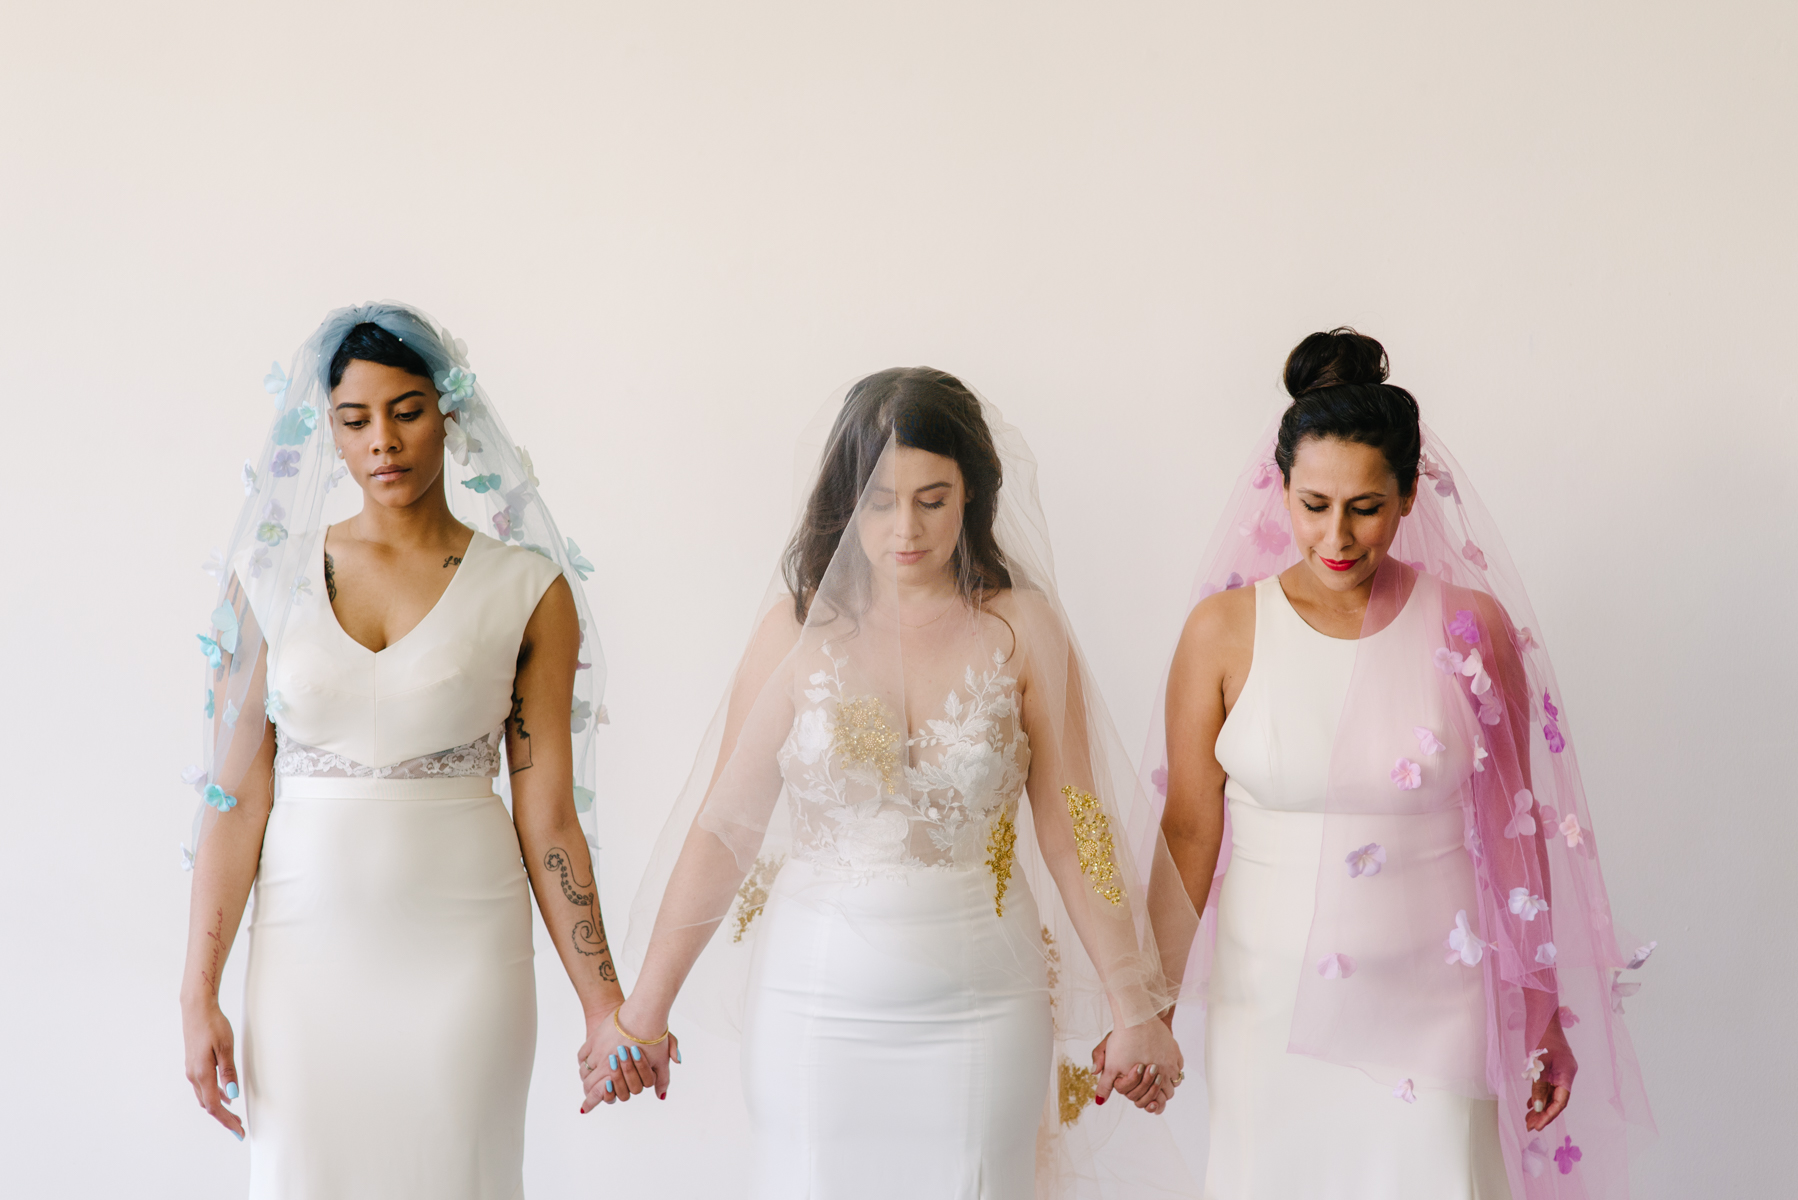
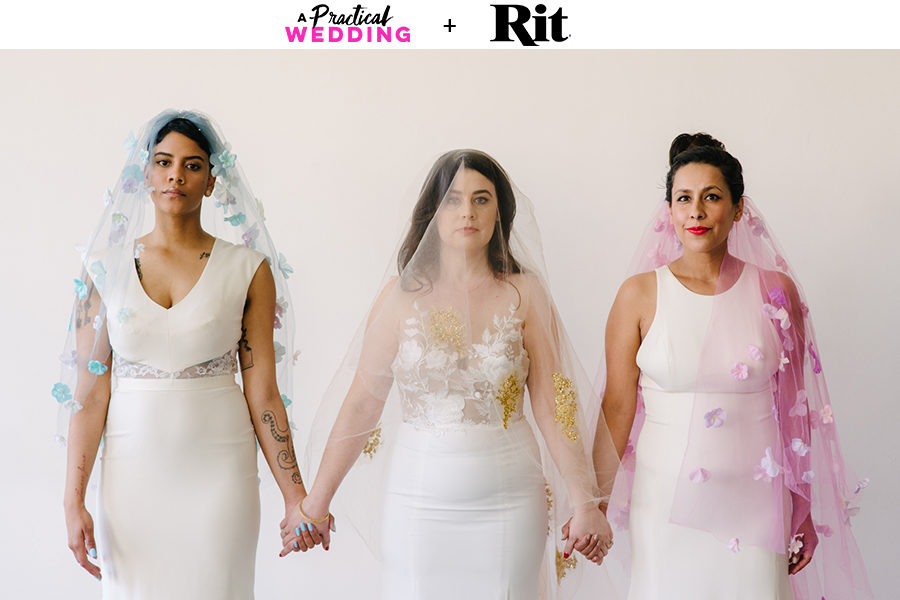
Once we finished our dyeing, I then spent countless hours sewing flowers and sequins all over these veils. And the resulting product is something that I want to—honest to God—tweak and modify and get out into the world. Because they were not only gorgeous, they also made me feel anything but generic. (Also, bonus, you can go BIG on a veil, and then take it off and have a super classic wedding look for the rest of the day.) And while everyone on our team has a different favorite (and my daughter has taken ownership of the huge pink veil) the gold is hands down my favorite, and I want to see it worn in a real live wedding.
Now please, somebody wear veils like these. Color choice: anything under the sun.
![]()
This post was sponsored by Rit Dye (and not the version from your childhood). With dozens of unique colors in easy-to-use liquid and powder form, there are hundreds of custom colors you can create with Rit Dye. Plus with their brand-new selection of dyes formulated just for synthetic fabrics, there is pretty much nothing you can’t dye with Rit. Click here to explore Rit’s Instagram and get inspired for your next project. And thanks Rit Dye for letting us live out our Project Runway fantasies this month!

