I always try to emphasize theory before tools when learning design, which is how I learned. But the comments from the inaugural Graphic Design 101 post, and some of my own foggy memories have reminded me that it can be helpful to understand which tool to use in order to create a great layout, set type, or for just designing in general.
Before I create a list of options, I do want to stress that it can be incredibly helpful to go with what you know. If you’re on a timeline, it can be frustrating if not downright impossible to get the hang of a new program. A really clever design can be realized in almost any tool. So enough of my caveats, let’s get down to brass tacks:
MS Office or Apple Productivity tools.
Word, PowerPoint, Pages, or Keynote are designed for document or presentation production, but they can all easily be used to create cards and stationery. Here’s a short overview of some of the things you can do:
If you don’t already have these programs, most offer free thirty-day trials. These general productivity programs tend to be a bit easier to learn and don’t assume specialized knowledge. These tools are great for designs that don’t require complicated photo editing work or the creation of intricate patterns. You can still import images, though! Just remember they should be hi-res (300 DPI) for printing. (If you’re not sure about the quality of your photo, right click on the photo file on your computer and choose “properties.” There should be a details tab that will tell you what the DPI is.) If you’re not printing your designs at home, just remember to save the final version as a PDF for the copy shop or printer.
You could easily create a design similar to this tandem wedding invitation in any one of the above programs:
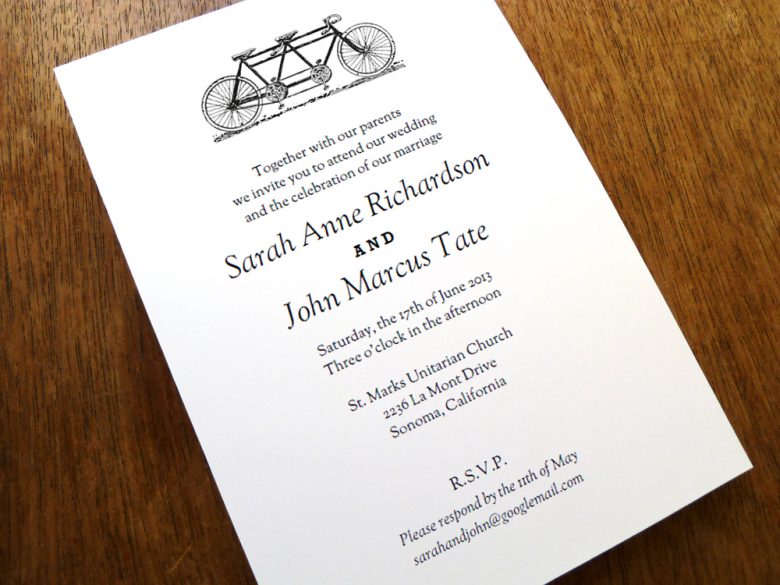
For the above, you’d need to set up the document for your desired size (i.e. your invitation is probably not an 8.5″ x 11″ document), import the tandem bike image, and add your text, working the font sizes and settings until you get the look you want.
Adobe Creative Suite (Adobe Creative Cloud)
The big guns: Photoshop, Illustrator, and InDesign. These are sophisticated tools created for the professional user. Having said that, if you go on to YouTube you’ll find tons of tutorial videos. If you’ve never used these programs, trust me that you’ll need the tutorial videos; there is a steep learning curve.
All of these programs have overlapping function and features. Photoshop was created to manipulate photography and for creating photographic effects. Illustrator is for creating illustrations and manipulating vector graphics. Adobe InDesign is for creating layouts and heavy-duty documentation like books and ebooks, but could be used for stationery design.
Here are just a few of the advanced features that these tools offer over general productivity software:
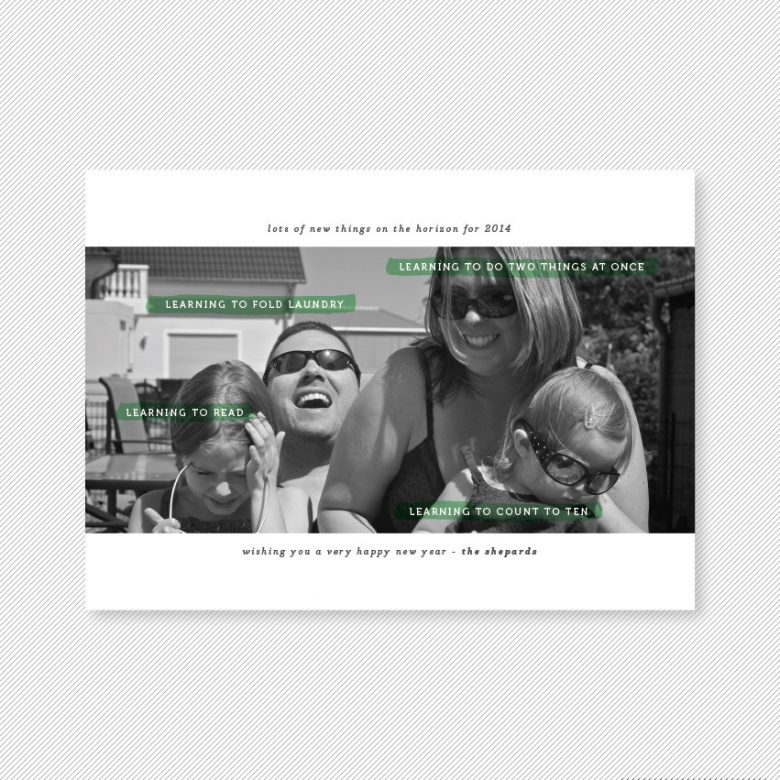
- The ability to work on layers: Layers (which you’ll find in Photoshop and Illustrator) allow you to alter and edit some parts of a design (on one layer) while leaving others unaffected (sort of like working with an art project, layers let you move individual elements before you glue them down, so to speak). For example, you might have a visual element, like a photo serving as a background layer, and your text on a layer above it. You can move the text around to different areas of the layout to see how the variations appear without affecting the image background layer. This holiday card from Up Up Creative demonstrates one way layers can be used, with the captions likely created on a separate layer than the image:
- Sophisticated image manipulation: Not only can you create Instagram-style filters, but you can also do detailed photo editing with these programs, such as masking: selecting a certain shape or element within a photograph and touching it up, changing the color, etc., as well as doctoring up photos that may not have been optimal right out of your camera by using features like white balance to brighten them.
- Creating vector images: If you want to digitally “draw” an element, Illustrator is the program use, to create what’s called a vector graphic. Although, this takes a lot of training, what I do is either start with a scanned line drawing, and use the “Trace and Expand” feature to turn it into a vector format, which can then be altered. Alternatively you can use a stylus so you that it’s more similar to drawing with a pen and paper. For example the background flora imagery in this invitation suite is all vector art layered together or arranged to create one compound image:
- Pattern creation: Among a million other features, Illustrator allows you to take one small visual element, like an ornament or a series of small flowers, and quickly turn it into a full-blown pattern.
- Paths: Whenever you see text that is an arc or not in a straight line (see example below) it has been set on a path. In other words, an invisible shape (half circle, diagonal line, zig zag, etc.) has been created and the text has then been placed and set on this path to mimic the shape. For example, the text on the A Printable Press invitation below that reads “The Twenty-Fourth of September” and “Half Past Four in the Afternoon” has been set on a path:

- Advanced typography control (letter spacing, kerning, line spacing, etc.): I will talk more about typography and type setting in a future post. For now, suffice it to say that if typographic accuracy is important to you, you should opt for one of these tools rather than the Office/Mac tools.
In the past, these programs were mostly cost-prohibitive if you were only hoping to use them for your wedding, but luckily Adobe now offers subscription-based use, so you can get monthly access to many of Adobe’s programs for around $30/month (some require year-long commitments, so just keep an eye on the fine print). You can also download trial versions of the software. A great (but not free) resource for learning these heavy-duty programs is Lynda.com.
Here are two more designs that would require these types of sophisticated tools and would be difficult if not impossible to create in less industry specific programs:
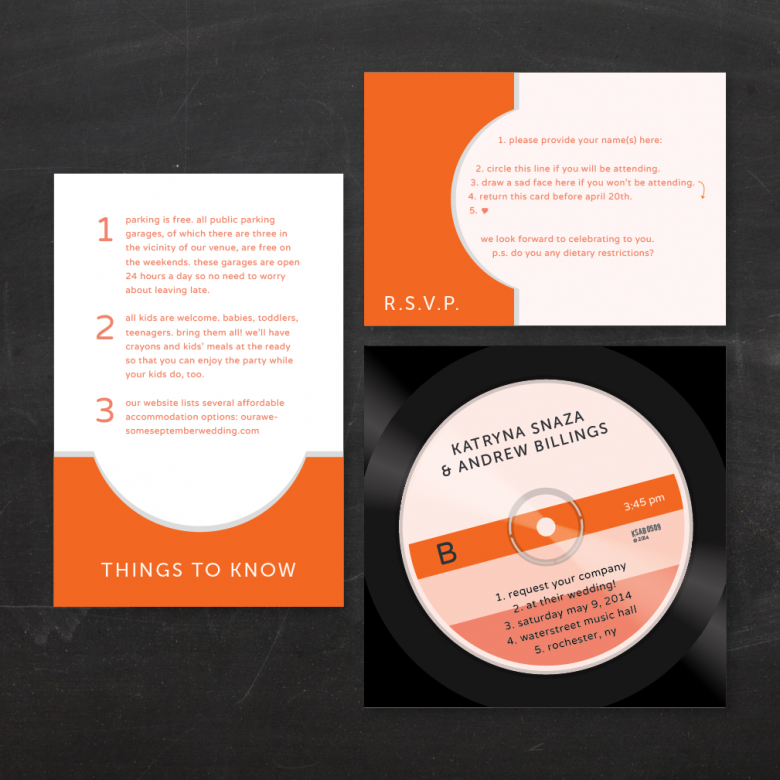
This record wedding invite above uses some dimension and reflection effects found in tools like Photoshop or Illustrator.
Same thing with this wedding invitation from A Printable Press:
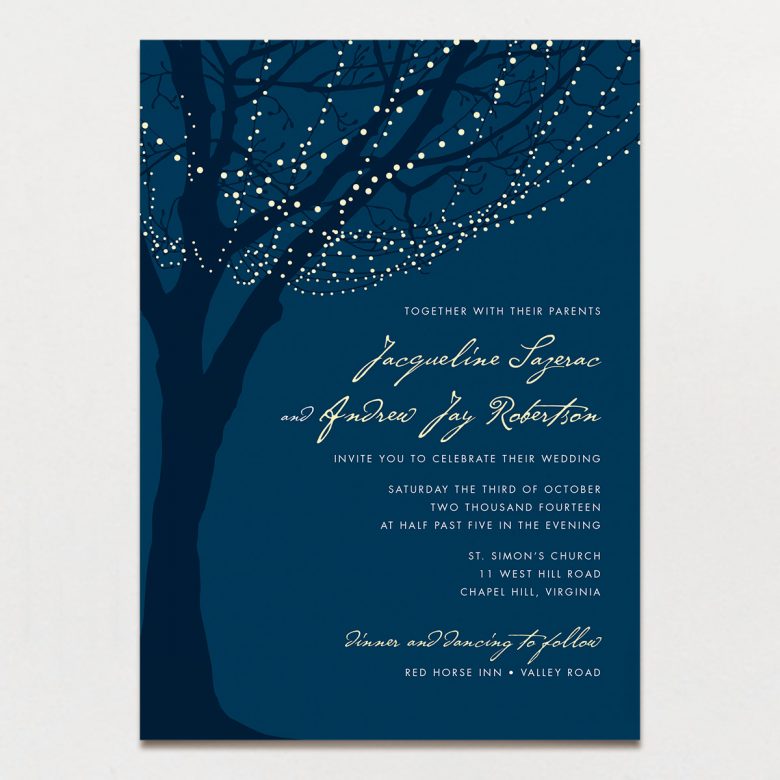
The image of the tree, lights and background are most likely vector art and are most easily created in a program like Illustrator.
“General Public” Design Tools
These are free tools that either mimic some of the Adobe Creative Suite programs, or are simpler, less feature-rich versions that don’t require as much ramp-up to learn how to use them.
- Pixlr: A free, web-based “Photoshop Lite” type tool. Includes layers and pretty sophisticated photo editing tools, but minimal typography control. (Side note: because it’s web-based you won’t be able to copy-paste screen shots into images.)
- Seashore: A Mac-based program, again “Photoshop Lite” but with some interesting filters. Download includes a user guide.
- Gimp: Available for both Mac and PC, Gimp is a free desktop application that also serves as a “Photoshop Lite” tool. It allows layers, and you can use any fonts that are installed on your computer with the program. There is a lot of online support for Gimp as well since it’s been around for a while, so you can troubleshoot the program pretty successfully through YouTube tutorials.
Design Your Own…
I researched several software packages or services for designing your own wedding invitations, but I can’t recommend any of them in good faith. They either have pre-made (and ugly!) templates that you can customize, so it’s not really designing from scratch. Alternatively, the palettes and images on offer are pretty clip-arty. In future posts I’ll talk about resources for good imagery.
One neat tool I did discover is Martha Stewart’s (of course!) app called “Craft Studio.” It seems to be targeted toward the scrapbooking set, but you can clearly use it to create invitations. It’s not strictly a design tool, in the sense that you start with a blank slate. The app provides elements, imagery and “tools” (glitter! punches! stamps!) that you can choose from to create a design. From what I can tell you can only import photos, so you are prevented from importing any other imagery (and clearly the business model is to get you to make in-app purchases of different design elements and themes). I haven’t used this myself, but it looks easy to use (which de-facto means less functionality) but if you’ve got some time and an iPad, it might be worth experimenting with.
I recently heard of a similar app called “MAKR,” which is brand new, so I haven’t had a chance to use it yet. Like the Martha Stewart app, it seems similarly user-friendly, but it’s more geared toward designing paper goods like invitations, business cards, and labels, so the typography, color, and pattern options all seem a little more advanced than Martha. Also, where the Martha Stewart app is a little on the sweeter/vintage side of design, MAKR is more trendy and modern. Both are only available for iPads at the moment. (Sorry Android users!)
Stay tuned as our Graphic Design Series 101 continues, and don’t hesitate to leave your questions and suggestions for future posts in the comments. (And if you’re working on your own designs, share those too! You can upload photos into Disqus, and you know we want to see!)

