
Ok, so you’re ready to build your wedding website. This probably means you’ve reached the point in wedding planning where your brain will absolutely explode if one more person pushes you for answers and details about your wedding plans. Pro-tip: that means it’s time to make a wedding website, so when asked you can text them the link and go back to what you were doing.
Let’s knock a couple of answers to your questions off right from the start: 1. No, you don’t have to make a wedding website. 2. Yes, it could make your life drastically easier. (I’m about to tell you how). 3. Not everyone will utilize your website (Hi, Grandma!), but the vast majority will. 4. It won’t be a waste of time or money, if you do it right—it will save you energy, and you can turn it into something else after the wedding.
So assuming you’re going to build your wedding website on Squarespace (because they’re full stop the best, see below), let’s baby step through it. We have had a partnership with Squarespace for years, but don’t think we haven’t tested other options. They are the best.
Step 1: Pick a platform
This is the easiest step. Last year when I was planning my ten-year anniversary party, I tried a bunch of other wedding website tools. (But like, in secret, because we have a long-running partnership with Squarespace.) I figured for a fast little project, it would be easier to go with one of the companies that offer completely pre-formatted wedding websites. Surprise: it wasn’t. Those pre-fab websites are so limited (and several still use the terms “bride” and “groom” which made me want to throw my laptop through a wall.) I couldn’t make the design look the way I wanted it, I couldn’t use my pictures in a cool way, and their built-in tools were just not that… good. (Which is funny, because places that only do wedding websites brag about their RSVP tools, but Squarespace’s tools are the bomb.) So I switched to Squarespace, thinking it would be time-consuming and complicated but worth it. Y’all. It wasn’t. It was simpler and more intuitive than hammering around in a templated site I hate. And the result was so damn pretty.
So in short: honest opinion. Pick Squarespace for your wedding website.
Step 2: Sign-up for an account
Ok, next up, Head right over here, create yourself an account on Squarespace. All it takes is your email because they’re going to hook you up with a 14-day free trial. That’s way more than enough time to create, edit, publish and even re-edit your wedding website.
Hot tip: We have a code for you to get 10% off your first year! That’s probably just about long enough to keep the site up until your wedding, right? Just enter APW2020 when you checkout.
Come back here after you’ve done that.
Step 3: Gather Information, Details, and Images
Generally speaking, the whole reason you’re putting a wedding website together is to share details and information with your guests. So it’s time to get organized, think like a guest, and start to pull it all together. Here’s a quick list of information and things to gather in one place so that it’s easy to plug it into your new wedding website:
What To Put On Your Wedding Website
- Your names (I read once about someone who got a wedding invite and visited the accompanying website and still wasn’t sure who exactly the wedding was for)
- Wedding date
- Schedule of times for your day/weekend (If you have it. If not, it’s easy to add in later.)
- Attire recommendations for each part of your event(s): Will the ceremony be in the forest where stiletto heels aren’t recommended? Is dinner a black-tie affair or a laid back endeavor?
- Travel information (transportation, venue parking, hotel/accommodations, maps, etc)
- Local info (things to do, see, eat, plus weather predictions)
- Registry information and links
- Wedding party information/bios/details (if you’d like!)
- Your love story (if you’re into that)
- Social media and technology guidelines for your event(s)
- RSVP details (again, you may not be ready quite yet, but you can still prep this page of your site)
- FAQ
- RSVP by date
- Plus ones?
- Kids or kid-free?
- Accessibility details
- Cash Bar? (It would be a bummer for someone to arrive without cash.)
- Not serving a meal, that otherwise may be expected? (Make sure folx know.)
- Contact info—it’s nice to give guests an easy way to reach you with their questions
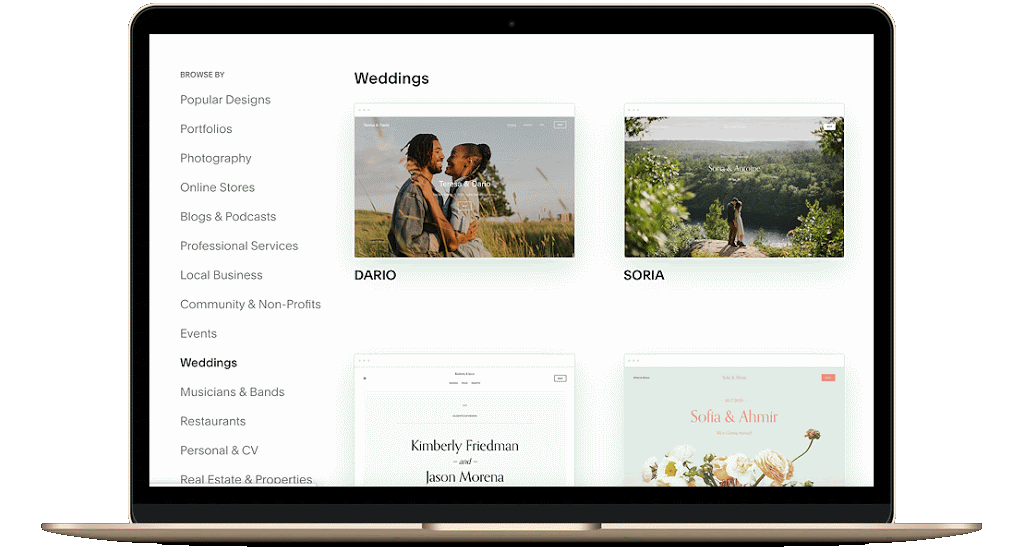
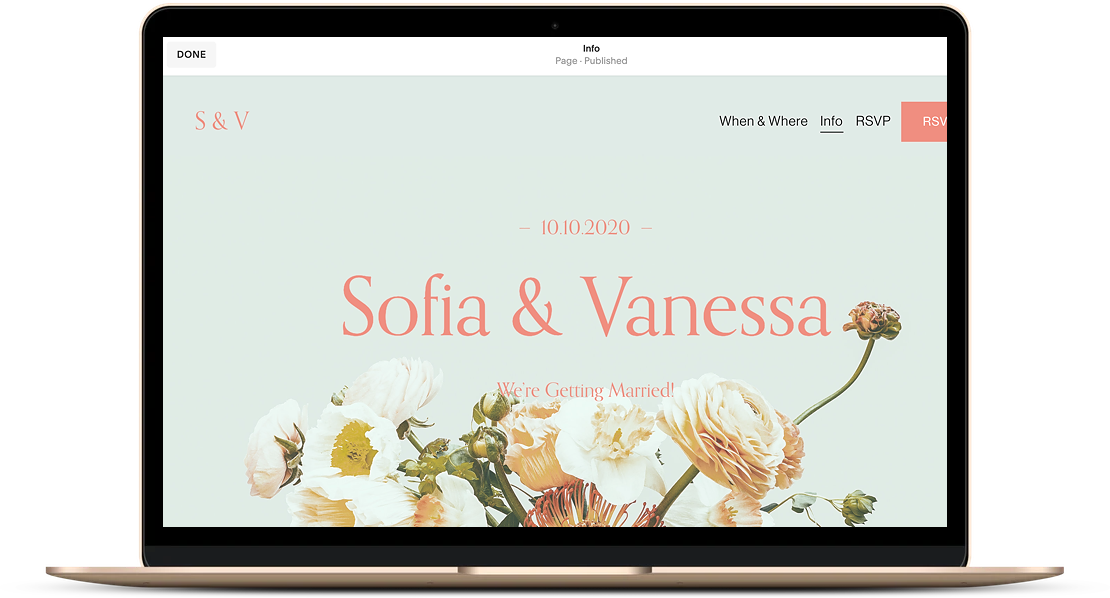
Step 4: Pick a wedding WEbsite template
Remember how I told you that Squarespace is the easiest, best, most customizable place to build your wedding website? Here’s my favorite part: TEMPLATES.
Most of the other wedding websites you’ll find out in the world all look exactly the same (and frankly, it’s not an inspiring look). But with Squarespace, you can actually make the website feel like it’s yours. (Not “just like my BFF Molly’s but with different colors.). You can look right here to find the six templates that are in the wedding section. Plus, there are 100+ other templates on their site that you could play with to make an absolutely original page, just for you. (All their templates have the same functionality, they just have different starting places.)
Here is what I didn’t get when I set out to make our anniversary party website: if you don’t want to do a ton of adjustments, you don’t have to. These templates come to you fully functional, plug and play—but with an incredible amount of style update options available. I picked a wedding website template, largely replaced my photos on the existing pages, and then played around with fonts and colors. It looked like I’d created a slick professional website all on my own, but making it was super fast. I also looked at the examples given of ways people had used that template and (cough) copied them. When making a wedding website you do not have to reinvent the wheel.
And if you want, you can learn all about the templates, how they work, and nitty-gritty details in the Squarespace Help Center. (I’ve never had a problem on Squarespace that I couldn’t solve with a quick Google search, frankly. Squarespace has published a ton of resources.)
Hot tip: Don’t stress too much as you go to pick a template. All templates can achieve the same functions, just with different flare!
Hot tip: Click “Preview ____” on any template and then “View Demo Site” at the top to get to experience each site in full size.
Step 5: Create pages
Or really, if we’re being honest… take the template you picked (particularly if it’s one of their wedding website templates) and tweak the pages slightly to make them your own. It’s… shockingly easy.
But if you don’t say, publish a website for a living, you might have a few questions. Namely: why your website needs to have pages. The answer is this: pages are simply how it’s all going to be organized—think of it as categories. Some websites have a flow from top to bottom and you scroll to see all the info, but on Squarespace, each of those sections is it’s own page. You can also set it up in a more traditional website format with a menu at the top, where each menu item leads to a different page.
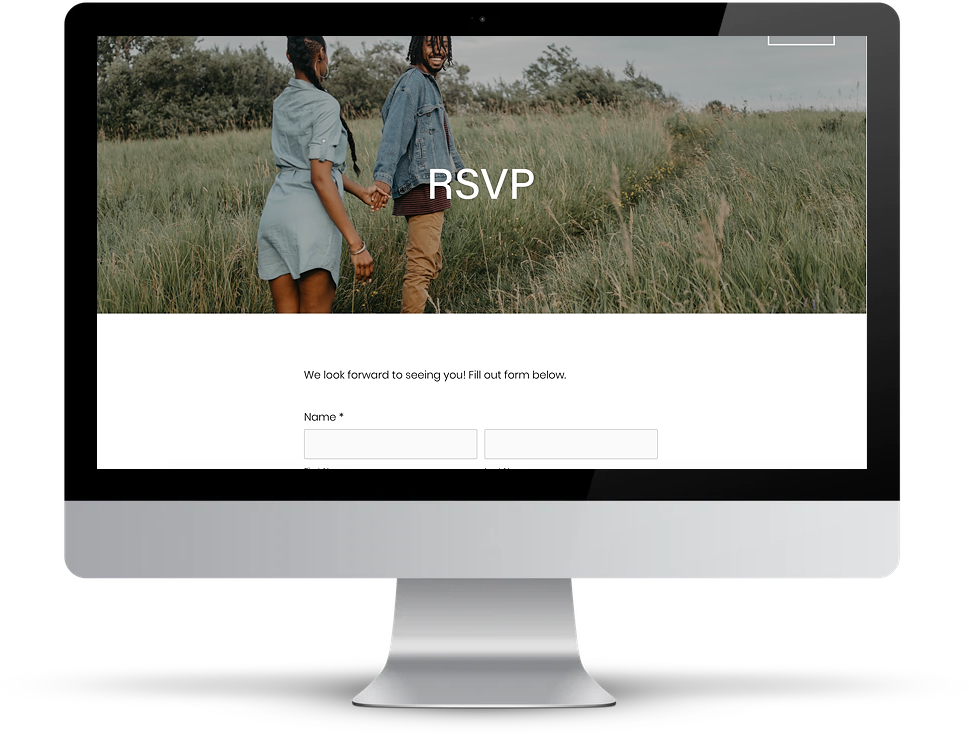
Pages To Include On Your Wedding Website
- RSVP (This is going to make the site worth it. The easiest and best way to gather those RSVPs!)
- Gallery (Share your life in photos, your engagement pics, and more.)
- Schedule (Make sure folx know where to be and when. Just don’t list the exclusive rehearsal dinner time if not everyone is invited.)
- Travel Info (Break down everything they need to know, this is going to save you so many text messages.)
- Other Details/FAQ
- Love Story (This is a fun way to get to share your story.)
Hot tips:
Utilize page layouts. Your template comes with pre-made layouts for pages. As in, no fuss. Use these so that you don’t have to build any pages from blank.
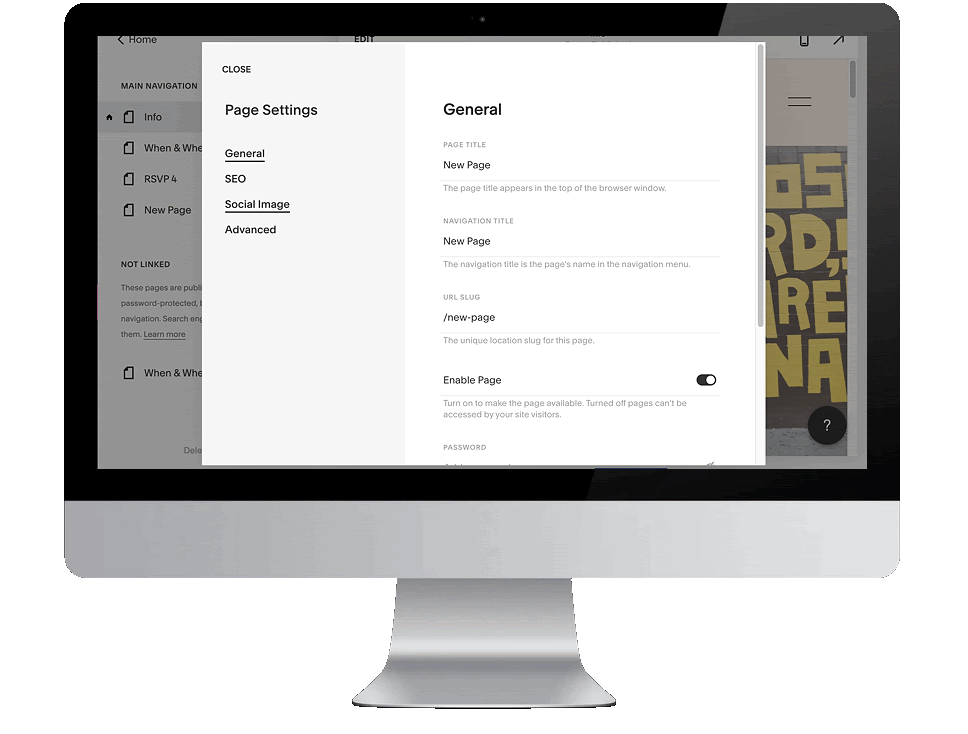
Each time to create a page, rename the page title, navigation title, and slug (that part at the end of the web address, after the “/”.) Just click the little gear symbol next to the page in the panel on the left. You don’t want your pages to have funky names.
You can make pages you don’t want to use yet. Here’s how to hide them, until you’re ready. (For example, haven’t sent out invites? Don’t make your RSVP page live until then.)
Want to pages that look similar? Duplicate the page you’ve already made.
Make a secret page for your wedding party/family with details about the rehearsal dinner or other smaller events, that is password protected. Do not, I repeat DO NOT put invite only events on your website in public, where you will make people feel sad they’re not invited.
Step 6: Enter Your Information
Now it’s time to utilize all that information you gathered in step three, and give the people what they want. No detail is too small (unless you want to purposely keep it secret), the more information you give folx, the more comfortable they will be come wedding day.
By now, you’ve already created all the pages you need and collected all your details, so this should be pretty plug-and-play. Visit each page on the site you’ve built, and start to place pertinent details in each section. Especially if you landed on using a wedding template, and you used the page layouts they offer, you should find that a majority of this step just involves changing out placeholder information (names, dates, times, etc) for your actual details.
If you do need to add some fresh sections or expand on what’s included in the pages already, you’ll need to add that content manually. With Squarespace, your pages are made up of content blocks. There are all different kinds, like text blocks, image blocks, image gallery blocks and more which are mostly pretty self-explanatory. (You can learn more about them right here from Squarespace).
Hot tip: Don’t forget to hit “Save” in the upper left corner when you’re done making changes to a page. It’s a bummer to have to start again.
Hot tip: If you’re adding more than one image to a page, I recommend using the gallery block so that you can upload multiple images at once, instead of a bunch of single image blocks.
When you’re ready to edit a page, just select that page from the menu on the left, then click edit in the top left corner. Then, you can add a section by clicking the blue “+” at the top of the page, or add a block by clicking the grey teardrop shape that will pop up as you move your cursor over the area you’d like to add it to.
Hot tip: the most under-appreciated block is the spacer block. If you’re not into design stuff, the term ‘white space’ may or may not mean much to you. Get cozy with it, though. It’s the thing that makes websites beautiful. If you just have a bunch of text and images smashed together, the viewer’s eye doesn’t know where to look. Instead, use spacer blocks to have some separation between things and allow images and text to stand out visually. (You’ll find lots of spacer blocks in use on your pre-built template pages.)
Step 7: Customize Your Wedding WEbsite
If I’ve said it once, I’ve said it one hundred times. Squarespace templates make building a professional-looking website possible for the rest of us, who know nothing about coding or design. You can, however, tweak the style and look to your heart’s desire, to create a website that is 100% you and your partner. If the template you’ve chosen sings to you, just stick with it exactly as is. If not, you can switch it up.
First up, make some design decisions. Keep it simple, both for you and the eyes that will look at your site later. Pick 2-3 colors and 2-3 fonts to be the style guide for your site, and then use those throughout. Here’s a style cheat sheet from Squarespace that will break down lots of the little adjustments you can make to your website.
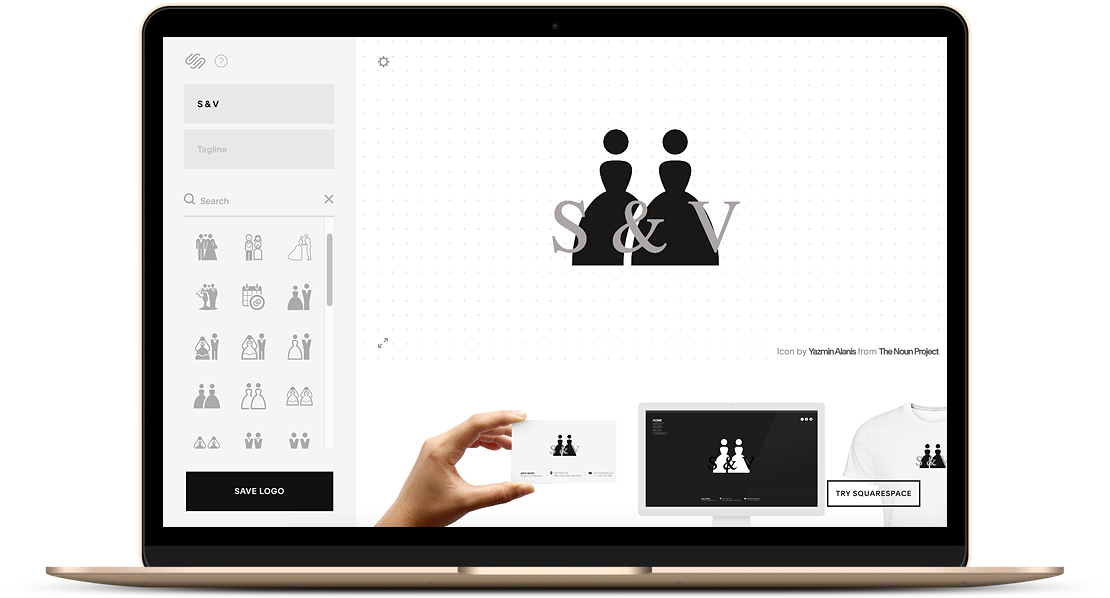
Want to amp up your site with a custom logo? Want to use that same logo for other parts of your wedding? Thanks to Squarespace, you can do that for free right here. Look at this cute logo I made in about one minute:
Hot tip: Keep your wedding themes, style, and vibe going on your website. Pick colors and styles that match what you want for your day, it will set the tone early.
How about a custom domain? If you haven’t already, you might want to. Your website will come with a domain that looks like somethingrandom.squarespace.com. For the ease of including it on invitations, and sharing it with family, it might be easier if it were TheMrsJoneses.com. So do some poking around and find a domain name you like and snag it. Squarespace gives you the first year free, and if you plan to turn your wedding website into a family site or a photo-sharing site, you may as well own the domain of your dreams.
Hot tip: Utilize your resources well. If you get stuck or have questions, the answers are out there. Squarespace has a huge knowledge base of help guides, videos, webinars, and forums—the answer to your questions is almost guaranteed to be there somewhere. You can also check out free Squarespace groups on Facebook and learn from other folx. Not to mention, they have 24/7 customer service if you find yourself stuck at 1:00 am.
Step 8: Edit, edit, edit
Have you ever heard the saying “write drunk, edit sober?” This applies to your wedding website too. If you are anything like me, you might have started your website at bedtime and actually be finishing up the site at around 1:00 am (oops!). So, take a step back, sleep on it, and ask someone else to give the site a read through. Double-check the dates, times, spelling, RSVP details, and links out to your registry.
Step 9: Publish Your Wedding Website
You did it! You built a custom wedding website for yourself. It’s time to hit publish and share it with the world. Once it’s live, start sharing it with family and friends so they can find the answers to their own questions, and you can get your brain back for other things.
Step 10: Keep it updated
I’ve seen it happen many times before. You build the site, you send it out to friends when the save the dates go out, and then the wedding is fast approaching and you frankly forget that you had a website at all. Don’t let that be you. Check on your site at least once a month between now and the wedding, to be sure that you’re communicating updated info to your friends and family. Did you make an RSVP page but keep it hidden? Make sure that’s visible by the time your invitations go out. Did the location for the ceremony change the week before because the weather looked nasty? Update that too.
Ya’ll, that’s it. That’s 10 steps for building a wedding website with Squarespace. If you haven’t started, go now. What’s there to wait for? It’s going to be easier than you think.
What questions do you have? Have you ever built a website before? Or will your wedding website be your first? Will you come back here and show us when you’re done? Please!
![]()
This post was sponsored by Squarespace. We are thrilled to be continuing our partnership with Squarespace in 2020, talking about different ways to use their intuitive website building services — your wedding website doesn’t have to look like everyone else. Squarespace provides an all-in-one hub (including everything from custom domain names to beautiful templates) that makes it easy to build your online home beautifully, even if you’ve never made a website before and have no idea where to start. Click here to get your website (of any kind) started today with a free 14-day trial from Squarespace. APW readers get 10% off your first Squarespace purchase when you use the code APW2020 at checkout.

